StampznewBright

  • Subscribe to our RSS feed.
  • Twitter
  • StumbleUpon
  • Reddit
  • Facebook
  • Digg

Friday, 28 August 2009

Texturized Acrylic Paper (for embossing digis or for stamping)

Posted on 01:15 by Unknown


Here's that pictorial for cardstock that's texturized with acrylic paint (used in the last post for the current Cuttlebug Challenge.)

You can stamp on this painted paper,
OR
(my very fave)...
You can get really great heat embossing of digital images like this one...


[Art by Mo (of Mo's Digital Pencil fame)
rendered for the Cuttlebug Challenge Blog]

I just cannot describe the kick I get out of the textures & layers that you can get with this! And each piece is your own original art paper. Hopefully you'll get a thrill out of it too, if you try it. :o)


  • cardstock-printed with...
  • pattern (I used ledger paper-digital file linked below)
  • stamp (this is illuminate def. from Above the Mark 27001J)
  • collage bits (old book page torn)
  • adhesive
  • acrylic paint (Kroma Tintanium White) Imagine coloured acrylics!?!
  • sand paper
  • digital image (or stamped image)
  • heat gun
  • anti-static bag
  • embossing powder
  • Copic markers (or any other colouring medium that will stick to acrylic paint)
Click these links to download
the ledger paper, if you like:


1) Ledger Paper PDF
2) Ledger paper JPG


Step 1} Print the ledger paper (of course, you could use any plain or patterned cardstock you like instead.) I printed it on Naturals White cardstock. Thin watercolour paper would be a nice choice to hold up to the water, but still be thin enough to fit in most printers.


Step 2}
Add a collage layer (glue on pieces of an old book page, tissue paper, sewing patterns, or whatever you like.)


Step 3} Paint it.

The paint: I used an acrylic paint wash (of Kroma Titanium White) A fairly thick wash with just a little water. I don't like too much water or you can get a lot of paper curling. You can alter it however you like, though, to show more/less of the paper underneath. With thicker paint you get more impression from stamping it (in step 4)

The brush: if you want decent paper for printing digital images, it really pays to use a decent quality brush (so there are fewer brushstrokes in your finished paper.) It's surprising how affordable a great brush can be at your local art supply store. I have one dedicated to gesso & acrylics that is lovely & messy. :-D
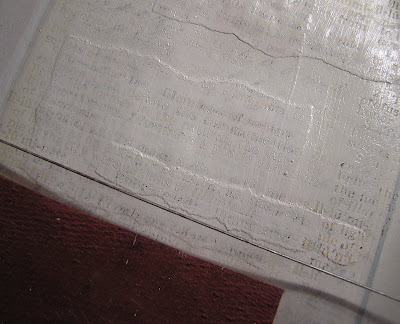


Step 4} Impress a stamp into the wet paint:

A) Prime your stamp with versamark or similar ink
B) Press the stamp into the wet paint
C) Clean acrylic paint off your stamp right away (I like to use a tooth brush to clean it)

If you're not happy with the impression the first stamping attempt gives you, you can paint over it & then press the stamp in it again. Sometimes a couple of coats of paint gives you a nice deep impression from your stamp.

Since this was a text stamp, I only pressed once, but you can repeat painting & pressing in patterned stamps over & over again for a lot of nifty texture. :o)


Step 5} Let it dry well-or cheat & dry it with a heat gun, if you're impatient like me.


Step 6} Sand it, if you like, to distress & reveal a little more of the collage layer. (The sanding marks will pick up deeper shades when you colour, so you can get some neat effects.) Sanding also helps embossing powder stay on much better.
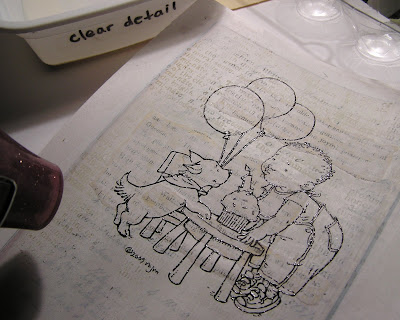


Step 7} The finished paper is perfect to emboss a digital image in most ink jet printers. (I have a cheapo printer and would not try this in a really expensive printer, just in case.)

To emboss a digital image on your new artsy paper...
(same as standard heat embossing only you print instead of stamp)

A) Wipe off any dust from sanding.
B) Run an anti-static bag over it.
C) Have your embossing powder & heat gun ready.
D) Print your digital image (I like a medium fast setting--my printer calls it "standard" but settings vary with the printer) You want the printer ink still wet enough to take the embossing, but the image quality good.
E) Sprinkle your image with embossing powder as soon as it prints.
F) Melt the embossing powder with a heat gun.


Step 8} Colour with Copic markers (or any other colouring medium that will stick to acrylic paint.) Copic colouring is so fast & so forgiving on this paper that you won't believe it (and it uses hardly any ink at all!)

If you want to try this but you're worried about residue on your Copics, you can try the broad (or chissel) tip of your Copics to preserve the finer colouring end. Acrylic paint has much less residue than gesso will, if any.


Another colouring method is to paint on Copic refills (or other alcohol inks.) I painted the large areas of the sky & the grass with Copic refills that were diluted with Colourless blender. You can get shades as light or pastel as you like and mix colours for a zillion possibilities.

The Copic colours will be darker in areas where the stamp impressing has removed some paint, and they will have a nice sheen. The cupcake in the photo below is iced with lacquer, but the rest of this image shows the variation & the sheen you can get...


The texture always surprises you, since it's unique to each piece you make.

If you want to remove the Copic sheen in places, you can use a bit of matte medium over your work. (It's just an acrylic gel that you paint on that takes the shine away.)


If you get an area that is too textured or has dark bits where you don't want them (for instance on a face) you can add a little more white paint with a paint brush (to tone down the contrast of the texture) and recolour.

Sound too crazy?
Since I blabber on about ALL the details here, this can sound cumbersome, but it is really easy-peasy (and much faster than it might seem!) ...sooooh, I hope you try it out, if you're at all interested. I'd love to hear pointers from your experience with it if you do try it. :-)


Thank You for taking time out
of your busy day!


P.S. Sorry I was MIA yesterday-(Migraine from "h" "e" double hockey sticks!)


(click to visit the blog from an email or reader)
...to subscribe: Feedburner or Feedblitz
Email ThisBlogThis!Share to XShare to FacebookShare to Pinterest
Posted in BASICS, Faves, Mo's-Digital-Pencil, techniques, Tutorials | No comments
Newer Post Older Post Home

0 comments:

Post a Comment

Subscribe to: Post Comments (Atom)

Popular Posts

  • free Butterfly Silhouette .studio cut files (in 3 styles)
    Hi, All! Here are those butterfly Silhouette .studio cut files. They are for only for the Silhouette machine... But I do hope to share other...
  • DIY digital paper (some freebies)
    The lull in posts (over the last couple of days) was for me to finish up this looooong post I've been wanting to share with you for eons...
  • New Popcorn Box template set (pretty stamp room storage) :o)
    Are you in the mood for a template or two? I was going to wait until I had really good photos and a full pictorial, but then I would take fo...
  • Missing with a migraine, Craft room BEFORE pics, & LINKs for Organizing the craft room
    Edited to add: Sorry guys. I feel like I was hit by a truck. Migraine's lasted so long... but I will be back with a post by tomorrow eve...
  • Graphics Fairy Inspiration (+vintage printables)
    Thank You all so much for your wonderful comments about the papers I've been obsessed with. Your kind words make me grin so big that I g...
  • "Honey, I shrunk the stationery!" (Hero Arts typewriter notebook)
    Still trying to make more of my cards into little gifts. This Hero Arts typewriter card is another take on the card turned refillable notebo...
  • 3 Clean And Simple cards (with SRM stickers)
    You guys may know that I was tragically born without the gene that let's you achieve a C lean A nd S imple card. ;-) Not sure why I find...
  • Making Your Own Colour Shimmer Sprays--Links & Info
    Info & Links Links for how to Mak e yo ur o w n Sh im mery s prays: (These are for you sweet Beth! oxo) ( more info on these colours in...
  • over 100 free pattern overlays ... at a glance
    Would you believe that the free overlay total is at 139 overlays and counting? (I might have a wee little addiction) ;-) Since overlays can ...
  • Felt-based cards (Rock-a-Bye Baby tutorial)
    New idea, Old projects.... I've been debating whether or not to post some older projects/tutorials since the big bad insecurity beast...

Categories

  • 'Mouse'-the-cat (10)
  • *TEMPLATEs (98)
  • 3D-projects (144)
  • A-Day-For-Daisies (7)
  • Amber Ink (9)
  • Angel's-Landing (2)
  • BASICS (47)
  • Blogging-tips (7)
  • Caardvarks (48)
  • Cat's-Pajamas (2)
  • cheap-tricks (224)
  • Christmas (33)
  • Claire-Keay (2)
  • Cricut (3)
  • cut-file (2)
  • Cuttlebug (45)
  • decor (6)
  • Digital-Images (131)
  • Distress-Inks-etc (14)
  • DIYstamps (1)
  • Eat-Cake-Graphics (11)
  • Faves (207)
  • Fred-She-Said (5)
  • Freebies (77)
  • GESSO (9)
  • Halloween (10)
  • Heather Ellis (3)
  • Hero-Arts (14)
  • ISC (7)
  • Jessica-Sprague (2)
  • Just-Rite (2)
  • LPS (63)
  • Mo's-Digital-Pencil (16)
  • My-Favorite-Things (33)
  • organizing (7)
  • Other-People's-Tutorials (36)
  • Paper-Garden-Projects (54)
  • Paper-Temptress (39)
  • Punches (21)
  • Purple-Onion-Designs (23)
  • S.U. (1)
  • SCOR-PAL (4)
  • silhouette (4)
  • Skipping-Stones-Design (7)
  • Squigglefly (6)
  • SRM-Stickers (8)
  • techniques (191)
  • templates (26)
  • Tiffany-Doodles (4)
  • Tutorials (252)

Blog Archive

  • ►  2013 (16)
    • ►  July (4)
    • ►  June (4)
    • ►  May (3)
    • ►  April (1)
    • ►  March (1)
    • ►  February (3)
  • ►  2012 (53)
    • ►  December (2)
    • ►  November (2)
    • ►  October (1)
    • ►  August (3)
    • ►  July (2)
    • ►  June (5)
    • ►  May (7)
    • ►  April (8)
    • ►  March (9)
    • ►  February (13)
    • ►  January (1)
  • ►  2011 (74)
    • ►  December (1)
    • ►  November (5)
    • ►  October (10)
    • ►  September (9)
    • ►  August (12)
    • ►  July (5)
    • ►  June (9)
    • ►  May (2)
    • ►  April (6)
    • ►  March (7)
    • ►  February (4)
    • ►  January (4)
  • ►  2010 (84)
    • ►  December (7)
    • ►  October (1)
    • ►  September (6)
    • ►  August (1)
    • ►  June (1)
    • ►  May (7)
    • ►  April (21)
    • ►  March (3)
    • ►  February (17)
    • ►  January (20)
  • ▼  2009 (234)
    • ►  December (16)
    • ►  November (21)
    • ►  October (11)
    • ►  September (23)
    • ▼  August (29)
      • Clothes Line Box set with Katie & Bear (LPS sketch...
      • Purse box set & template (on the Cuttlebug Challen...
      • Happy Birthday to You Cuttlebug Challenge Blog!!! ...
      • Texturized Acrylic Paper (for embossing digis or f...
      • Cuttlebug Challenge Altered Desk set (with Cosmo C...
      • In the pink at the Paper Temptress Blog
      • Naughty or Nice? Tree shaped card template a la Ma...
      • {Forest Critters} Label box
      • Hero Arts Christmas Card & 3x3 gift box set
      • DIY text papers (Caardvarks Stamp Box colour chall...
      • Day 3 of Caardvarks & Coredinations Blog Hop: a ro...
      • Baking a Paper (Popsicles) Pie--Cuttlebug Shape Ch...
      • Caardvarks Hop: Sewing Box made with Coredinations
      • LPS Release {Katie Whale sketch card}
      • BIG Caardvarks Core'dinations Basket set (birdy ap...
      • LPS {Katie Carousel} Preview-Peek Box
      • Boat Box template for LPS {Katie Whale} Preview
      • Fabric Links
      • Snow Buddies: Caardvarks Winter Challenge
      • A peek for the Caardvarks Coredinations blog hop &...
      • BIG round CD gift box: The Cuttlebug Challenge Blo...
      • Paper Temptress Hummingbird freebies (and notepad ...
      • New Envelope templates (Standard A2 size) Two styl...
      • LPS {Butterflies} Pretty Petals Purse
      • Distressed embossing-Hero Arts gift set
      • Cuttlebug Label-Shaped Coredintations Box (new tem...
      • Caardvarks Challenge & Hero Arts sneak peeks!
      • LPS Cloud Shaped Box (template and infinitely long...
      • Shaped cards, & Funky Folds--LINK, templates, tuto...
    • ►  July (26)
    • ►  June (10)
    • ►  May (16)
    • ►  April (26)
    • ►  March (22)
    • ►  February (27)
    • ►  January (7)
  • ►  2008 (39)
    • ►  December (14)
    • ►  November (25)
Powered by Blogger.

About Me

Unknown
View my complete profile