This round sewing box (and other jazz) is for day two of
Caardvarks first blog hop--with Core'dinations.

Caardvarks first blog hop--with Core'dinations.

Welcome back Blog Hoppers! Thank You for your amazing comments yesterday. You sure know how to make a gal feel fabulous!
I made the photos smaller today, so there should be a tad less for you to scroll through (but if you'd like a closer look, you can enlarge them by clicking on them. Just hit back in your browser button to return to the main post)
Happy Hopping! :o)

1...Caardvarks & Core'dinations blog hop info
2...an altered round sewing box (before & after)
3...round sewing box details & some cheap tricks
4...how to make patterned lined Core'dinations boxes
5...some new templates (the ones used in this post)

with
 and
and 
read the details on how to hop to win Core'dinations goodies here
Not already hopping? Please start on Jenyfur's blog
the hopping order:
Jenyfur
Lauren
Mel <----You are here Lori
Tanis
Adela
Kryssi
Nathalia
Jenn B.
Pamela
Stef
Carrie
Ashley
Lucy
Heidi
Michelle
Jolene
Daniela
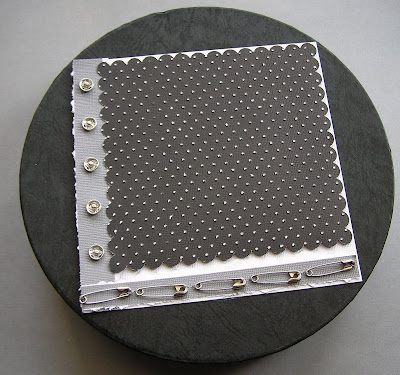
round sewing box...


an old round two inch deep pressed paper incense box


Black Magic Core'dinations cardstock-Cuttlebugged with a
Swiss dots folder & sanded. Grey & white Core'dinations too


a sewing box with an embellished front


The quote says: "And then this dress of hers- where was the tear?
And her needle to be threaded. This was a favourite dress..."
Virginia Woolf-Mrs. Dalloway

Do It Yourself patterned
Core'dinations Cardstock
Basic but so fun. :o) This makes speedy custom patterned paper that's
textured & has all the core possibilities of Core'dinations:
1) Print a digital pattern onto Coredinations (this is white from ROY G. BIV & a digital pattern file made from an old sewing pattern that I scanned & lightened.) Some Core'dinations might need heat setting to cure the ink, depending on your printer.
2) Use your patterned Coredinations as is, or alter it...


Embossing sentiments from the computer:

1) Type it up (the bolder the font, the thicker the embossing)
2) Print on Whitewash Core'dinations (standard setting is good)
3) Sprinkle clear embossing powder--quickly onto the wet ink
4) Heat it with a heat gun to melt (just avoiding burning it)
Embossing text also works on black magic cardstock
with silver or white embossing powder:

 Embossing on the Black Magic shows a little less distinctly than the Whitewash. I like to use bold fonts or lines or print a just a small section at a time so the ink stays wet. You might like to use an anti-static bag to prevent stray embossing powder.
Coredinations holds up to a lot of messing around...


sewn on safety pins...on a strip of scored & torn gray Core'dinations
snapped on snaps (made even by piercing holes with Tim Holtz ruler)
a big fabric shirt tag adhered onto more gray Core'dinations cardstock
a glass vintage button (stitched on the bow & through the cardstock)


This is some wide polyester ribbon (folded over on itself with double-sided tape, cut, & melted at the ends with a lighter.) The bow is a piece that was looped & stitched together.

Pattern-lined core'dination boxes
(with bucket handbag & new label box template)

1) Print a template on the white/light side
of Black Magic Core'dinations cardstock:

2) Score the lines to make the folds:

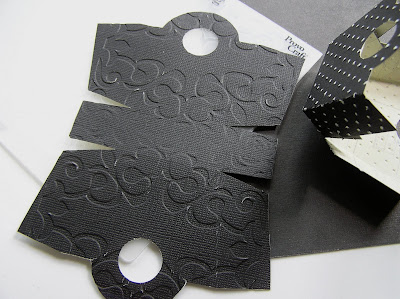
3) Cut it out & punch holes for the handles
(a 3-4 inch circle punch fits perfectly)

4) Emboss the template
(this is the Skeleton Scroll folder)

Partial embossing the template lets you
omit the skulls and just get scrolls:

(I just embossed half at a time, backing
the plates out of the Cuttlebug)
Click here to download the 3
template PDFs (two boxes & labels)
(or go download the JPGs versions by clicking these pics):

SEWINGPatterned.jpg)

Next stop on the hop:
Lovely Lori & her beautiful work
(click to visit the blog from an email or reader)
...to subscribe: Feedburner or Feedblitz
eta P.s. I got the sewing image stamps at Above the Mark here.


0 comments:
Post a Comment