StampznewBright

  • Subscribe to our RSS feed.
  • Twitter
  • StumbleUpon
  • Reddit
  • Facebook
  • Digg
Showing posts with label Heather Ellis. Show all posts

Saturday, 1 October 2011

Happy World Card Making Day (and Merry Kissmas?)

Posted on 13:14 by Unknown
Happy World Card Making Day,
Everybody!

Merry Kissmas card and envelope
And Merry Kissmas?

Are ya starting to notice Christmas cards popping up everywhere?
Guess it's that time again, hey?

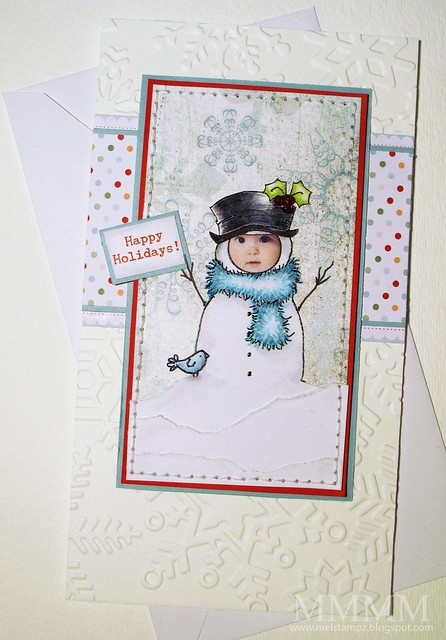
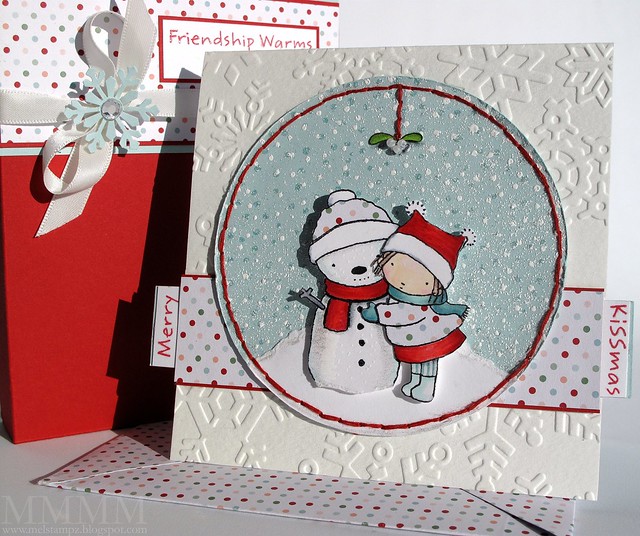
Here's an little idea for a card & box set
using a sweet ol' MFT stamp called Merry Kissmas
Or if you prefer digital, you can find it here.

The image is cut out & stuck onto a heat embossed background
and a torn piece of white cardstock for a hill.
The little girl's coat & the snowman's hat are paper pieced (old S.U. paper)

The card base
is 14o lb watercolour paper embossed with
a large Cuttlebug folder (the Winter Wonderland set)

The matching gift box:

Kissmass gift box

Just a super simple box made with pale blue & red cardstock to fit a gift
and a little snowflake embellishment on the bow made from the
EK Success/Martha Stewart snowflake punch & a crystal.

The mistletoe is fancied up with teensy pearl beads stitched on
& shaded with grey marker to make them stand out:

kissmass mistletoe with pearl seed beads

The mistletoe leaves are cut out so that they look clean against
the heat embossed snowy background.

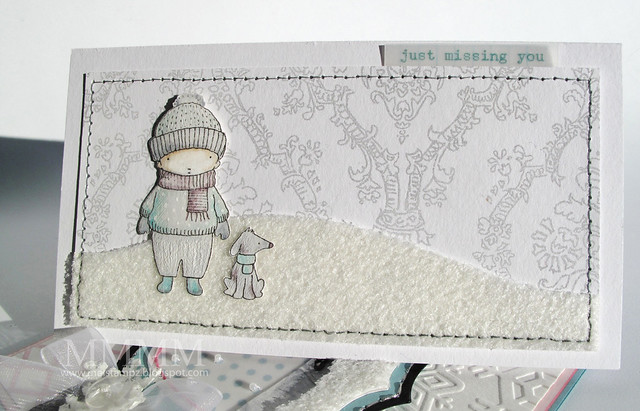
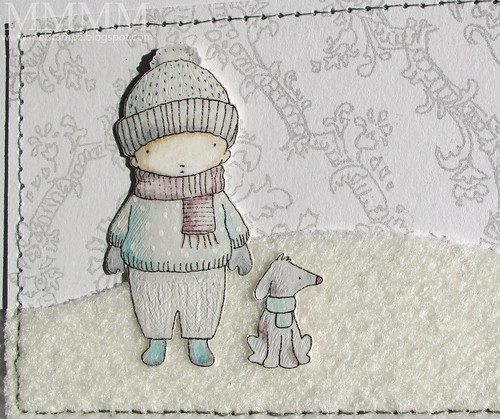
The snow heat embossing effect was made this way...

1) Stamp & heat emboss a dotted background two times: once in pale blue ink embossed in clear embossing powder & once on white pigment ink with white embossing powder

2) Sprinkle loose white embossing powder over the sky & heat it from behind to set it in place (but not have the air from the heat gun blow the loose powder away).

There's a full pictorial for the sprinkled heat embossing here:


Thanks for having a look.
Hope you
get a chance to craft today,


P.S. On a personal note:

Bye Bye Mean Old Mister Migraine Monster!

Sorry I've been missing this week--migraine & flu, but YAY: methinks the cause of the recent return of the killer migraines is rooted out! We had switched dishwasher detergents trying to find the greenest brand. The migraines seem to be fading now that we have switched back!

It always seems to be scent or chemical triggers, for me. Now, we use only baking soda, vinegar, Doctor Bronner's all-in-one Castille soap, and ultra green shampoo & conditioner by Carina (grapefruit & deep conditioner) which surprisingly has made my hair 10 times nicer). But finding the right dishwasher soap has been problematic... Anywho, just thought I would share all this in hopes that it might help some of you fellow sufferers out.
Read More
Posted in 3D-projects, cheap-tricks, Christmas, Cuttlebug, Heather Ellis, My-Favorite-Things | No comments

Monday, 20 December 2010

photo-faced snowman card: Last minute Christmas card idea

Posted on 14:00 by Unknown
Do you have friends who have
outrageously gorgeous children?


We do!
and here he is all dressed up as a snowman:

Hayden as a snowman (mel stampz)
giggle! giggle! giggle!
That wee face is so cute, I can never get over it.


How to make your own photo-faced snowman:

1) Scan a photograph or work with one that you have on your computer
2) Using photoshop (or other software) cut & paste a face onto a digital image/clipart.
3) If needed, use the digital eraser to clean up the image (layers in PS are great for that!)
4) Print & colour your image

Not into digital photo manipulation?
Of course you could add a photo the old fashioned way,
with a punch & some glue:

This older tutorial of mine shows you some ideas for how to add photos to snowman treat boxes (and there are free templates there), but that punch method would work for a digital image like this one as well....

baby hayden as a snowman 2010

I pasted Hayden's sweet cherubic little face over this
digital snowman image by Heather Ellis.

You may notice that the image is changed a little, since I wanted a patterned paper sky behind him... I drew the arms on with a permanent marker & put a little sign in his hands...

...and The little bird is from another different Heather Ellis snowman image.
I cut him out digitally, reversed his orientation, printed him,
& cut him out, etc.. :o)

AND

I felt like I got a big Christmas gift when I discovered that some special marker paper I had bought embosses beautifully in the ink jet printer!!!

so..... a bit of rambling under the heading of...

(i'm flipping out about this!)

Digital inkjet Embossing a new EASY way,
with no wet mediums
or potential clogging of markers

baby hayden embossing

WHAT? This image Digitally embossing an image from the ink jet printer... (Which really helps prevents blurring when colouring with markers & gives that lovely embossing feeling & look to your digital images.)

However,
a couple of You have had trouble with my Matte Medium digital embossing method. And what I didn't like about it was the potential it had for clogged copics (You may recall that tutorial with the oh so scary disclaimer?) ;o)

WHY? I'm not sure why (is it your printer brand? your ink variety?
your paper? your matte medium? OR my crazy instructions? ;o) Who can say?)

BUT I found an easier way you just might love--- with no wet art medium, so had to tell you about it right away. After all, you might get a gift certificate for Christmas & want to add this to your list of supplies to try.

WHAT (already)!?!


Borden & Riley #234 Paris Bleedproof 108lb paper for pens
[The new love (commodity fetish) of my life!] ;o)

$ wise: It works out (for me having paid 9.99 here in Canada
at Curry's online) to be approximately 25 cents a sheet.


WHERE? You should be able to find this in most art supply stores--especially those that sell markers. It's also readily available online. In Canada, I found it online here at Curry's (no affiliation) ;O)

Emboss a Digital Image:

Step 1) Have all the supplies ready, so that you can work quickly. (Clear embossing powder, a tray, & heat gun & Paris Bleedproof paper cut to size.)

I like to cut the paper to be about 8 1/2 inches by 6 inches so it comes out of the printer in less time, but it will depend upon the size of the image, and you may find you don't need the extra time.

Step 2) Print the image on the Paris Bleedproof paper:

A) Set the INK JET printer: the highest quality setting should work best, but it will depend on your printer. I've had success with standard (or mid quality setting as well). The aim is to get enough ink on & let the ink to stay wet enough to hold the clear embossing powder.

B) Print the image and....

C) Grab the paper quickly when it comes out of the printer

You can print in black & white (shades of gray) or any colour! (Clear embossing powder will give you embossing in any colour you can print in--even for photographs or multiple colour images.)

Step 3) Hit it with clear embossing powder. As soon as the image comes out of the printer, sprinkle embossing powder on & Heat to set the embossing powder to melt it. I prefer "detail clear embossing powder" since it's more fine and seems to stick better).

You can also experiment with other colours or types of embossing powder, of course.

Please Note: Results may vary with your printer & ink type and even with the humidity levels in your geographical area. (Weird hey?) A little experimenting is always helpful if you're having trouble, please don't hesitate to comment/email. :o)

COLOURING with Copics:

The paper is a favourite of many marker artists, because the ink floats a little on the paper's surface so it is easier to use and get neat effects with. (Though everyone has different taste or preference when it comes to papers & Copic markers, of course, so the bit of "float-ability" might not be your style...) Personally, I adore it. :-D


The beads are stitched on to the berry part of the holly image:
baby hayden beaded holly
The beads look gargantuan here,
but of course they are teensy weensy seed beads. :-)


clickable blogger pics of the card:

embossing:

beads:


I hope that the New Year brings you all the most joy imaginable!
&
A very Merry Christmas to those who celebrate it. May the year be
full of blessings for you and your loved ones!


P.S. In case you wonder, this post is completely unsolicited
from start to rambling finish. Just schtuff i love! :-D
Read More
Posted in cheap-tricks, Christmas, Digital-Images, Faves, Heather Ellis, techniques, Tutorials | No comments

Friday, 17 December 2010

Just Missing You! (damask digi paper freebie & tutorial)

Posted on 18:00 by Unknown
I'm "just missing you"...

Heather Ellis digi Boy & the Dog card by mel stampz

...so, in honour of the holidays, I thought I'd post a couple of cards this week.

For today's post, this ultra simple
3 1/4" by 6 1/4" card
(with a little digi paper freebie and a short how-to).

-1-

digital image shopping:

I was ever so excited to find the website & digital image
shop of the artist Heather Ellis...here...

... extraspecially since I love MFT stamps so much (including her Pure Innocence and Boy & the Dog series), but I must admit I have found myself drawn to digital so much of late. I like that I can scale them down and I'm a MESSY stamper so digi actually saves me paper. (I still have to find the perfect ink, I guess).

I embossed this little pair of friends from my inkjet printer
(on some white paper painted with Matte Medium):

CLOSE boy & the dog Heather Ellis digi

...and coloured them very lightly with pale Copic marker colours. Then,
scratched the paper with a paper piercing tool to get texture:

texture on boy & dog by mel stampz

I scratched a cross-hatch pattern onto the boy's pants
I also added white dots of gel pen on his sweater.
His doggy got fur texture scritches.

Do you guys like different textures?
(Or am i just a weirdo)? ;o) heehee

and Great news if you're looking for a previously retired Heather Ellis image: It just might be back! There's a note on her site detailing that she's decided not to discontiue her images, since she's had so many requests to keep them available.

Heather Ellis also has an etsy shop called
digistampcharacters and you can find it here.

-2-

pencil damask patterned paper

DIY embossed pencil damask paper

So, I'm broke, ya know?
LOL
...but really it's true!

Hence, I'm always trying to find ways to get a fresh new look on things
without breaking the bank. This do-it-yourself damask paper has been
super useful in my projects lately (and relatively costless)
so I thought I'd share a copy of it...
and share how you can make your own.

Click the image or links
to download pencil damask paper.


The paper is available for download from
my account at acrobat.com here

When you get to acrobat.com,
just click the little green download button in the top left corner:


If you have any trouble downloading from acrobat
,
please see this post describing how to do it.

If you're still stuck, feel free to comment here or drop me
a note--melstampz@gmail.com---:o)

-3-

make your own digital patterned paper
with a hand-drawn damask pattern:


Step 1) Create a single damask element. (The sneaky trick is that you only need one shape will be repeated to make the pattern).

Draw one, or use a digital or rubber/acrylic stamp; clipart etc... (following copyright, of course) ;o)

Don't like to draw, but want a hand drawn look? You can trace a copyright free image (public domain images are great!) Just lay tracing paper over & use a nice sharp pencil (I love mechanical pencil)


Step 2) Scan your damask element. I scanned it as a colour photograph and at a high resolution (600) for detail & flexibility.


Step 3) Open your damask image in Photoshop (or other software) & Clean it up, cropping & fixing any areas you like using the eraser tool or paint brushes. I didn't worry about getting the image perfect, since I wanted it to look hand drawn.


Step 4) Turn Your scanned image into a photoshop brush.(Not sure how to do that? Here's a great tutorial by Dani for how to make a brush in Photoshop.)

and then

Step 5) Repeatedly "stamp" your new photoshop brush in a pattern to make a piece of digital paper. I made mine dark by "stamping" the brush in black & then adjusted it to use later by making it pale (under the "image" tab > "adjustments" > "hue & saturation" > then slide the scale bar to increase the "lightness"


Step 6) Print the image out to make your very own paper. To emboss mine, I just...

A) brayered a thin layer of Matte Medium (by Golden) onto white cardstock,
B) had the clear embossing powder ready,
C) printed it in the digital printer (my printer is a Canon Pixma 260),
D) quickly sprinkled the embossing powder on the wet printer ink and heat it to melt it...

et voilĂ , homemade embossed damask paper!

Blogger pictures for those who prefer them...


(Simply click on the photos to see them larger
& click back to return to this post). :o)


Digital Image: The Boy & the Dog by Heather Ellis

To emboss the image: Inkjet printer, White cardstock & Matte Medium by Golden; clear embossing powder, heat gun

Pale Copic markers: E50 eggshell; E00 skin white; BG10 cool shadow; B00 frost blue; V000 pale heath; V95 light grape; cool grays: C1 & C3. (Please see this tutorial for a disclaimer on digi embossing & copics.)

To emboss the sentiment: word doc. with coloured phrase, vellum cardstock, inkjet printer, clear embossing powder, heat gun.

Miscellaneous: Fuzzy snow paper (gift from my BFF Kimmy, sorry no source); paper piercing tool to score texture into image & pierce holes for sewing, needle & gray thread


I hope your days are bright and beautiful this winter!


P.S. By the by, this is an unsolicited post. I just bought some Heather Ellis images on etsy a while back and thought you all might find the shop info handy for last minute digi cards. :o)

Copyright notice: this damask image copyright M. McCarthy 2010 and
is for personal use only, please. :) Feel free to sell handmade items made with this, but not digital ones. Thanks!
Read More
Posted in cheap-tricks, Digital-Images, DIYstamps, Freebies, Heather Ellis, techniques, Tutorials | No comments
Older Posts Home
Subscribe to: Comments (Atom)

Popular Posts

  • free Butterfly Silhouette .studio cut files (in 3 styles)
    Hi, All! Here are those butterfly Silhouette .studio cut files. They are for only for the Silhouette machine... But I do hope to share other...
  • Flying by to say ... 'hello'
    Do you shop for stamps often? I don't have a huge crafting budget, but every once in a while I find some images that call out "you ...
  • a Silhouette Challenge project
    This might look like a card in the photo, but...   ... it's actually a collage on a wooden canvas  to hang on the wall (or give as a gif...
  • Silhouette Cameo - Sketch pen Camera card
    Happy Happy Independence Day, to my American Friends! (and happy belated Canada Day to my fellow Canadians!) So, have those of you with Silh...
  • over 100 free pattern overlays ... at a glance
    Would you believe that the free overlay total is at 139 overlays and counting? (I might have a wee little addiction) ;-) Since overlays can ...
  • Graphics Fairy Inspiration (+vintage printables)
    Thank You all so much for your wonderful comments about the papers I've been obsessed with. Your kind words make me grin so big that I g...
  • Circle Overlays (to revamp your papers!)
    Can you ever have too many ways to use your stash? No card today, just popping in with a cheap trick for revamping your "old" pat...
  • New Popcorn Box template set (pretty stamp room storage) :o)
    Are you in the mood for a template or two? I was going to wait until I had really good photos and a full pictorial, but then I would take fo...
  • "Honey, I shrunk the stationery!" (Hero Arts typewriter notebook)
    Still trying to make more of my cards into little gifts. This Hero Arts typewriter card is another take on the card turned refillable notebo...
  • Everything I've Ever Made (at a glance)
    This post is a visual overview of my blog history-- with thumbnails that are linked to tutorials & templates for pretty much everything ...

Categories

  • 'Mouse'-the-cat (10)
  • *TEMPLATEs (98)
  • 3D-projects (144)
  • A-Day-For-Daisies (7)
  • Amber Ink (9)
  • Angel's-Landing (2)
  • BASICS (47)
  • Blogging-tips (7)
  • Caardvarks (48)
  • Cat's-Pajamas (2)
  • cheap-tricks (224)
  • Christmas (33)
  • Claire-Keay (2)
  • Cricut (3)
  • cut-file (2)
  • Cuttlebug (45)
  • decor (6)
  • Digital-Images (131)
  • Distress-Inks-etc (14)
  • DIYstamps (1)
  • Eat-Cake-Graphics (11)
  • Faves (207)
  • Fred-She-Said (5)
  • Freebies (77)
  • GESSO (9)
  • Halloween (10)
  • Heather Ellis (3)
  • Hero-Arts (14)
  • ISC (7)
  • Jessica-Sprague (2)
  • Just-Rite (2)
  • LPS (63)
  • Mo's-Digital-Pencil (16)
  • My-Favorite-Things (33)
  • organizing (7)
  • Other-People's-Tutorials (36)
  • Paper-Garden-Projects (54)
  • Paper-Temptress (39)
  • Punches (21)
  • Purple-Onion-Designs (23)
  • S.U. (1)
  • SCOR-PAL (4)
  • silhouette (4)
  • Skipping-Stones-Design (7)
  • Squigglefly (6)
  • SRM-Stickers (8)
  • techniques (191)
  • templates (26)
  • Tiffany-Doodles (4)
  • Tutorials (252)

Blog Archive

  • ▼  2013 (16)
    • ▼  July (4)
      • A Triple-stamped Fancy-cut Flower card
      • Flying by to say ... 'hello'
      • a Silhouette Challenge project
      • Silhouette Cameo - Sketch pen Camera card
    • ►  June (4)
    • ►  May (3)
    • ►  April (1)
    • ►  March (1)
    • ►  February (3)
  • ►  2012 (53)
    • ►  December (2)
    • ►  November (2)
    • ►  October (1)
    • ►  August (3)
    • ►  July (2)
    • ►  June (5)
    • ►  May (7)
    • ►  April (8)
    • ►  March (9)
    • ►  February (13)
    • ►  January (1)
  • ►  2011 (74)
    • ►  December (1)
    • ►  November (5)
    • ►  October (10)
    • ►  September (9)
    • ►  August (12)
    • ►  July (5)
    • ►  June (9)
    • ►  May (2)
    • ►  April (6)
    • ►  March (7)
    • ►  February (4)
    • ►  January (4)
  • ►  2010 (84)
    • ►  December (7)
    • ►  October (1)
    • ►  September (6)
    • ►  August (1)
    • ►  June (1)
    • ►  May (7)
    • ►  April (21)
    • ►  March (3)
    • ►  February (17)
    • ►  January (20)
  • ►  2009 (234)
    • ►  December (16)
    • ►  November (21)
    • ►  October (11)
    • ►  September (23)
    • ►  August (29)
    • ►  July (26)
    • ►  June (10)
    • ►  May (16)
    • ►  April (26)
    • ►  March (22)
    • ►  February (27)
    • ►  January (7)
  • ►  2008 (39)
    • ►  December (14)
    • ►  November (25)
Powered by Blogger.

About Me

Unknown
View my complete profile