This very long post is part of Cardvarks first ever
blog hop-with Core'dinations!...
...and it's birdy approved! heeheehee.
Seriously! The strangest thing happened when I was photographing this: a whole flock of Starlings roosted in the giant cedar beside out balcony and sang their hearts out! It was lovely. Then, as soon as I stopped photographing, they all flew away. Weird. Either I have strange bird powers, or Starlings just enjoy being appreciated through the making of tiny paper decoys (well maybe?) ;o)

1...Caardvarks Blog Hop-with Core'dinations!
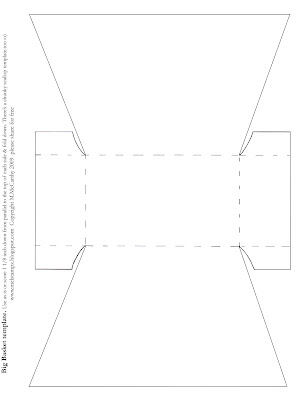
2...new templates: a big basket & chunky scallop trim
3...how-to: make the basket
4...techniques: colour tinted Coredinations embossing...
..........(making the handle & sides)
5...Digital stuff: flying birdies (embossed on Whitewash)
6...Medallion sentiment (You can Customize the type!)
-1-
with

&

What? Caardvarks first ever Blog Hop
When? August 17th, 18th, and 19th
Partnered with? Core'dinations
Ready to hop?
Please start on Jenyfur's blog
(so you can see her amazing work and
so you don't miss the talented Miss Lauren too)

&

What? Caardvarks first ever Blog Hop
When? August 17th, 18th, and 19th
Partnered with? Core'dinations
Ready to hop?
Please start on Jenyfur's blog
(so you can see her amazing work and
so you don't miss the talented Miss Lauren too)
Jenyfur
Lauren
Mel
Tanis
Adela
Kryssi
Nathalia
Jenn B.
Pamela
Stef
Carrie
Ashley
Lucy
Heidi
Jolene
Daniela

How to win one of the big prize packs
of Core'dinations Goodies:
Then you will then be entered in a drawing to win a Super Assortment Package of Core'dinations product (retail value $68.00) One prize package given away for each day! Best of Luck! :o)
Lauren
Mel
Tanis
Adela
Kryssi
Nathalia
Jenn B.
Pamela
Stef
Carrie
Ashley
Lucy
Heidi
Jolene
Daniela

How to win one of the big prize packs
of Core'dinations Goodies:
A) Follow and/or subscribe to the participants: Please "Follow" and/or subscribe to the newsletters of Caardvarks and Core'dinations' blog and the blogs of Caardvarks Crew ladies too (linked above).
B) Hop & Comment: Visit each DT member's blog and leave a comment on the Blog Hop posts, each day.
C) Let us know you did: Return to Caardvarks to comment that you've completed the hop each day. :o)
B) Hop & Comment: Visit each DT member's blog and leave a comment on the Blog Hop posts, each day.
C) Let us know you did: Return to Caardvarks to comment that you've completed the hop each day. :o)
Then you will then be entered in a drawing to win a Super Assortment Package of Core'dinations product (retail value $68.00) One prize package given away for each day! Best of Luck! :o)
-2-
_melstampz.jpg)
.jpg)
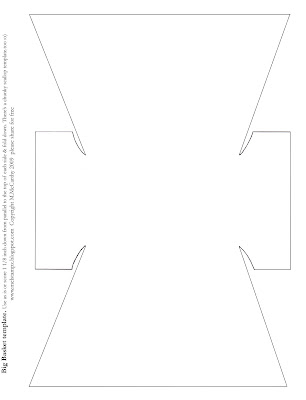
I printed this one with no dotted lines right onto the
Coredinations cardstock for this project:
.jpg)
I don't know how "BIG" you may find this basket, but it is bigger than any template I've made (or maybe even used before) but it's smaller than a breadbox... :o) Hope you can use it!
When finished, it measures:
- width: 6" (at the basket top) and 4 2/8" at the basket bottom
- height: 2 6/8" (for the basket height) and (7" high, with the handle)
- depth: 2 1/2" (from basket front to basket back)
-3-

...make the Core'dinations basket
(with high sides)
.jpg)
Core'dinations Cardstocks:
-Black Magic Collection (12x12) (Lost Ruby BM020)
-Roy G. Biv Super Assortment (Lavendar shades)
-Whitewash (Weather Vane WW530 for the medallion)
-& Whitewash to emboss the birdies too (Picket Fence WW760)
Miscellaneous:
-Embossing folder (Floral Fantasy) & a Sanding block
-Scissors, Tim Holtz design ruler & homemade embossing tool
-M.M. paper piercer, needle & embroidery thread
-Double-sided tape
-Clear embossing powder (to emboss digis on Whitewash)
-Copic markers (Amethyst V17, New Leaf YG23, Canary Yellow Y02, Black)

Step 1) Print the basket template
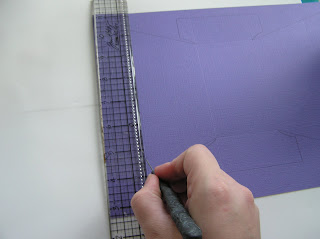
Step 2) Score it
A) To form basket bottom/main shape: score where dotted lines indicate (on the template above)
B) To make the scallop trim: Mark 1 and 1-8 inch down & score a parallel line-where blue arrows & blue dotted lines indicate in this score guide below:
.jpg)

Step 3) Print the scallop trim template. I printed it on the cover of the coredinations 12x12 package to save cardstock...

Step 4) Cut the scallop trim template out

Step 5) Cut the basket out & trace the scallop onto the tops of the basket box

Step 6) Sand the front & back of the box

Step 7) To get a big basket template to fit on a standard piece of paper (for your printer) I added side pieces.
Make side pieces by cutting 4 pieces of cardstock to measure 2 and 6-8 inches and just under 2 and 1-2 inches & sand them (They'll be attached with the handle later...)

Step 8) Add adhesive to the four tabs
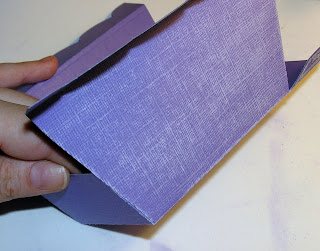
Step 9) Put the box together
Lining the tabs up with the edge of the front & back will...
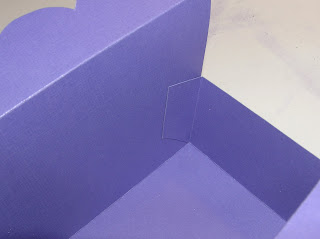
...give you a nice angle to your sides :o)
the handle:

Step 10) Cut a handle from the Black Magic Core'dinations to measure 12 x 2 inches & emboss it

Step 11) Sand the embossing

Step 12) A fun way to get colour variation (and match your Copic marker or ink colours too): tint the sanded area by colouring with a Copic marker (this is Amethyst V17.) The broad tip-or chisel end is handy for that.
No Copics? No problem! ;o) You could any colouring medium--inks, paints, etc.-- to add any shade you like.

Step 13) Sanding the core'dinations again after colouring it with the marker (or what-have-you) removes a little of the colour and leaves you with some of the original Core colour as well as the colour you added.

Step 14) Stitch the handle, if you like, & line it with another piece of the 12x2 inch core'dinations

Step 15) Add the handle: Adhere the handle to the inside top of one of the 4 side pieces
& attach that to the side of the basket box.
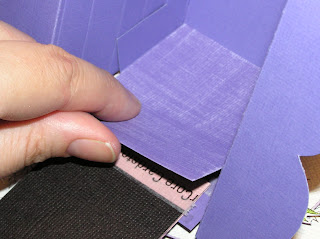
Step 16) Adhere a second side piece in the inside of the box-to sandwich the handle (this also makes the higher sides.) If you want no handle just omit it & add sides only.
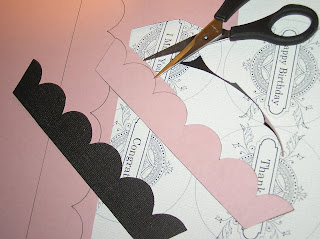
Step 17) Print the scallop trim pieces directly on the Lost Ruby Black Magic cardstock & cut them out. (There's no wasted cardstock with the extra printed template bits like the writing and long scallop, since I used the piece for the card & the pink side doesn't show.)

Step 18) Repeat the embossing, sanding, & copic colouring process with the scallop trim pieces of Black Magic & stitch it, if you like.

Step 19) Stick the scallop edge down onto the box

Step 20) Adhere the scallop trim to the box
The bows...
...were added to the side of the handles by
stitching them on with button centers:
stitching them on with button centers:

A) Putting the needle & thread through the button, the bow & the basket handle.

B) Bringing it back out again through to the other button hole & tying a doubel knot

C) Hiding the white stitch with a black Copic marker
-5-
Birds


Ever since stumbling on the fun fact that you can emboss digital images on Core'dinations Whitewash (even easier than with stamping) I can't stop myself! The thicker the line of the image, the bolder the embossing. (Warning: it's highly addictive!) :-D
How to emboss on Whitewash:
1) Print your digital image
(on a piece of Whitewash cut to 8.5 inches wide)
2) Quickly sprinkle clear embossing powder on & heat it
(just avoid burning) :o)
How to emboss on Whitewash:
1) Print your digital image
(on a piece of Whitewash cut to 8.5 inches wide)
2) Quickly sprinkle clear embossing powder on & heat it
(just avoid burning) :o)

Please click this link to
download the bird PDFs
(or click the pictures below for JPGs)
Hope you like these birdies. I've always wanted some flying bird outline stamps (and always wanted to be un-broke, haha) So for now, I'll just draw stuff to share with you (my fellow broke crafters?) ;o)
The PDFs of these small birds will print birds that are 1 and 2/8" long from beak to tail tip:

Here's a whole flock of small birdies:

The PDF of these LARGE birds will print birds that are 2" long from beak to tail tip:
to make the flying birdies:
Step 1) Make the birds:
A) Prepare clear embossing powder
B) Print the LARGE digital birds on Whitewash Core'dinations cardstock ( I like fast or standard setting, depending on your printer
C) Emboss them: Sprinkle with clear embossing powderm as soon as they print & heat set it
D) Shade with Copic markers if you like
E) Cut them out...
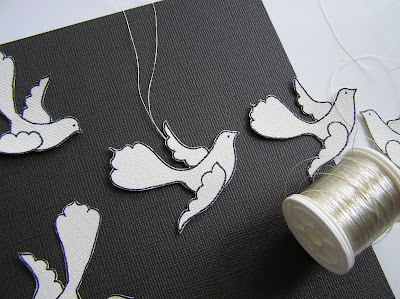
Step 2) Make the flying apparatus:
A) Cut the birds out (they are mirrored pairs so they can be double-sided)
B) Adhere silver thread to them (and check to see if they hang how you like)
C) Add the matching bird on the back to sandwich the thread
Step 3) Attach them to the basket (using beads):
A) Pick a needle that will fit your beads & pierce a hole in the basket handle.
B) Thread the silver threads (attached to birdies) into the needle
C) Use the needle to pull the threads in through the hole in the basket handle
D) Slide a bead onto the needle
E) Tie a knot around the bead to hold it all on
There's a bird on the candle too:
.JPG)
The card has the little birdies on it and...
-6-


Customizable Martha Stewart
Favour Label Template is here
It's a PDF form & You can type anything you like in the boxes
(but you can only print the text not save it.) Too cool, hey?
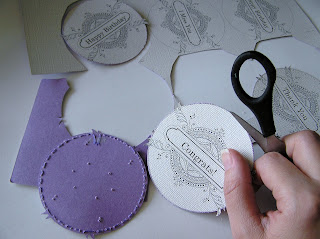

&

with Core'dinations
This is a Copic trick that I learned from the always Brilliant Dawn:
Colour your cardstock with Copic markers...

It works wonders with Core'dinations Whitewash. You get the fantastic
woven texture & can get any custom colour you want.
Layering marker colours will give you an exact shade. (The embroidery thread I was matching had more yellow than the New Leaf Copic YG23, so I layered with Canary Yellow Y02.)

The ever talented Tanis is
the next stop on the hop!
(her stunning card has me pea green with envy!)
I hope you can join us in our first ever hop; the Ladies on the Caardvarks Crew have made some AWEsome Core'dinations projects!
Click here to subscribe: Feedburner or Feedblitz


.jpg)
.jpg)




0 comments:
Post a Comment