


The lull in posts (over the last couple of days) was for me to finish up this looooong post I've been wanting to share with you for eons--how to make your own digital paper & images (or just ways to add oomph to any that you find or buy... Hope there's some ideas you can use in it:
All the papers for this Caardvarks POD project are homemade digital papers. I don't do a whole lot of shopping for patterned papers, so my supplies are limited in that department. I really wanted some tree paper to go with this adorable Purple Onion tree stamp, so I made some with photoshop and some scans of drawings.
Don't think you have to be a pro to make your own papers--I am only a Photoshop novice--at best. You might want to just try playing around & see what you get... or just use these tree ones if you like em. :O)
For those of you who do want to make your own digital papers, Gimp is an alternative to Photoshop: a free...open-source alternative. It's an "image manipulator" with many of the options of Photoshop.

1...how to make the stamped tree (and the card)
2...template for the box (2 5/8" square)
3...tree freebies (digital images & papers)
4...DIY: ideas for making your own digital images/paper


the background
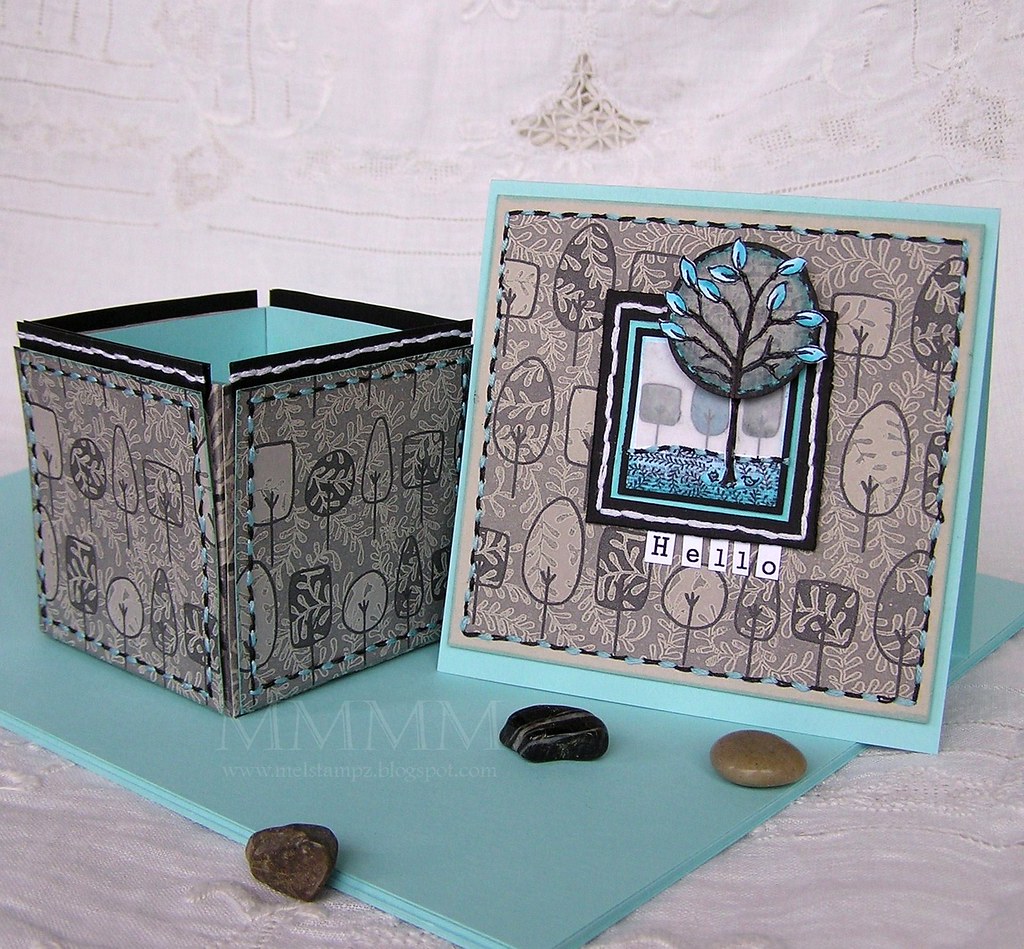
A) Created a little block by printing the 3 trees image at 1 1/4 inch:
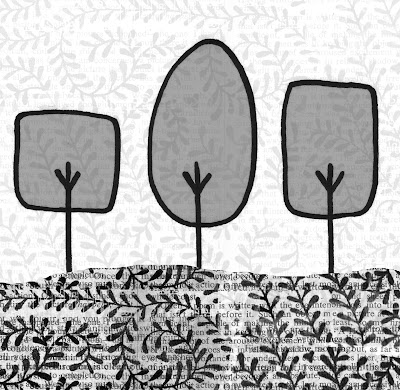
(this image is not sized at that, but left large so you can re-size however you like.)
B) Pierced and stitched along the horizon in black & turquoise thread
C) Added vellum over the sky to give a soft misty look
D) Adhered it to a Cool Caribbean coloured square (1 1/2" square)
E) Pierced & Stitched a black mat (2" square) with white thread
F) Adhered the a black mat to the back of the square
G) Printed "hello" in a typewriter font on white paper & cut it into strips
H) Adhered "hello" strips to the back of the black mat

the P.O.D. Celebitties tree:
Step 1} Created the tree trunk:
A) Embossed the tree in black ink and clear embossing powder
B) Coloured it in with cool grey Copics
C) Cut out just the trunk & adhered it to the background square
Step 2} Made the round tree top:
A) Printed the background paper:

B) Embossed the tree again on the background paper (for the tree top this time)
C) Punched a circle around the tree top (1 and 1/4 inch)
D) Inked around the edge in turquoise
E) Stitched aruound the edge with little turquoise & black stitches
F) Added a line of black Copic marker on the outside of the stitches
G) Adhered it over the trunk with foam tape (or dimensionals)
Step 3} Added the leaves:
A) Embossed a bunch of the adorable tiny leaves [from Celebitties set too] (black embossing on white paper)
B) Coloured the leaves with aqua & frost blue Copics
C) Cut them out & adher to the round tree top
Step 4} Made the main card:
A) Print the background paper (at 4" square)
B) Adhered to a Sahara Sand coloured mat
C) Stitched around it with turquoise & black stitches
D) Adhered it to a Cool Caribbean card 4 and 1/4" square
Don't think you have to be a pro to make your own papers--I am only a Photoshop novice--at best. You might want to just try playing around & see what you get... or just use these tree ones if you like em. :O)
For those of you who do want to make your own digital papers, Gimp is an alternative to Photoshop: a free...open-source alternative. It's an "image manipulator" with many of the options of Photoshop.

1...how to make the stamped tree (and the card)
2...template for the box (2 5/8" square)
3...tree freebies (digital images & papers)
4...DIY: ideas for making your own digital images/paper

This sweet tree stamp is from Purple Onion Designs--
the coloured tree & little cut out leaves are from
P.O.D.'s set Celebitties:
the coloured tree & little cut out leaves are from
P.O.D.'s set Celebitties:
-1-

...make the background
and the stamped tree:
and the stamped tree:

- Stamps: tree + leaves (Celebitties Purple Onion Designs)
- Tree digital papers & images
- Computer & printer
- Black & White cardstock
- Cool Caribbean & Sahara sand cardstock (SU)
- Vellum cardstock scrap
- Black Craft (or pigment ink)
- Clear embossing powder & heat gun
- Paper piercer & needle
- Black, Turquoise, & White thread
- Double-sided tape
- Tombow monomulti adhesive
- Copic markers (cool greys no 1, no3, no7, black, aqua, frost blue)
- Turquoise ink
the background
A) Created a little block by printing the 3 trees image at 1 1/4 inch:

(this image is not sized at that, but left large so you can re-size however you like.)
B) Pierced and stitched along the horizon in black & turquoise thread
C) Added vellum over the sky to give a soft misty look
D) Adhered it to a Cool Caribbean coloured square (1 1/2" square)
E) Pierced & Stitched a black mat (2" square) with white thread
F) Adhered the a black mat to the back of the square
G) Printed "hello" in a typewriter font on white paper & cut it into strips
H) Adhered "hello" strips to the back of the black mat

the P.O.D. Celebitties tree:
Step 1} Created the tree trunk:
A) Embossed the tree in black ink and clear embossing powder
B) Coloured it in with cool grey Copics
C) Cut out just the trunk & adhered it to the background square
Step 2} Made the round tree top:
A) Printed the background paper:

B) Embossed the tree again on the background paper (for the tree top this time)
C) Punched a circle around the tree top (1 and 1/4 inch)
D) Inked around the edge in turquoise
E) Stitched aruound the edge with little turquoise & black stitches
F) Added a line of black Copic marker on the outside of the stitches
G) Adhered it over the trunk with foam tape (or dimensionals)
Step 3} Added the leaves:
A) Embossed a bunch of the adorable tiny leaves [from Celebitties set too] (black embossing on white paper)
B) Coloured the leaves with aqua & frost blue Copics
C) Cut them out & adher to the round tree top
Step 4} Made the main card:
A) Print the background paper (at 4" square)
B) Adhered to a Sahara Sand coloured mat
C) Stitched around it with turquoise & black stitches
D) Adhered it to a Cool Caribbean card 4 and 1/4" square
-2-

(a 2 and 5/8 inch square box)

Click here to download the BOX template
(It measures 2 5/8" square; I've used it without the lid)
I also added a turquoise liner :O)

For tutorials with other examples of this box, please click these pics:
Wee snow hill box:

Felted {Katie Cupcake} box:

-3-

Tree freebies:
Please feel free to use these digi images/papers, if you'd like
(for personal or non-commercial use only.)
Please link them, if you use 'em. I'd love to see what you make. :O)
(for personal or non-commercial use only.)
Please link them, if you use 'em. I'd love to see what you make. :O)
Three trees with a vine...
(about 2 1/2 inches square)

The same image with a hill:
(also about 2 1/2 inches square)
The patterned paper for the box:
(sized approximately 3 inches square to fit on the box)
You can adjust the colour (or contrast or other qualities) of these in any image editor.
-4-

for Do it Yourself digital papers & images
 Remember this tree doodle from my old post with links for "nifty tricks"? Well it was pretty boring, but I had some fun turning it into those digital images up there (and the matching digital patterned paper.) I thought the adventurous among you might be interested in checkin' out how to do it yourself.
I made it all in Photoshop (and I am no pro, by any stretch of the imagination...) but I'm having fun learning. Here's what making DIY digital paper & photoshop brushes involves:

- Making your own pattern papers (using Photoshop or a program that allows you to layer & use brushes...)
- Making your own custom photoshop brushes

First, the simple way to make your own digital paper (without photoshop):
Step 1) Draw something (or print copyright free things)
Step 2) Colour it if you like
Step 3) Scan it
Step 4) Print it on cardstock or paper
And now for the "playing-around-with-digital-layering" way...
- Computer
- Printer-Scanner
- Photoshop or program of your choice
- Drawings, photos, Copyright free images, textures...
- Cardstocks or Papers (a variety is good)
- Optional: embossing powders & heat gun
- colouring medium(s) of your choice
make your own digi paper from scans
Step 1) Scan some things you've drawn (or something copyright free.) Scanning with colour is a very good idea since it opens up your options.
Step 2) Turn Your scanned image into a photoshop brush. Here's a great tutorial by Dani for how to make a brush in Photoshop.
Step 3) Experiment with layering your new brushes: Images can be texturized by layering with other brushes. (Use Layer>New...) One thing that seems important to keep in mind is contrast. Depending on the quality of your printer and the paper you use, your printed pattern may not be as sharply contrasted or as detailed as your digital image.
Step 4) Save your image in stages: As you work, it's a good idea to remember to save a good copy & a working copy in case you don't like the changes you've made in the process of making your paper (but also so that you can make variations on a theme...WARNING: it's addictive!!!)
Step 5) Print it out.

It's so snifty that all you need for this technique (as your main tools) are merely:
1} Computer Program (and a Printer+Scanner)
2}Papers
3}Printer ink
1} Computer Program: Don't have photoshop? (Here's a great post on free alternatives to Photoshop thanks to Six Revisions <--the comments on that post are also a goldmine for open source programs to try out.)
2}Paper: I like to mess around, trying different papers out. The ink will absorb differently, of course. Some favourites:
Papers for sparkle, texture, & crazy interest:
White Diamond paper (from Paper Temptress) (Sparkle City!)
Kraft paper/cardstock
Textured cardstock/paper (like: linen; elegant laid; classic columns; felt texture)
Printable canvas [I like StickStock (Linen) by Close to my Heart]
Grunge paper (scroll to the very bottom) :O)
Printable acetate
patterned papers (like Basic Grey/the solid colour ones that have texture)
Double sided paper (you can print a different pattern on each side)
Printing on tissue paper
Printing on Fabric
Papers to emboss:
The Iridescent family (at Paper Temptress.)
The Glimmer cardstock family
Mica or Metallic cardstock
Gesso Cardstock (more on that here)
You can also paint cardstock with Lumiere or acrylic paint & print on it. (It will emboss gorgeously; in fact it may require embossing since the ink may not dry.)
A lot of my favourite papers are faves because they let you emboss printer ink really easily & beautifully. Here's how i like to do that...

3} Printer ink: Is printer ink acid free? How will it endure? Here's the skinny on everything inky from your printer. (Thanks to Rebecca.)

(seal your images)
--> my #1 choice: I prefer Microglaze since it's environmentally great and brings out colours like you wouldn't believe. It also has no fumes (no headaches) and waterproofs your images...
tutorial here:

-->Sometimes merely heat setting the printer ink will work
-->I have had success with Krylon matte finish. It can cover large areas (BUT it smells & it can affect the way colouring mediums go o-though I like different effects sometimes...)
(for embellishing your images/papers)
-->LOVE this: Embossing over your digis (DIY/bought/freebies) with background stamps can look incredible! [I like to emboss patterns in clear over anything to add oomph. embossing powders with some glitter look stunning too--even with solid coverage (just Versamark the whole thing.)]
-->Add gorgeous details by colouring with markers, or doodling over areas with silver or glitter pens. (You may find it needs sealing first.)
-->Dry Emboss papers for layers of interest (Cuttlebug or die cut them...)
(for saving money & trees)
Saving scraps: Testing your DIY papers on scrap paper may be a good idea too. I find I often use scraps of things for something anyhow so it doesn't waste a lot of paper, in the long run.
Double-sided printing: This is handy not only because it's way too kewl to have double-sided papers you made yourself (with images or text or with both), but it's also handy because it saves paper (Also, if you're like me at all, you get excited and print some experimental things you may not end up using. Two options on one sheet of paper is handy if you don't like one later.)
Conserving Ink: You can design low contrast papers in black & white, if you are trying to conserve ink for budgeting and/or being green.
Sources for copyright free images: There are lots of images in the public domain that you can use copyright free. Just do a search and include "public domain" with it.
Here's an example of an image that has an expired copyright. I opened it in Photoshop & changed the colours & drew in the book:

I'm no pro with images, but have found that sometimes the ones you find end up grainy when printed & sometimes you score big time & they are lovely. These ended up so-so.

It can be fun to print your digital papers & hand colour them...(especially embossed ones that have dark outlines with white space inside to colour.) Then you can re-scan the coloured version, and you have a new image to turn into a brush. When you use hand coloured images in Photoshop (or just as digital images) they can give you such fascinating texture.
If you try making these, you may find that you play with the same brushes again and again for a few papers. These make nifty little families of paper that coordinate. Saving them in one file (named for the theme of them) might be handy. I like it. :O)


Some tricks I like to try...
--->Change your brush to have some transparency (select the brush tool & adjust where it says "opacity" to a lower percentage & play around...) The image above shows some of the funky texture you can get with transparency.
--->Play around with different colours (if you scanned your images as colour scans)
--->Experiment with funky functions: Specifically I favour using the "find edges" or "glowing edges" function to make the image fill-able & different (both are under filter-->stylize)
--->Use the fill tool to fill sections of your image (you can adjust the opacity on that too & working in layers seems to make it way easier.) The image above used a lot of fill (with different levels of transparency to get different greys and textures.)
 It might be wise to research your brand of printer (to make sure that your printer can handle cardstock) & I'd try not to get any embossing powder in it, (but I am just crazy me, so I tear into it heedlessly and make a big mess and love every minute. hehehe)
Hope you found some ideas here, :O)

P.S. There are LOTs more digital freebie links here (and some techniques too)


0 comments:
Post a Comment