This post is inspired by & dedicated to the Fabulous Allison (whose birthday is this week--I won't say the day, just in case I shouldn't) ... I'm so grateful that Allison is one of my longtime blog friends. She has been nothing short of a hero of mine ever since I met her online & she continues to wow me with her extraordinarily rockin' personality--no exaggeration!

1...the Birthday Girl's rockin' sketch challenge
2...layered stamping on a wierd label shape (& a lacquered guitar)
Lurve how it uses the rule of 3rds perfectly! (and how it makes me feel all smart for a change, since it's perfectness lets me talk about the only design rule I know, ynuk ynuk!)

- Black & turquoise cardstock
- Sharp scissors
- White pencil crayons & SU markers (turquoise & teal)
- Waterbrush
- Stamps (used here: LPS {Rock Star})
- White craft ink
- Heat gun
- embossing buddy (or anti-static bag/ol' dryer sheet)
- Silver embossing powder
- Crystal Lacquer
- Green seed beads
- Silver marker (dollar store)

Step 1} Create a funky mat shape- A) fold a piece of paper in four & cut a shape in it B) Cut & unfold and recut until you like the shape C) Trace it on your cardstock

Step 2} Cut the (weird) mat shape out. ;o)

Step 3} Stamp an image (I used the skull from the Little Paper Shop set {Rock Star} in white Craft ink (from S.U.)

Step 4} Dry the ink with a heat gun (so it won't pick up embossing powder with the next layer

Step 5} Rub the cardstock with an anti-static bag (aka embossing buddy) to prevent extra embossing powder sticking)

Step 6} Stamp a second image on your mat--over the other layers. I stamped 2 guitars (one for the whole guitar and one to use just the strings & guitar neck for dimension)

Step 7} Colour with white pencil crayon to make a base for the image colour

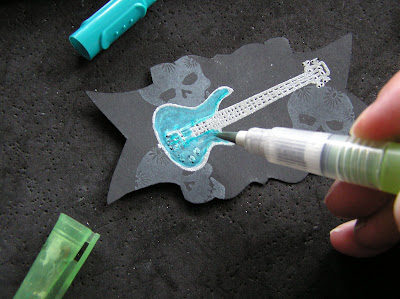
Step 8a} Add marker colour over the white pencil crayon (this may look a little sloppy now, but it looks better later, honest.)

Step 8b} Shade with a second colour, if you like

Step 8c} Water-based markers will let you blend shading with a water brush

Step 9} Cover the guitar with Crystal Lacquer
Step 10} Adhere the silver embossed guitar neck to the lacquered guitar.
(I also glued on some green seed beads on for the tuning pegs & splattered silver ink from a really wet dollars store marker.)
Thank You for taking time out of
your busy busy day to check this out!

P.S. I'll re-take better photos of this & post them on the blog later today, so you can actually see the details. The light was bad, but I just didn't want to miss the Little Paper Shop Monday mornin' post. :O)


0 comments:
Post a Comment