StampznewBright

  • Subscribe to our RSS feed.
  • Twitter
  • StumbleUpon
  • Reddit
  • Facebook
  • Digg

Sunday, 5 July 2009

Organizing with Caardvarks & Sheetloads (a Corkboard Acetate Calendar)

Posted on 16:31 by Unknown


A couple of buzz words seem to be popping up around the crafty Net lately: 'craft burnout', 'crafty overload', 'stamper's A.D.D.', and the focus today 'craft time management!' :O)

Time management an issue for you too?
You might want to make an acetate calendar:


It took a little while, but now I hope to have all my projects in plain sight. :O)


1...some ideas (on time management)
2...a challenge: Caardvarks Sheetloads Sketch
3...how to...make an acetate calendar corkboard
4...how to...prepare & assemble the corkboard
5...cheap tricks: homemade dimensional foam tape

-1-

....on Time Management:

The acetate squares on this corkboard calender let you write on it with a dry/wet erase pen {...or...you can use my trick of choice & add sticky notes to each day--That way if you're forced to procrastinate hehehe you can move the note to another day.

For me, shifting to-do items means more accomplished & less guilt.} :O) I'm hoping to solve these craft equations:

minus energy
+ add fun commitments
=equals a BIG need for more organization!
or
(add more organizing, divide the tasks, multiply accomplishments, and subtract the guilt!) ;o)

my Problem: I need planning tools for time management. As you can tell--by the fact that post is a tad late today, and it's doubled up with another post (that I could have saved for later this week)--I needs me some organization BADLY! My whacky projects can take days & days to make and photograph, so I need to plan ahead to have enough content on here.

One solution: SO, this is a wet/dry erase calendar to get my ducks in a row.

-2-

(Caardvarks Sheetloads Sketch)

Sketch challenge HERE:


The star of this calendar show is (by far) the thick frosty acetate from...

...Short Cuts and it's sister site Sheet loads of Cards:

and

The Short Cut frosted acetate has just the right thickness to make writing on it--even over embossed papers!--a complete dream:


The embossing doesn't get crushed when you write. The way the frosting also unifies the look of papers under it (even this cheap tinfoil & fancy silver paper) really rocked my world:


Note to self: must get more of that frosted acetate!

Short Cuts Acetate Supplies for this:
I used 3 sheets of frosted acetate & one square from a card.
I also used 4 clear acetate squares for the "notes" section:


-3-

...make an acetate calendar (on a chipboard frame)


  • Short Cuts acetate (frosted thick & thin clear)
  • a Corkboard
  • Large chipboard frame & little ones too (S.U.)
  • Nail file or sanding block
  • Gesso or paint (I used white acrylic Gesso)
  • Paint brush
  • To emboss the chip board: A stamp, White craft ink, White Embossing powder
  • Double-sided tape
  • Heavy duty tinfoil (glued on cardstock)
  • Cuttlebug embossing folders
To make the weekday tabs:
  • Days are printed from computer on Paper Temptress paper Candido (Incandescent) cardstock
  • Embossed with clear embossing powder
  • Stitched with white thread
  • Using Paper piercer & needle
  • Layered on gesso-ed watercolour paper impressed with Impressabilities (while the gesso is wet)

(you can click to enlarge any of these photos) :O)


Step 1} Sand little tabs off of chipboard frame (this is the left over scrap frame of Stampin' Up! chipboard.)
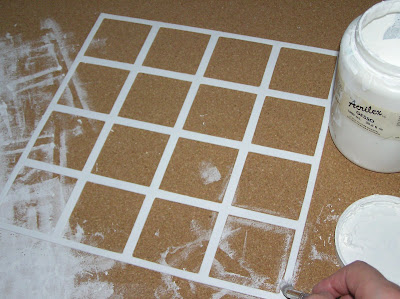


Step 2} Paint frame with gesso or paint


Step 3} Sand and paint little frames (these are from Stampin' Up)

I also embossed all of the chipboard for added texture using a paisley stamp from Cornish Heritage Farms (retired) & Some white craft ink & embossing powder (from Stampin' Up!)


Step 4} Cut frosted acetate these are 2 and 7-8 inches square to fit the SU chipboard frame


Step 5} Cover the back of the chipboard frame with strong double-sided tape


Step 6} Adhere the frosted acetate to the chipboard frame. I used 3 sheets worth of acetate and one extra square to get 20 squares (and I also used 4 clear acetate squares for the notes section.)


Step 7} Make embossed tinfoil squares (or other embossed or patterned papers to add under the acetate) the solid nature of the frosted acetate lets you write over it but still protects the texture


(with TINFOIL)

As I was saying earlier, the frosted quality of the acetate makes even cheap tinfoil look great. This is heavy duty tinfoil and I glued the shiny side down the look was more muted.)


Step 8} Adhere squares behind the acetate (seems to need really great adhesive, and reinforcing once they're all down-with scotch tape-seemed to really help keep it all tickity boo.)


Step 9} Make tabs with week days. These are printed on Paper Temptress paper Candido (Incandescent) cardstock which has a lovely linen texture, but lets you emboss the printer ink. The paper has a gold shimmer which really sparkles. The curvy mat at the base of these tabs is a gesso cardstock impressed with Impressabilities (which you can find here, if you like).


Step 10} Adhere weekday tabs to the top of the acetate calendar


Step 11} Add scallop or other embellishments to the side of the calendar--the 'notes' tab is tucked in between the layers:


There's also a bit of bling on the side scallops:


Step 12} Embellish by adhering bling (these are Swarovski crystals stuck on with Crystal Lacquer.)

-4-

...prepare & assemble the corkboard:


  • Magnets
  • Tombow Monomulti
  • Fun foam
  • Double-sided tape
  • Gesso or paint & brush
  • Squares of patterned paper


Step 1} Adhere magnets on the back of the acetate calendar so that the dates can me rearranged on the front. (I'll go over this in detail in another post to come) :O)


Step 2} Adhere the acetate calendar to the cork board with dimensional tape (to give the magnets some room).


Step 3} Paint a corkboard. I used gesso for a matte finish. (This was an old trashy corkboard that I found in our condo--left behind by the previous tenants. Thanks guys!) :O)


Step 4} Cut squares & adhere them to the cork board. DIMENSIONS: This corkboard measures 22" tall x 34 1/2" wide and I used 4" square papers. I wasn't worried about perfect placement, because the shabby chic look is so forgiving. ;o)

(I must admit, it was all I could do to stop myself from handstitching around each square, but that would've taken two weeks instead of one! :O)

You can save paper by not adding squares where the calendar will cover:


The papers I used are miscellaneous ones I got on sale ages ago with silver details. It was hard to cut up so many of my favourite 12x12 sheets, but at least with 4 inch pieces there was no waste (and now I get to look at them every day.)
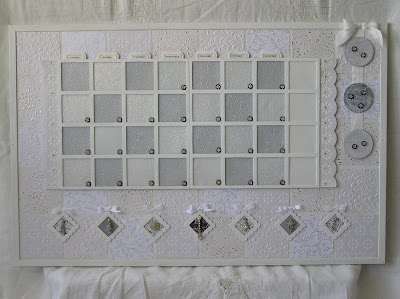


Step 5} Adhere the acetate calendar to the corkboard. I used a cheap cheap foam tape...

add a couple more details & there you have it:

Organization heaven (heehee)

-5-

(homemade dimensional foam tape)


The copious amount of foam tape for this project was free (and it was recycled from a fun foam piercing mat.) To make your own fun foam dimensional tape:

1} Cut strips of fun foam (I used long strips 1" wide by 12" long)
2} Adhere two of the strips to each other
3} Cover both sides of that doubled up foam with double-sided tape
4} Cut into pieces the size you'd like and
5} Peel the tape of when you want to apply


Later this week:

...how to make movable date magnets
(for arranging the dates each month):


details on chipboard frames & gem push pins:


...how to make metal disks for magnet storage:


...I'll mark it all on my new calendar,
so I don't forget about it! ;O)

Hope you have the most fantastic day!


Email ThisBlogThis!Share to XShare to FacebookShare to Pinterest
Posted in 3D-projects, Caardvarks, cheap-tricks, Cuttlebug, Faves, Tutorials | No comments
Newer Post Older Post Home

0 comments:

Post a Comment

Subscribe to: Post Comments (Atom)

Popular Posts

  • free Butterfly Silhouette .studio cut files (in 3 styles)
    Hi, All! Here are those butterfly Silhouette .studio cut files. They are for only for the Silhouette machine... But I do hope to share other...
  • DIY digital paper (some freebies)
    The lull in posts (over the last couple of days) was for me to finish up this looooong post I've been wanting to share with you for eons...
  • New Popcorn Box template set (pretty stamp room storage) :o)
    Are you in the mood for a template or two? I was going to wait until I had really good photos and a full pictorial, but then I would take fo...
  • Missing with a migraine, Craft room BEFORE pics, & LINKs for Organizing the craft room
    Edited to add: Sorry guys. I feel like I was hit by a truck. Migraine's lasted so long... but I will be back with a post by tomorrow eve...
  • Graphics Fairy Inspiration (+vintage printables)
    Thank You all so much for your wonderful comments about the papers I've been obsessed with. Your kind words make me grin so big that I g...
  • "Honey, I shrunk the stationery!" (Hero Arts typewriter notebook)
    Still trying to make more of my cards into little gifts. This Hero Arts typewriter card is another take on the card turned refillable notebo...
  • 3 Clean And Simple cards (with SRM stickers)
    You guys may know that I was tragically born without the gene that let's you achieve a C lean A nd S imple card. ;-) Not sure why I find...
  • Making Your Own Colour Shimmer Sprays--Links & Info
    Info & Links Links for how to Mak e yo ur o w n Sh im mery s prays: (These are for you sweet Beth! oxo) ( more info on these colours in...
  • over 100 free pattern overlays ... at a glance
    Would you believe that the free overlay total is at 139 overlays and counting? (I might have a wee little addiction) ;-) Since overlays can ...
  • Felt-based cards (Rock-a-Bye Baby tutorial)
    New idea, Old projects.... I've been debating whether or not to post some older projects/tutorials since the big bad insecurity beast...

Categories

  • 'Mouse'-the-cat (10)
  • *TEMPLATEs (98)
  • 3D-projects (144)
  • A-Day-For-Daisies (7)
  • Amber Ink (9)
  • Angel's-Landing (2)
  • BASICS (47)
  • Blogging-tips (7)
  • Caardvarks (48)
  • Cat's-Pajamas (2)
  • cheap-tricks (224)
  • Christmas (33)
  • Claire-Keay (2)
  • Cricut (3)
  • cut-file (2)
  • Cuttlebug (45)
  • decor (6)
  • Digital-Images (131)
  • Distress-Inks-etc (14)
  • DIYstamps (1)
  • Eat-Cake-Graphics (11)
  • Faves (207)
  • Fred-She-Said (5)
  • Freebies (77)
  • GESSO (9)
  • Halloween (10)
  • Heather Ellis (3)
  • Hero-Arts (14)
  • ISC (7)
  • Jessica-Sprague (2)
  • Just-Rite (2)
  • LPS (63)
  • Mo's-Digital-Pencil (16)
  • My-Favorite-Things (33)
  • organizing (7)
  • Other-People's-Tutorials (36)
  • Paper-Garden-Projects (54)
  • Paper-Temptress (39)
  • Punches (21)
  • Purple-Onion-Designs (23)
  • S.U. (1)
  • SCOR-PAL (4)
  • silhouette (4)
  • Skipping-Stones-Design (7)
  • Squigglefly (6)
  • SRM-Stickers (8)
  • techniques (191)
  • templates (26)
  • Tiffany-Doodles (4)
  • Tutorials (252)

Blog Archive

  • ►  2013 (16)
    • ►  July (4)
    • ►  June (4)
    • ►  May (3)
    • ►  April (1)
    • ►  March (1)
    • ►  February (3)
  • ►  2012 (53)
    • ►  December (2)
    • ►  November (2)
    • ►  October (1)
    • ►  August (3)
    • ►  July (2)
    • ►  June (5)
    • ►  May (7)
    • ►  April (8)
    • ►  March (9)
    • ►  February (13)
    • ►  January (1)
  • ►  2011 (74)
    • ►  December (1)
    • ►  November (5)
    • ►  October (10)
    • ►  September (9)
    • ►  August (12)
    • ►  July (5)
    • ►  June (9)
    • ►  May (2)
    • ►  April (6)
    • ►  March (7)
    • ►  February (4)
    • ►  January (4)
  • ►  2010 (84)
    • ►  December (7)
    • ►  October (1)
    • ►  September (6)
    • ►  August (1)
    • ►  June (1)
    • ►  May (7)
    • ►  April (21)
    • ►  March (3)
    • ►  February (17)
    • ►  January (20)
  • ▼  2009 (234)
    • ►  December (16)
    • ►  November (21)
    • ►  October (11)
    • ►  September (23)
    • ►  August (29)
    • ▼  July (26)
      • Susie Surprise at Paper Garden Projects: Woo hoo!
      • Winter Wonderland Gatefold with Belly Band (Cuttle...
      • Free-hand cut D.I.Y. Cereal box Cuttlebug or Press...
      • Two Peas videos by Jennifer--Link Index (inspiring...
      • Garden Furniture Card & a Little Tall Purse (templ...
      • Caardvarks Shower Challenge (CC&M acetate gift car...
      • Cuttlebug Challenge! Zenware altered Circus box
      • Cuttlebug Challenge #41! (and I'm a crazy clown) :o)
      • Little Bitty Paper Temptress posting :O)
      • LPS Sketch Challenge: {Beary Best Katie} house
      • Creative Cuts & More-Caardvarks wedding shower set
      • Some Digital Grooviness (enabler alert: digi shopp...
      • Paper Garden Projects Birthday Notebook with a Boo...
      • City Salon Anya
      • Little Paper Shop Release Day!
      • Your background stamps emailed me...
      • Little Paper Shop Preview {Angelic Jena} cloud card
      • DIY digital paper (some freebies)
      • Cuttlebug Challenge Blog shopping scoop!
      • Sticks and Stones and Animal Homes (Cuttlebug Chal...
      • You Rock Allison! (LPS sketch challenge)
      • Organizing with Caardvarks & Sheetloads (a Corkboa...
      • Quilted Cuttlebug Squares
      • Cuttlebugged Felt (+some BIG news) *GRIN* :O)
      • Popsicle Bucket (with Purple Onion Design stamps)
      • Special-tea (Do it Yourself) teabag ;O)
    • ►  June (10)
    • ►  May (16)
    • ►  April (26)
    • ►  March (22)
    • ►  February (27)
    • ►  January (7)
  • ►  2008 (39)
    • ►  December (14)
    • ►  November (25)
Powered by Blogger.

About Me

Unknown
View my complete profile