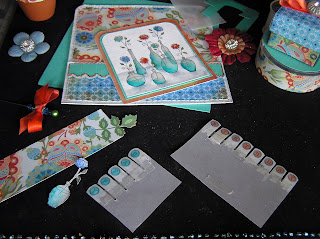
1...how to make the zinnias image & the vellum sentiment
2...make the stitched bookmark
3...make a stitched notebook (& assemble the works) :o)
-1-
...make the image & sentiment
(zinnias in glass vases)
(zinnias in glass vases)
shiny! heeheehee

- Zinnas Cling Stamp
- Black ink & clear embossing powder
- Marrakech paper pack (Basic Grey)
- Paper piercer
- Turquoise & orange thread and a needle
- Double-sided tape
- Vellum cardstock
- White opaque marker (CTMH)
- Crystal Lacquer
- Copic markers
- Corner rounder

To create the image:
A) Stamp "Zinnias" & colour (these were embossed on gesso cardstock
B) Round top corners of the image
C) Colour. These were coloured with Copic markers: Apple Green G14 & Moss YG67, & Night Blue B97 with Aqua BG15 & Cadmium Yellow Y15 with Cadmium Orange YR07 & Lipstick Red R29. The table was shaded with Cool Gray NO3 C-3 & blended with a colourless blender)
D) Cover vases with Crystal Lacquer & let dry
E) Mat on pieces of paper (these are from the Marrakech Basic Grey 6x6 pack & they have their corners rounded too) :O)

To make the sentiment:
(that cheating way to make it look like you stuck little letter bits on) ;o)
Step 1} print sentiment on vellum cardstock (using a font you love. This was a typewriter font with round keys)
Step 2} Emboss the printer ink with clear embossing powder & heat set
Step 3} Cut between the letters to make them look separate
Step 4} Colour the letters & distress the vellum with a white marker...

Step 5} Adhere the sentiment to the back of your image & mat; then pierce (to stitch) if you like

Step 6} Stitch away

-2-

- Vibrant teal Prism cardstock
- Marrakech paper pack (Basic Grey)
- Paper piercer
- White & orange thread & needle
- Double-sided tape
- Tombow Monomulti

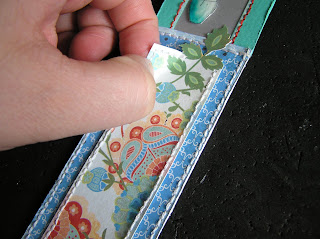
Step 1} To create a little Vellum Window for the top of the bookmark
A) Fold a piece of cardstock in half & punch with a keyhole punch (SU)
B) Sandwich vellum cardstock in the middle

Step 2} Pierce & stitch it (hiding stitches at bottom.)

Step 3} Add two strips of patterned paper on either side. This is Marrakech (Basic Grey 6x6 pack)

Step 4} Stitch all the way through the bookmark for double stitching (that will show nicely on either side. Just make sure your thread is long enough so you can....

Step 5} Hide the thread ends: tuck the end of the stitch under the patterned paper & hide by adhering (i love that tombow monomulti)

Step 6} Create a decorative panel for it & pierce it

Step 7} Highlight edges with a white opaque marker (CTMH)

Step 8} Stitch the decorative panel & Adhere it to the bookmark

Step 9} Glue on a matching flower.

- Vibrant teal Prism cardstock
- White cardstock (note paper)
- Scor-pal
- Paper piercer
- Turquoise thread & needle
- Marrakech paper pack (Basic Grey)
- Foam mounting tape or dimensionals...
- Scallop punch
- Key hole punch (SU) or any shape you like

Step 1} Cut Vibrant Teal cardstock (to measure 11 by 6 inches)
& Score and fold notebook cover & Adhere scallops onto ends

Step 2} Cut, score, fold & scallop the ends of white note-papers (I used 4 sheets cut to measure 11 by 6 inches & folded in half.) In hindsight, I should have rounded the corners, by the spine, too. I'll have to do that when I refill it for her. :O)

Step 3} Open note-papers to the middle (centerfold) and line up inside the notebook cover

Step 4} Pierce for stitching (or Sew on a machine, if you like)

Step 5} Remove the note-papers from book cover for a moment to start off your stitch knot it & adhere end

Step 6} Stitch the spine (of course you could use a sewing machine, if it can handle the layers. I am clueless in that department, so I stick to this.) :O)

Step 7} Hide thread ends after the final stitch

Step 8} Adhere a decorated panel to the front of the notebook. This is that BG Marrakech and some more stitchin'

Step 9} Dry fit the decorative bits-Line up the bookmark behind your image to see where to put foam tape

Step 10} Add foam tape to the back of your image (or dimensionals) with the bookmark in place. [I went a little nutso boingo here, hey?But Kat's worth at least a hundred and seventy three foam bits.] :o)

Step 11} Adhere the image (after removing the bookmark)


Step 9} Dry fit the decorative bits-Line up the bookmark behind your image to see where to put foam tape

Step 10} Add foam tape to the back of your image (or dimensionals) with the bookmark in place. [I went a little nutso boingo here, hey?But Kat's worth at least a hundred and seventy three foam bits.] :o)

Step 11} Adhere the image (after removing the bookmark)

Step 12} Slide the bookmark under the image
Thanks for visiting! Hope there was something useful to Ya in here,


.jpg)


0 comments:
Post a Comment