Missed you yesterday! Hope you had a great Saturday. I was down for the count, so I took a random day off. I'm back at it now, though, and a little bit early with this LPS Monday post. :O)
This little set is for the latest Little Paper Shop colour challenge. Well, the card isn't little (it's a 5 1/2 inch square card) but the purse is wee (it's 3 inches tall.) It's a new template..it's a really simple one--just a rectangular box & some sides--but hopefully you might dress it up a bit & have some fun with it.

1...Little Paper Shop colour challenge
2...cheap tricks for custom ribbon
3...new template for a little tall purse (3" high)
4...how to make a version of it
-1-

LPS colour challenge #12
I've never made a card with pink & red before. I always start a colour challenge with a bit of the grumbles, wondering how am I going to use those colours (at the boring heart of me, I just want everything to be turquoise) LOL. When I do go for the colours, though, I'm always so glad that I did.
The image is from the LPS set {Garden Gate}:

to make it, I did this stuff...

to make it, I did this stuff...
1) Embossed the image with silver encore ink & clear embossing powder on watercolour paper
2) Painted the grass & sky with an ink wash (Kiwi Kiss, Certain Celery, & Tempting Turquoise from SU)
3) Paper pieced the chair seats with some old red Basic Grey paper
4) Coloured the tea cups & covered them in Crystal Lacquer
5) Stitched a ribbon on for the table cloth...
I bought this May Arts ribbon in the "I want it white" collection, & am loving colouring the dots with copics:
It's a fast way to get a custom look, but another neat thing is that the copics let you shape the ribbon a little. They stiffen it some, so it's easier to get a bow with a shape you like. :o)
2) Painted the grass & sky with an ink wash (Kiwi Kiss, Certain Celery, & Tempting Turquoise from SU)
3) Paper pieced the chair seats with some old red Basic Grey paper
4) Coloured the tea cups & covered them in Crystal Lacquer
5) Stitched a ribbon on for the table cloth...
-2-
I bought this May Arts ribbon in the "I want it white" collection, & am loving colouring the dots with copics:
It's a fast way to get a custom look, but another neat thing is that the copics let you shape the ribbon a little. They stiffen it some, so it's easier to get a bow with a shape you like. :o)
-3-
-4-
...make a little tall purse:
(with feet)

(with feet)

This little purse has a bunch of layers of cardstock to make it sturdy, but you could make a quick version of it with less than half a sheet of cardstock & two little pieces of patterned paper.
It might make a nice wedding favour box since it uses so little paper. It's small (3 inches high) but it would fit a wee gift nicely (a pair of earrings or a lip gloss, maybe?)

- Black cardstock
- Basic Grey 6x6 paper packs: Marrakech & Porcelain
- Double-sided tape
- Thread & needle
- Wire & beads

Step 1} Print little tall box template (print it on the back of patterned paper if you like.) Cut out box & side panels & add stitching if you like

Step 2} Adhere it to cardstock & trim it

Step 3} Make scallop trim for the panel bottoms by adhering a strip of patterned paper to cardstock.

Step 4} Add beads to the feet or other embellishment.

Step 5} Adhere them to cardstock & trim (This is an optional step that makes them match the cardstock you use for the box, makes thinner papers stronger & it hides the stitching mess too) :O)

Step 6} Build the box & attach the panels (raising the box up a little can create feet for your purse)

Step 7} Depending on your curves, you might want to trim to level off the feet. I think I'd use a scallop punch next time & then punch the cardstock to match before sticking it all together. That way it'd be more stable. :O)
...Please overlook the fact that this side of the box has birdie cages that defy gravity (I put the paper on upside down. It's the back, ya that's the ticket--it's the back.) ;O)

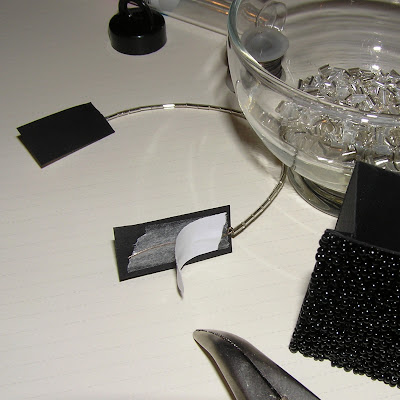
Step 8} Attach the handles by cutting a piece of cardstock to fit in the side of the rectangular box & adding a beaded wire handle to it with some really good double-sided tape...

Step 9} Adhere the handle & cardstock pieces in each side of the purse box.
...and there ya have it.... :O)
Thank you so much for taking time to stop in!
Hope you liked this. :O)
P.S. Next post will be on Tuesday mornin' :O)
P.P.S.

If you would like some more specific beaded handle
instructions, please see this post

Purse templates galore here.


0 comments:
Post a Comment