StampznewBright

  • Subscribe to our RSS feed.
  • Twitter
  • StumbleUpon
  • Reddit
  • Facebook
  • Digg

Monday, 13 July 2009

Your background stamps emailed me...

Posted on 02:26 by Unknown
...They said they want some LOVE already! heehee ;o)


Don't background stamps seem to have taken a backseat, lately? O Admit it, Dear Reader! You neglect old Bob the background stamp a little. You loved him once upon a time, but left him high and dry once he got boring--without so much as a Dear John letter, I might add. ;o) At least, I know I did. Is it time to rejuvenate that love affair, perhaps?


1...Preview of LPS set {Beary Best Katie} & enter to win it!
2...LPS Sketch challenge
3...Techniques: Stuff to do with background stamps Part #1: Magic pattern stamping
4...Cheap tricks: Sanding & White ink for fine highlights
5...Digital variation of magic patterns

-1-

{Beary Best Katie}

This new LPS set is one beary sweet set! teeheehee ;o)

They don't come any cuter than this:
{Beary Best Katie} from Little Paper Shop
(releases tomorrow July 14th)

Leave a comment on the LPS blog and be entered to win Katie & her bear!

Katie is an outline stamp just like yesterday's little angel & the pattern stamping is the same too. There's a tutorial below for how it was done,

but first my backwards take on the newest LPS sketch...

-2-


Don't know how I managed to reverse the squares on this.
(It was not an act of rebellion) but...here's the real sketch:


If you'd like to join us, please do!
Play along with our challenge this week and a winner will be announced next week to win this set!
You
have until next Monday (the 20th) to play. :O) Details on the blog HERE

-3-

Stuff to do with Background stamps-Part #1


...do magic pattern stamping


Your outline stamps told me that they wanna feel
some magic with background stamps...

"Magic pattern" stamping that is...it's one way to get new life out of your background stamps (and strike up a new romance with outline stamps (past & present.)


  • Cardstock (any that will take embossing & maybe a bit of water)
  • Outline stamp
  • Background stamp
  • Black Craft/Pigment ink
  • Versamark (or clear embossing ink)
  • Clear embossing powder
  • Heat gun
  • Inks/markers (used here: a blend of Copic & water-based markers)
  • Optional (for masking): scotch tape


Summary of the technique: Stamp an image & colour any parts of it that you'd like to be solid, then heat emboss over it with a clear pattern background stamp & continue to colour. The embossing will resist your colouring and a magic pattern will appear. hehehe


Step 1}
Stamp your outline image, and emboss if you like. This is {Beary Best Katie}


Step 2}
Colour any areas that you would like to be solid (without pattern)


Step 3}
Emboss a clear background over your line image: Stamp a background stamp in Versamark (or any clear ink for embossing) add clear embossing powder & heat set. Press well if the first image was embossed. (You may still get a halo effect around your image a bit, but I actually like the pop it gives the image...)
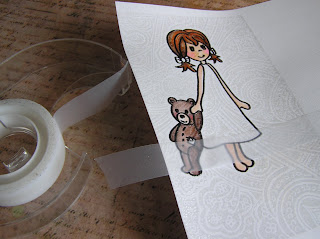


Step 4}
If you would like to mask, just use scotch tape. (The embossing means it won't stick too much-depending on the tape of course.) This image was masked to make a baseboard behind Katie & Bear.


Step 5}
Colour with whatever medium you like. I used a mix of water-based markers on a waterbrush as well as Copic markers for this. It is such a blast to watch the pattern appear!
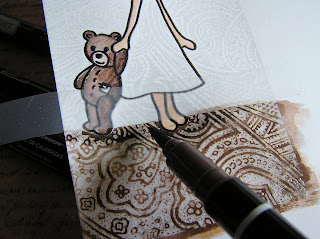


Step 6}
Directly marker it if you like:
Applying colour directly with a marker will give you nice deep shadows to ground your image or just bold colour contrast with the emboss resist background pattern.

If you want, you can experiment with layers of colour to get the most out of your markers & apply them in different brushstrokes to add interest.


Step 7} Blend with a waterbrush, if desired. It's a soft way to add other colours. It may be a good idea to avoid oversaturating the paper with water. If you get curling, dry it under a stack of books, or cover the entire back of your image with adhesive and the curl will go away.

I like how you can make patterned wallpapers & how easy it is to add depth using deeper colours in areas.
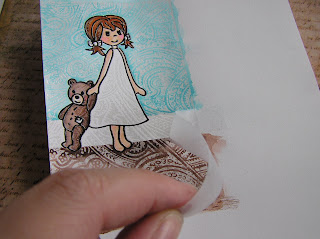


Step 8}
Peel the scotch tape mask to reveal the white baseboard.
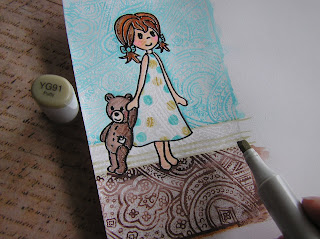


Step 9} Add shading to give your masking some depth (in this case, the baseboard.) I just drew lines with the chisel end of a Putty Copic marker to mimic the profile of a baseboard.

Colour in dots or patterns if you like. (Katie's dress got some polka dots.) :O)

-4-

(sanding embossing powder)


You can sand embossing to reduce the shine, or for a matte look. Of course, you'll want to avoid sanding too deeply, so you don't blur the black ink/embossing underneath the clear.

Sanding is handy for photographing your cards too, since them un-sanded embossing glare can make them difficult to shoot--though the technique never seems too shiny to me in person-depends the embossing powder you use, I imagine. :O)


(White ink for fine highlights)


A couple of teeny dots of white acrylic ink can go right on
top of embossing for sneaky fine highlights. :O)

-5-

(a digital magic pattern variation)

A) Print out any digital image or paper you like
B) Heat-set or emboss to prevent it from blurring
C) Stamp over it with clear embossing & colour it

Magic pattern stampin's is handy for adding some dimension & pizazz to digital images too. :O)
Thanks for readin' or lookin'!


P.S. You can see some gorgeous previews of these 2 new sets on the LPS blog here.

P.P.S.

(with magic patterns)

Magic pattern stamping on vellum :

(fun since you can colour from the
back of the vellum cardstock too)
&
Magic pattern silhouette stamping:
(colouring sections in black)

&
Magic Pattern Blooms tutorial:

(affordable perty 3D flowers)
Email ThisBlogThis!Share to XShare to FacebookShare to Pinterest
Posted in cheap-tricks, Faves, LPS, techniques, Tutorials | No comments
Newer Post Older Post Home

0 comments:

Post a Comment

Subscribe to: Post Comments (Atom)

Popular Posts

  • free Butterfly Silhouette .studio cut files (in 3 styles)
    Hi, All! Here are those butterfly Silhouette .studio cut files. They are for only for the Silhouette machine... But I do hope to share other...
  • DIY digital paper (some freebies)
    The lull in posts (over the last couple of days) was for me to finish up this looooong post I've been wanting to share with you for eons...
  • New Popcorn Box template set (pretty stamp room storage) :o)
    Are you in the mood for a template or two? I was going to wait until I had really good photos and a full pictorial, but then I would take fo...
  • Missing with a migraine, Craft room BEFORE pics, & LINKs for Organizing the craft room
    Edited to add: Sorry guys. I feel like I was hit by a truck. Migraine's lasted so long... but I will be back with a post by tomorrow eve...
  • Graphics Fairy Inspiration (+vintage printables)
    Thank You all so much for your wonderful comments about the papers I've been obsessed with. Your kind words make me grin so big that I g...
  • "Honey, I shrunk the stationery!" (Hero Arts typewriter notebook)
    Still trying to make more of my cards into little gifts. This Hero Arts typewriter card is another take on the card turned refillable notebo...
  • 3 Clean And Simple cards (with SRM stickers)
    You guys may know that I was tragically born without the gene that let's you achieve a C lean A nd S imple card. ;-) Not sure why I find...
  • Making Your Own Colour Shimmer Sprays--Links & Info
    Info & Links Links for how to Mak e yo ur o w n Sh im mery s prays: (These are for you sweet Beth! oxo) ( more info on these colours in...
  • over 100 free pattern overlays ... at a glance
    Would you believe that the free overlay total is at 139 overlays and counting? (I might have a wee little addiction) ;-) Since overlays can ...
  • Felt-based cards (Rock-a-Bye Baby tutorial)
    New idea, Old projects.... I've been debating whether or not to post some older projects/tutorials since the big bad insecurity beast...

Categories

  • 'Mouse'-the-cat (10)
  • *TEMPLATEs (98)
  • 3D-projects (144)
  • A-Day-For-Daisies (7)
  • Amber Ink (9)
  • Angel's-Landing (2)
  • BASICS (47)
  • Blogging-tips (7)
  • Caardvarks (48)
  • Cat's-Pajamas (2)
  • cheap-tricks (224)
  • Christmas (33)
  • Claire-Keay (2)
  • Cricut (3)
  • cut-file (2)
  • Cuttlebug (45)
  • decor (6)
  • Digital-Images (131)
  • Distress-Inks-etc (14)
  • DIYstamps (1)
  • Eat-Cake-Graphics (11)
  • Faves (207)
  • Fred-She-Said (5)
  • Freebies (77)
  • GESSO (9)
  • Halloween (10)
  • Heather Ellis (3)
  • Hero-Arts (14)
  • ISC (7)
  • Jessica-Sprague (2)
  • Just-Rite (2)
  • LPS (63)
  • Mo's-Digital-Pencil (16)
  • My-Favorite-Things (33)
  • organizing (7)
  • Other-People's-Tutorials (36)
  • Paper-Garden-Projects (54)
  • Paper-Temptress (39)
  • Punches (21)
  • Purple-Onion-Designs (23)
  • S.U. (1)
  • SCOR-PAL (4)
  • silhouette (4)
  • Skipping-Stones-Design (7)
  • Squigglefly (6)
  • SRM-Stickers (8)
  • techniques (191)
  • templates (26)
  • Tiffany-Doodles (4)
  • Tutorials (252)

Blog Archive

  • ►  2013 (16)
    • ►  July (4)
    • ►  June (4)
    • ►  May (3)
    • ►  April (1)
    • ►  March (1)
    • ►  February (3)
  • ►  2012 (53)
    • ►  December (2)
    • ►  November (2)
    • ►  October (1)
    • ►  August (3)
    • ►  July (2)
    • ►  June (5)
    • ►  May (7)
    • ►  April (8)
    • ►  March (9)
    • ►  February (13)
    • ►  January (1)
  • ►  2011 (74)
    • ►  December (1)
    • ►  November (5)
    • ►  October (10)
    • ►  September (9)
    • ►  August (12)
    • ►  July (5)
    • ►  June (9)
    • ►  May (2)
    • ►  April (6)
    • ►  March (7)
    • ►  February (4)
    • ►  January (4)
  • ►  2010 (84)
    • ►  December (7)
    • ►  October (1)
    • ►  September (6)
    • ►  August (1)
    • ►  June (1)
    • ►  May (7)
    • ►  April (21)
    • ►  March (3)
    • ►  February (17)
    • ►  January (20)
  • ▼  2009 (234)
    • ►  December (16)
    • ►  November (21)
    • ►  October (11)
    • ►  September (23)
    • ►  August (29)
    • ▼  July (26)
      • Susie Surprise at Paper Garden Projects: Woo hoo!
      • Winter Wonderland Gatefold with Belly Band (Cuttle...
      • Free-hand cut D.I.Y. Cereal box Cuttlebug or Press...
      • Two Peas videos by Jennifer--Link Index (inspiring...
      • Garden Furniture Card & a Little Tall Purse (templ...
      • Caardvarks Shower Challenge (CC&M acetate gift car...
      • Cuttlebug Challenge! Zenware altered Circus box
      • Cuttlebug Challenge #41! (and I'm a crazy clown) :o)
      • Little Bitty Paper Temptress posting :O)
      • LPS Sketch Challenge: {Beary Best Katie} house
      • Creative Cuts & More-Caardvarks wedding shower set
      • Some Digital Grooviness (enabler alert: digi shopp...
      • Paper Garden Projects Birthday Notebook with a Boo...
      • City Salon Anya
      • Little Paper Shop Release Day!
      • Your background stamps emailed me...
      • Little Paper Shop Preview {Angelic Jena} cloud card
      • DIY digital paper (some freebies)
      • Cuttlebug Challenge Blog shopping scoop!
      • Sticks and Stones and Animal Homes (Cuttlebug Chal...
      • You Rock Allison! (LPS sketch challenge)
      • Organizing with Caardvarks & Sheetloads (a Corkboa...
      • Quilted Cuttlebug Squares
      • Cuttlebugged Felt (+some BIG news) *GRIN* :O)
      • Popsicle Bucket (with Purple Onion Design stamps)
      • Special-tea (Do it Yourself) teabag ;O)
    • ►  June (10)
    • ►  May (16)
    • ►  April (26)
    • ►  March (22)
    • ►  February (27)
    • ►  January (7)
  • ►  2008 (39)
    • ►  December (14)
    • ►  November (25)
Powered by Blogger.

About Me

Unknown
View my complete profile