


Firstly, thank you so much for your kind comments. You certainly
know how to make a gal blush over some ol' cereal box stuff!
and today's project...

and today's project...

This is an embossed gatefold card--
with a belly band that you slide off:
the inside has a pocket with a little sentiment

the inside has a pocket with a little sentiment
.JPG)
that says...

"The snow melts on the road
between friends' homes"
...and when you pull the card out of the pocket,
there's a snowy sky:

The sky is stitched with little embroidery knot snow.
i'm knot crazy! ;o)
& here's the steps that went into putting this jazz together...

1...Cuttlebug Challenge (Wednesday Inspiration #42: gatefold & digital)
2...Copics on white embossed image (with Digital/Stamped images)
3...cheap tricks: snowy scene with ripped Q-tip snow
4...gatefold construction (assembling bits & embellishments)-1-

Cuttlebug Challenge Blog
Wednesday Inspiration #42 (Gatefold & Digital)
This was for the Cuttlebug Challenge Blog
Here's the challenge link

(#42 Gatefold for Friendship week)

This was for the Cuttlebug Challenge Blog
Here's the challenge link
(#42 Gatefold for Friendship week)
It might seem strange that this was made for this week's the Cuttlebug Challenge Blog's Be Inspired Wednesday (#42) in honour of friendship week. "What?" You might ask; "isn't this a little frosty for friendship?" But my BFF Kimmy expressed a like for a card I made in these colours with this stamp, so winter it is! :O)
Hope you can play along with us!
-2-

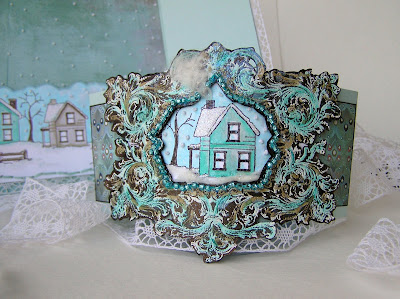
Copic markers on white embossed digital image
(works on stamping too though!):O)


It uses a gorgeous digital frame created by Maggie (who is Mlamarre Designs). :o) The frame is embossed white--straight out of the printer-- and coloured with copics.
I know some of you stampers may be getting tired of digital image tricks, but please rest assured that this technique works with stamps & copics too! :O)

- Digital Frame from Mlammare designs....
- printed from computer onto...
- Bronze Stardream cardstock from Paper Temptress...
- ...embossed with white embossing powder & heat gun...
- ...coloured with Copic markers
- Scissors
- exacto knife/hobby blade
Step 1} Print & Emboss the frame. The metallic cardstock I used (Bronze Stardream cardstock from Paper Temptress) lets you emboss right out of the printer & white embossing powder shows up on the dark cardstock. It's like magic! giggle-giggle.
You could also emboss in silver or other colours, of course. I didn't worry about the dots of white embossing, since I knew I was cutting them away, but you could use an embossing buddy, if you're not lazy like me. :O)
Step 2} Colour the embossing with Copic markers (other alcohol markers might work too.)

--> Colour goes on surprisingly quickly (but avoid overworking so it doesn't muddy.) This might sound intricate, but it's super speedy. I'm just trying to share everything I can think of with ya...
--> Use your finger for speedy blending: smudge the copic marker with your finger right after applying a stroke of it. The ink will blend slightly and stay in nooks & crannies for a nice texture & softer lines.
--> Layer colours for shadows: Three turquoise shades were used on this to get shadows in the white embossing. To get shadows of the frame, I used a Dark Bark Copic right onto the bronze cardstock.
--> Please see the "disclaimer" below for ideas on how to preserve your Copic marker tips with this technique. :O)
Step 3} Cut the frame out. Use an exacto knife or hobby blade to cut the middle, if you like.

Step 4} Pierce it around the inside of the frame

Step 5} Bead it (if you like)

(ways to preserve Copic tips)
-->Avoid colourless blender: It will smudge & muddy your white embossing powder. To pull colour or blend I use a lighter version of the colour I've applied (like a Frost Blue BOO to remove an Aqua BG15)
-->White embossing powder may come off on your Copic marker: To avoid wrecking your tips, you can use the chisel side (or broad tip) of the marker (which I hear many people never use anyhow.) :O)
-->My favourite alternative: If you have refills for your Copics, you can paint them right onto the embossing with a paint brush. I only have one refill--so far, hehehe.
-3-

...Snowy scene with ripped Q-tip glitter snow
- Stamps (Winter Neighborhood)
- A q-tip (cotton swab or cotton ball)
- Adhesive (I like Crystal Lacquer)
- Glitter
- Sakura Quickie glue pen

Step 1} Stamp & colour a scene. This is Winter Neighborhood, by Eat Cake Graphics, from Paper Garden Projects. It's embossed with Chocolate Chip craft ink & clear embossing powder.

Step 2} Add cotton & glitter:
A) rip the top of a Q-tip or cotton swab (or use a cotton ball) glue it onto the areas where you'd like snow. I used Crystal Lacquer for this.
B) sprinkle with glitter.
The cotton bits make fun chimney smoke too:
-5-

the gatefold construction:
.JPG)
This is basically two simple gatefold cards an outside one (white) and an inside one (blue) In other words, the blue one acts as a liner for the white one.) Lining it lets you stitch both of the parts & hide all the mess easily.
- Neenah White cardstock (outside gatefold)
- Soft Sky cardstock (inside gatefold)
- BasicGrey Marrakech 6x6 pack (patterned paper)
- Blue & white embroidery thread & needle
- Paper piercer
- Double-sided tape
- Crochet lace trim
- Copic markers
- Computer generated sentiment
- Snow Dots embossing folder
- Floral Fantasy embossing folder
the outside gatefold:

To make the white outside gatefold card:
A) Cut a piece of white cardstock to measure 11 by 5-1/2
B) Score it at the 2 6/8 inch mark and the 8 2/8 inch mark & fold flaps in
C) Emboss each flap with a Cuttlebug embossing folder (this is Snow Dots)
D) Pierce along the outside of the 2 flaps & stitch it if you like
Since it's going to be lined you could add ribbon or other trim to the flaps:

I cut crochet trim in half & adhered it to the edges.
the inside gatefold (or liner):

Create a second gatefold to line the white one (scoring at the same spots--at the 2 6/8 inch mark and the 8 2/8 inch mark--and then dry fitting to see if it needs scoring again just beside your first score marks.)
Cut some patterned cardstock for the sky & sides. (The sky was cut with the cloud shape at the top & stitched with those embroidery thread knots for snow.)
the pocket:

The pocket was made by...
A) ...stamping the Winter Neighborhood on Neenah white & colouring it
B) ...cutting it out with a cloud shape at the top
C) ...adding some snow embroidery knots,
D) ...putting some quickie glue and glitter to the roofs etc.
E) ...sticking some lace on the bottom & stitching.
the sentiment:

The sentiment was...
A) ...printed the sentiment off the computer & cut up the words
B) ...stuck the words on some white paper & cut them out again (to make white frames)
C) ...stuck them on a card (with patterned paper & a curvy embossed white topper) (curvy template here)
D) ...stitched a bit (stitches on the curvy bit & at the top of the words)
E) ...backed it all with a plain piece of cardstock for writing on...
....then it can slide in the pocket:

the belly band:

To make the belly-band, I did this stuff:
A) Cut two strips of cardstock: the first measuring 2-2/8 x 11 inches (to fold around the card) and the second measuring 2-2/8 x 5-3/8 inches and as a panel on the front.
B) Scored the belly band at at the 2 6/8 inch mark and the 8 2/8 inch mark and again about 1/8 of an inch to the left & right of that-(makes room for the layers of the card) :O)
C) Cut a piece of BasicGrey Marrakech patterned paper to measure 2-2/8 x 5-3/8 inches, distressed the edges with a Dark Bark Copic marker, & adhered it to the front panel.
D) Adhered the image under the embossed frame & stuck it to the front of the belly-band.
E) Slid the belly band on over the finished card:

and that's it...
Hope all this chit chat had something useful for Ya! :O)


0 comments:
Post a Comment