StampznewBright

  • Subscribe to our RSS feed.
  • Twitter
  • StumbleUpon
  • Reddit
  • Facebook
  • Digg

Saturday, 17 April 2010

Millie Mouse High-Backed 3x3 Box (pictorial) :o)

Posted on 10:35 by Unknown
MFT 3x3 Box Pure

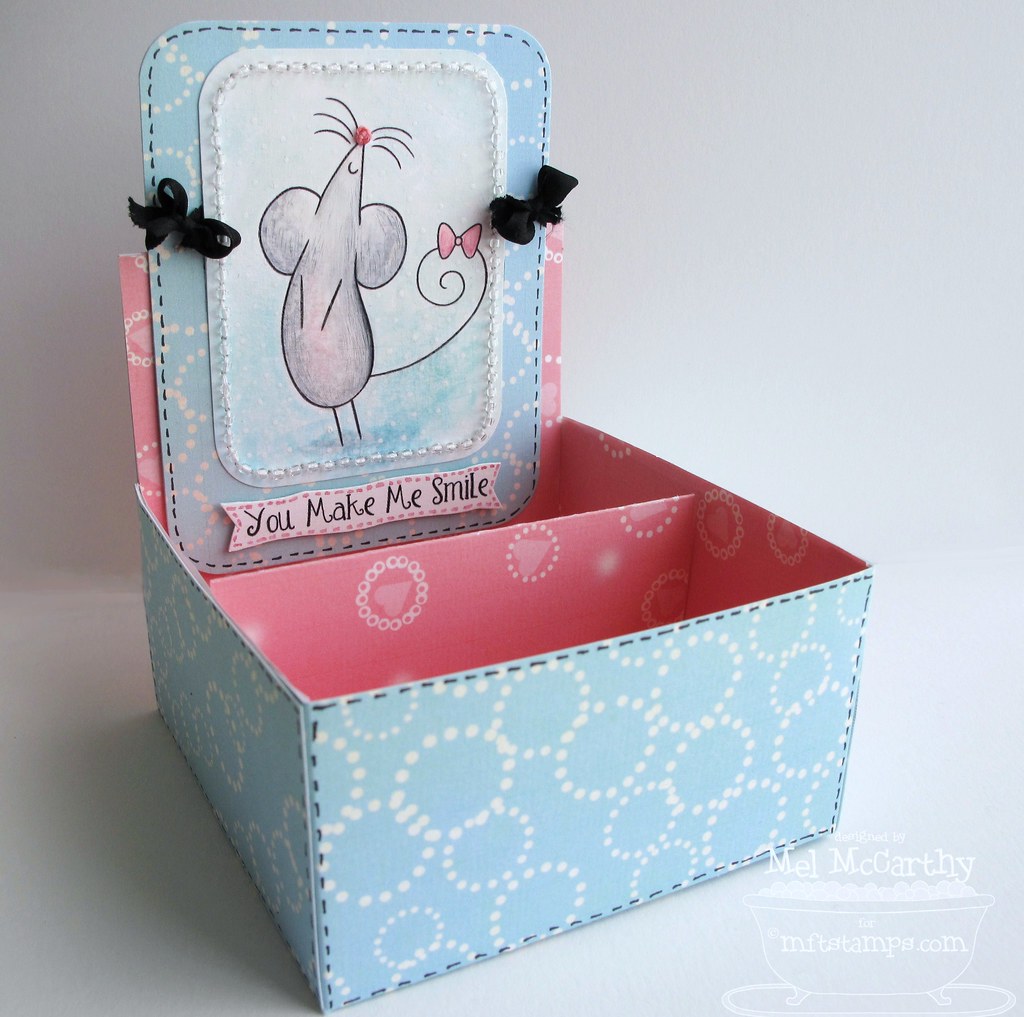
Here's that pictorial for the 3x3 box with the high back & Millie. :-D

Something about that little Millie the Mouse's smiling fur face just makes ya grin!
(..but I am biased, because I have quite the thing for "Mouse" critters):


Sorry, more Mouse the kitty photos. ;o)
We didn't get too many of these "baby" pics, so they're precious. lol


Make a high backed 3x3 Box
(with the MFT templates)


All the templates used to make this high-backed 3x3 box, with a divider, come in the MFT 3x3 Baby Bump template set ($3.95 here)
  • MFT set Millie the Mouse
  • MFT Summer collection & Spring collection (digital papers)
  • Heavy weight 100lb white Sweet tooth cardstock (for the boxes)
  • Heavy weight white Sweet tooth cardstock
  • Text paper (to print digital papers
  • Gesso, Black Archival Brilliance ink, clear embossing powder, heat gun
  • Copic Markers (or what have you)
  • Paper cutter and-or Scissors, Scoring tools, Paper piercer, exacto knife
  • Glue Glider Pro Perma Tac, Tombow Monomulti
  • Computer & Printer
  • Clear seed beads, needle & white thread
  • Black silk ribbon (May Arts)
  • Corner rounder punch (or something circular to trace)

Step 1) Make the box bottom with a digital pattern on it:


1
A) Print the template for the box bottom template on one side of a piece of heavy cardstock & the MFT Summer digital paper on the other. (Please print the lid instead if you'd like to turn this into a business card holder: it's slightly larger & fits business cards perfectly.) :o)


1B) Score, cut, & assemble the box.

Step 2) Line the box bottom with another pattern:


2
A) Print the liner template on one side of text weight paper. Flip that paper & print the pink MFT digi paper on the other side


2B) Score along the dotted lines of the liner template, Cut on the solid lines, & then crease the folds


2C) Fit the pink patterned liner into the box & adhere it there.


Step 3) Add the insert (box divider):


3A) Print the inserts for the MFT 3x3 box on one side (of heavy weight cardstock) and print the digi paper on the other side.


3B) Cut out the single insert (box divider) score it & fold it mountain, valley, mountain. This photo (above) shows the underside; the other side is pink & patterned.


3C) Add adhesive to the two middle sections (the valley) of the divider.


3D) Press those sides together to make the divider (now would be a good time to dry fit to see be sure it fits perfectly or trim if need be.


3E) To affix the divider in the box, simple expose the remaining white sides & apply adhesive on them...


3F) Then, simply put the divide, adhesive side down, into the bottom of the box & press to secure it.


Step 4) Build the high back to the box:
[using the remnants of the "insert" template you printed in step 6]


4A) Cut the 2 gift card inserts out (along the solid lines) but do not score them anywhere.


4B) Apply Adhesive to half of the insert piece.


4C) Affix that first gift card holder piece to the back of the box (on the inside.)


4D) Apply adhesive to the entire back of the second gift card holder piece.


4E) Stick that other half of the gift card piece to the back of the first one (on the outside at the very back of the box.)


Step 5) Add the image (and a mat for it):

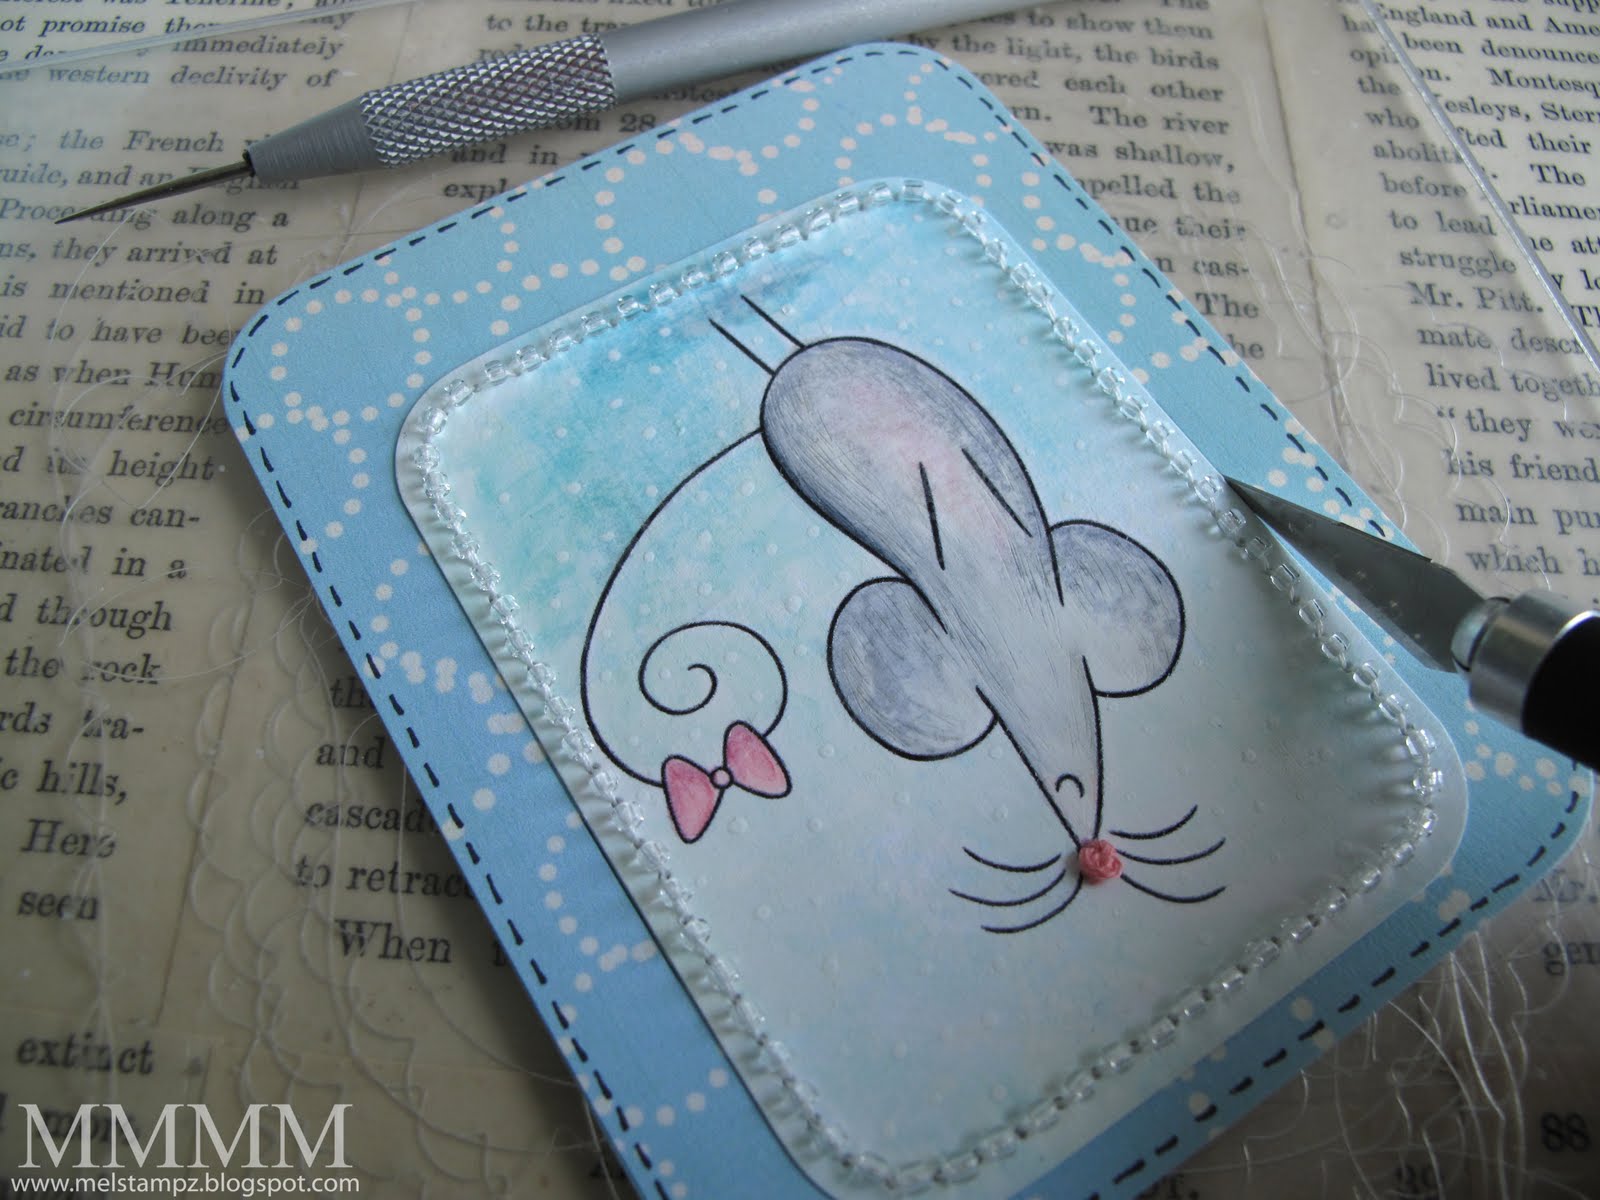
This happy little cutie pie is Millie Mouse from My Favorite Things...


Millie was made by doing this schtuff....

5A) Apply gesso to cardstock
5B) Once dry, stamp Millie on it Black Brilliance ink.
5C) Emboss her in clear embossing powder & heat it to melt it (heat gun.)
5D) Scratch her fur texture using a paper piercing tool.
5E) Colour her with Copic markers.

{The texture on Millie & the background comes from applying Gesso (an artist's primer) --it was applied roughly with a piece of cardstock. More info about the "gesso, scratching, & copic" technique here.} :o)


5E) Trim around Millie Mouse & round the corners. (For this project, she ended up cut to measure 2 2/8" wide by 3" tall.)


Step 6) Make a mat for Millie:

6A) Cut a mat (from a piece of the MFT Summer digital paper) This mat measures 3" wide by 3 and 3/4" tall.


6B) Round the corners of the mat & add faux stitching to the mat with a black multiliner


Step 7)
Give Millie a little knotted embroidery thread nose:


7A) Adhere Millie to the mat. Pierce a hole in her nose.


7A) Get the thread started:
  • Thread a needle with embroidery thread. (I used coral coloured thread--all 6 strands).
  • Put the needle through the hole you pierced in Millie's nose (from the back of the image) and pull the needle up through to the front of the image.
  • Adhere the thread end at the back.


7B) Tie a basic knot.


7C) Go back down through the hole in Millie's nose (beside the knot). Adhere the thread end at the back of the image & cut the thread to trim it off of the needle.


Step 8) Pierce around the outside of the image & stitch on beads (if you like) ;0)


Step 9)
Cut slits & add the ribbon:


9A) To create a more stable path for the cuts, drag a paper piercing tool to score a line where you want to cut...


9B) Cut a slit on either side of the image...about an inch long 2/3 up.


9C) Thread black ribbon through the slits & tie it in little bows (May Arts silk ribbon.)

Step 10) Stamp the sentiment (also from the Millie Mouse set); cut it into a free-hand flag shape, and add pink stitches with a copic marker.


Step 11) Adhere the image to the back of the box.


Step 12) Add black faux stitches to the box with a black multiliner. (My "lysdexia" is kicking in again: this would've been easier to do before assembling the box, hey?)

and there she is:


Thanks so much for taking time out of your busy day!


(Please click if you'd like to visit the blog
from an email or from a reader.)
Email ThisBlogThis!Share to XShare to FacebookShare to Pinterest
Posted in 3D-projects, Faves, My-Favorite-Things, techniques, templates, Tutorials | No comments
Newer Post Older Post Home

0 comments:

Post a Comment

Subscribe to: Post Comments (Atom)

Popular Posts

  • free Butterfly Silhouette .studio cut files (in 3 styles)
    Hi, All! Here are those butterfly Silhouette .studio cut files. They are for only for the Silhouette machine... But I do hope to share other...
  • DIY digital paper (some freebies)
    The lull in posts (over the last couple of days) was for me to finish up this looooong post I've been wanting to share with you for eons...
  • New Popcorn Box template set (pretty stamp room storage) :o)
    Are you in the mood for a template or two? I was going to wait until I had really good photos and a full pictorial, but then I would take fo...
  • Missing with a migraine, Craft room BEFORE pics, & LINKs for Organizing the craft room
    Edited to add: Sorry guys. I feel like I was hit by a truck. Migraine's lasted so long... but I will be back with a post by tomorrow eve...
  • Graphics Fairy Inspiration (+vintage printables)
    Thank You all so much for your wonderful comments about the papers I've been obsessed with. Your kind words make me grin so big that I g...
  • "Honey, I shrunk the stationery!" (Hero Arts typewriter notebook)
    Still trying to make more of my cards into little gifts. This Hero Arts typewriter card is another take on the card turned refillable notebo...
  • 3 Clean And Simple cards (with SRM stickers)
    You guys may know that I was tragically born without the gene that let's you achieve a C lean A nd S imple card. ;-) Not sure why I find...
  • Making Your Own Colour Shimmer Sprays--Links & Info
    Info & Links Links for how to Mak e yo ur o w n Sh im mery s prays: (These are for you sweet Beth! oxo) ( more info on these colours in...
  • over 100 free pattern overlays ... at a glance
    Would you believe that the free overlay total is at 139 overlays and counting? (I might have a wee little addiction) ;-) Since overlays can ...
  • Felt-based cards (Rock-a-Bye Baby tutorial)
    New idea, Old projects.... I've been debating whether or not to post some older projects/tutorials since the big bad insecurity beast...

Categories

  • 'Mouse'-the-cat (10)
  • *TEMPLATEs (98)
  • 3D-projects (144)
  • A-Day-For-Daisies (7)
  • Amber Ink (9)
  • Angel's-Landing (2)
  • BASICS (47)
  • Blogging-tips (7)
  • Caardvarks (48)
  • Cat's-Pajamas (2)
  • cheap-tricks (224)
  • Christmas (33)
  • Claire-Keay (2)
  • Cricut (3)
  • cut-file (2)
  • Cuttlebug (45)
  • decor (6)
  • Digital-Images (131)
  • Distress-Inks-etc (14)
  • DIYstamps (1)
  • Eat-Cake-Graphics (11)
  • Faves (207)
  • Fred-She-Said (5)
  • Freebies (77)
  • GESSO (9)
  • Halloween (10)
  • Heather Ellis (3)
  • Hero-Arts (14)
  • ISC (7)
  • Jessica-Sprague (2)
  • Just-Rite (2)
  • LPS (63)
  • Mo's-Digital-Pencil (16)
  • My-Favorite-Things (33)
  • organizing (7)
  • Other-People's-Tutorials (36)
  • Paper-Garden-Projects (54)
  • Paper-Temptress (39)
  • Punches (21)
  • Purple-Onion-Designs (23)
  • S.U. (1)
  • SCOR-PAL (4)
  • silhouette (4)
  • Skipping-Stones-Design (7)
  • Squigglefly (6)
  • SRM-Stickers (8)
  • techniques (191)
  • templates (26)
  • Tiffany-Doodles (4)
  • Tutorials (252)

Blog Archive

  • ►  2013 (16)
    • ►  July (4)
    • ►  June (4)
    • ►  May (3)
    • ►  April (1)
    • ►  March (1)
    • ►  February (3)
  • ►  2012 (53)
    • ►  December (2)
    • ►  November (2)
    • ►  October (1)
    • ►  August (3)
    • ►  July (2)
    • ►  June (5)
    • ►  May (7)
    • ►  April (8)
    • ►  March (9)
    • ►  February (13)
    • ►  January (1)
  • ►  2011 (74)
    • ►  December (1)
    • ►  November (5)
    • ►  October (10)
    • ►  September (9)
    • ►  August (12)
    • ►  July (5)
    • ►  June (9)
    • ►  May (2)
    • ►  April (6)
    • ►  March (7)
    • ►  February (4)
    • ►  January (4)
  • ▼  2010 (84)
    • ►  December (7)
    • ►  October (1)
    • ►  September (6)
    • ►  August (1)
    • ►  June (1)
    • ►  May (7)
    • ▼  April (21)
      • Oh Man oh Man is this BIG fun!
      • 2 Challenges--Pure Innocence Collage Shadow Box
      • Caardvarks' Coredinations Monochromatic Challenge!
      • Thank YOU! (teensy peek at a sneaky playful silly...
      • Blog tales of a toast-eating-zombie-stampire-hermi...
      • New MFT Set & Templates--- Sheltering Tree 4.5" box
      • Thank YOU! many miscellaneous sewing themed freebi...
      • MFT VIP Hop (Winter Sheltering Tree card)
      • How nifty is this Clips n Cuts perpetual blog hop!?!
      • Millie Mouse High-Backed 3x3 Box (pictorial) :o)
      • Link Love: GENIUS or gorgeous...
      • MFT 3x3 box with Gift-Card holder (pictorial)
      • Baby Bump MFT--3x3 Box (pictorial)
      • MFT Hop & Shop (and the secret template) LOL
      • Tonight's the night & Day 5 of the MFTeasers!
      • MFTeasers Day 4-Jolinne! (+Copic scatch on gesso ...
      • MFTeaser--Day 3 Tree Swing!
      • Meet some New Characters! (MFTeasers)
      • a couple of cutting ideas for paper flowers...
      • Embossed Fresco Flowers (with a 5 petal flower pun...
      • Caardvarks Photo Inspiration card (late late late ...
    • ►  March (3)
    • ►  February (17)
    • ►  January (20)
  • ►  2009 (234)
    • ►  December (16)
    • ►  November (21)
    • ►  October (11)
    • ►  September (23)
    • ►  August (29)
    • ►  July (26)
    • ►  June (10)
    • ►  May (16)
    • ►  April (26)
    • ►  March (22)
    • ►  February (27)
    • ►  January (7)
  • ►  2008 (39)
    • ►  December (14)
    • ►  November (25)
Powered by Blogger.

About Me

Unknown
View my complete profile