


Finally! The evil migraine beast seems to have hit the road! (I HOPE!)
and so.... without further ado, the tutorial for the gift-card version
of that My Favorite Things 3x3 gift box:
and so.... without further ado, the tutorial for the gift-card version
of that My Favorite Things 3x3 gift box:
Here's the top...
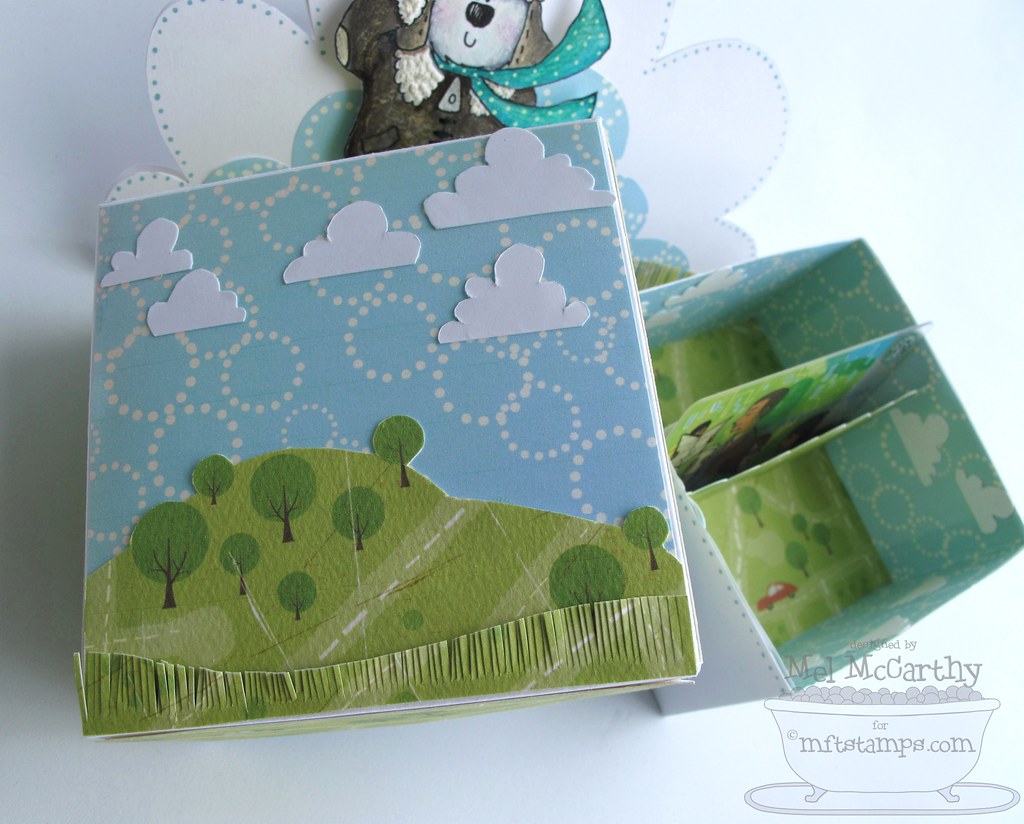
and Here's the inside...

The lid has dangling clouds in it (but more about that later...) ;o)

..make an MFT 3x3 box
with gift card insert:

- MFT Baby Bump 3x3 box template set ($3.95 here)
- MFT Summer collection (digital papers)
- Heavy weight 100lb white Sweet tooth cardstock (for the boxes)
- Text weight paper (to print the MFT digital paper)
- Green patterned paper--My Mind's Eye Abbey Road-Nice Ride
- Paper cutter and-or Scissors, Scoring tools
- Glue Glider Pro Perma Tac, Tombow Monomulti
- Computer & Printer
-1-


Step 1) Print the 2 MFT 3x3 box templates (bottom & lid) on cardstock.

Step 2) Score the box bottom & lid templates-- (score along the dotted line.)

Step 3) Roughly cut the templates (This is optional but it makes for easier and neater cuts) If you like, you can mark the top and bottom before cutting for reference when assembling the liner. (The liner will cover the marks later.)

Step 4) Finish finely cutting around the bottom & top templates; then, cut the tabs (I like to cut the black printer ink off of them by cutting just inside the template lines. Makes it nice & clean looking.)

Step 5) Crease the folds.
Step 6) Assemble the box bottom and top, adhering the tabs on the inside:

6A) Flip the box over so that the dotted lines are facing down.

6B) Add Adhesive to the 4 smallest tabs in the corners (marked ABCD here.)

6C) Assemble the box: adhere the larger tabs to the outside of the smaller tabs that you've put the adhesive on (with the smaller tabs on the inside. (Align the corners so they are nice & flush)
(Repeat the process for both the bottom & the lid.) :o)

Optional finishing detail:

Before assembling the box, you can add cut outs by marking center & punching out half of a circle (or another shape.) The side that has no tab cuts in it, seems to be the easiest to punch through (it means punching through one layer only.)
Then simply repeat the cut-outs for 2 of the side panels (if you use any.)
Then simply repeat the cut-outs for 2 of the side panels (if you use any.)
-2-
...make a lining for
the box bottom...

...and add clouds:
Step 2) Make some clouds:
(cutting them free-hand)
(cutting them free-hand)

Step 1) Print cut & score a liner for the box BOTTOM (MFT summer digital paper)

2A) Cut a scrap of cardstock.
2B) Fold it in half & draw a cloud on in pencil.
2C) Cut it out doubled (I find, for me, there's no need to cut perfectly on the pencil lines; just make some nicely rounded cloud curves)

2E) Cut some clouds in half to adhere inside the box bottom
(Saving some other clouds for decorating the box lid.)

2F) Adhere the clouds inside the bottom of the box
...add a gift-card holder insert:
Step 1) Make the gift card inserts:
(using the INSERTs template in the MFT Baby Bump 3x3 Box set)

(This photo shows the backside of the gift card inserts)
1A) Print two insert pieces (for the gift card holder) on the backs of patterned paper.
1B) Score it, cut it out, & crease the folds.
1C) Add a scallop or other border edging to it (scalloping or edging any side of each piece is fine, Add adhesive to only one half of each (the plain un-scalloped halves.)

Step 2) Adhere the first part of gift card holder (adhesive sticking it to the bottom of the box.)

Step 3) Adhere the second part of gift card holder behind the first. (adhesive sticking it to the bottom of the box for this one too.) :o)
Little Tip: For a perfect fit, dry fit the gift card holder before adhering it (with no adhesive on it) to see if it needs any trimming.

Step 4) Slide a gift card in between the 2 holder pieces
Since the gift card holder is not affixed on the sides, it will naturally lean back...

(...so that you can add a little gift or a letter, if you like as well. The box lid will sit just-so on top.)
-3-
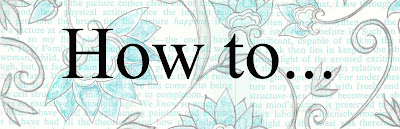
...decorate the box lid:

Lid OUTSIDE:
Step 1) Cut the pieces to decorate the sides
& the top of the box lid:
& the top of the box lid:

1A) To decorate the sides of the lid: Print the template for panels on the back of patterned paper & cut them out.

1B) To decorate the top of the lid: Cut a piece of the left-over scraps of the digital & patterned paper to make a scene:
the sky is a 3 1-4 inch square of MFT Summer White Circles digital paper to fit the lid;
the grassy hill is a 3 1/4" wide piece of the Abbey Road paper cut into a hill & fringed to make grass.

Step 2) Adhere the 4 smaller panel pieces to the sides of the lid.

Step 3) Adhere the square piece of MFT Summer White Circles digital paper to the lid flush with the top (the bottom will be covered up with the hill.)

Step 4) Adhere the hill & the grass.

Step 5) Adhere a couple of clouds to the summer sky. :-)
Lid INSIDE:
Line the lid inside
& add dangling clouds:

Step 1) Make a liner for the lid inside: Print the LID liner template, score it, cut it out. (This is more MFT Summer digital paper.)
Step 2) Make dangling clouds:
2A) Cut the double clouds (Please see above for full directions; cutting like this makes for tidy cloud bottoms.) :o)

2B) To make the clouds dangle (on a string) thread a needle & adhere the thread onto the middle of the cloud so it hangs straight.

2C) Fold the cloud over itself & adhere it to itself (as well as over the end of the thread, leaving the thread attached to the needle & checking to see if it hangs the way you like.)
Step 3) Affix the hanging clouds to the box liner:

3A) Pierce the liner with the needle to thread the cloud thread through to the back of the liner.

3B) Pull the needle & thread through so that the cloud is positioned & temporarily adhere the cloud on the front with low tack adhesive to keep it in position.

3C) Adhere the thread ends at the back of the liner & trim them.
(Repeat for each cloud.)
Now, the clouds will dangle in the liner:

So when the recipient opens the box, it'll have interactive fun. ;O)

3D) Insert the liner, with the clouds, into the lid of the box (dry fit, with no adhesive, to see if it needs trimming anywhere & then adhere it.)

So when the recipient opens the box, it'll have interactive fun. ;O)

3D) Insert the liner, with the clouds, into the lid of the box (dry fit, with no adhesive, to see if it needs trimming anywhere & then adhere it.)
...and that's all she wrote... ;o)


Thank You ever so much for stopping by today!
I'm SO sorry that I'm so very behind in email replies, but the computer screen is murder on my eyeballs with this capital-M-Migraine,

P.S. If you'd like to see a pictorial on how to make the matching cloud-shaped card
(or download the free cloud-shaped template) please see this post:
(or download the free cloud-shaped template) please see this post:


0 comments:
Post a Comment