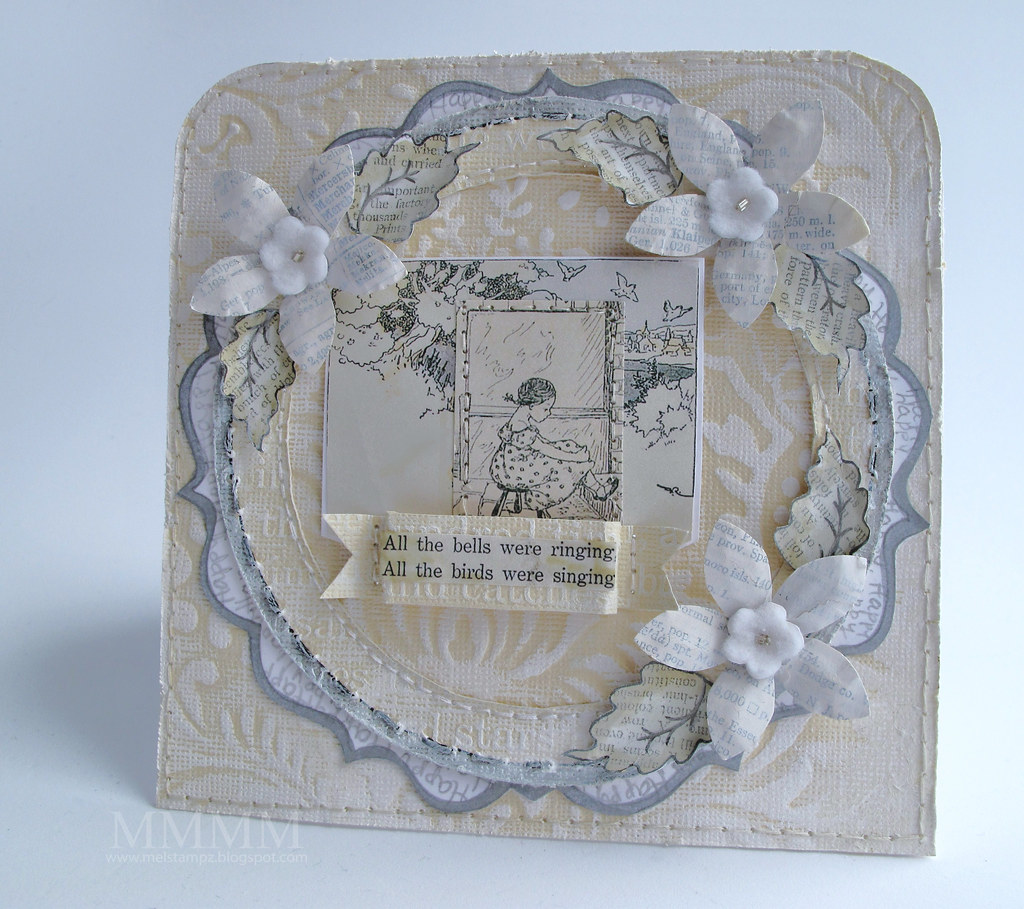
A little monochromatic Core-dinations fun for the latest Caardvarks challenge...

1...Caardvarks Celebrating Core-dinations Challenge!
2...How to make this monochromatic card (painted Core-dinations etc...)
-1-

This is for the

Core-dinations Monochromatic
Challenge here.
The cards the team has made are a droolfest!
Hope you can play along with us!
And for more inspiration you might wanna
have a visit here:


This is for the

Core-dinations Monochromatic
Challenge here.
The cards the team has made are a droolfest!
Hope you can play along with us!
And for more inspiration you might wanna
have a visit here:

-2-

- Core-dinations Jenni Bowlin Studio Core Impressions Collection (pre embossed yumminess!)
- White cardstock
- White acrylic paint, brayer, sanding block
- Circular stuff to trace (glue bottle, bowl, & cup), pencil, scissors
- Paper piercer, thread, needle,
- Nursery Boy RP 78 paper by the Bottled Image Paper Co.
- Flowers (felt, cardstock, old book pages, Mod Podge, paint, bugle beads)
- Fred She Said leaves (Dancing Daisies digital set)
- Putty Copic marker, silver gel pen, silver marker.

Step 1) Cut Core-dinations cardstock & Brayer a little white acrylic paint onto it (this is cut to measure 5.5 inches square.)
...the pure white colour with no dust...not to mention the way that snazzy waffle Core-dinations texture picked up the paint & looked like fabric. It looked even more fabric-like with a little bit of sanding, distressing, & stitching:

Of course, you could use a different colour of paint or a combination of colours for all kinds of crazy looks: faux verdigris copper with turquoise paint & rusty colours or something would be hot, no? :-D

Step 2) Round the corners. To get a large radius rounded corner with no punch, just trace something round in pencil, cut it out with scissors & erase the pencil line.
(This was a Judikin's diamond glaze bottle, but you could use anything, of course. Why even limit it to circles? You could make your own funky shaped corner "jigs" out of cardstock to trace instead.) :o)

Step 3) Pierce, stitch, & distress the Core-dinations cardstock.

Step 4) To make the folded card & round the corners on it:
A) Fold a piece of cardstock (this one is a piece of cardstock cut to measure 11 inches x 5.5 inches & scored in the middle to make a 5.5" square card)
B) Attach the textured piece with the rounded corners
C) Trim with scissors to cut the excess cardstock off
D) Distress with the edge of the scissors, if you like that look

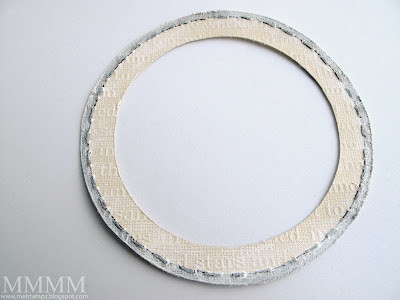
Step 5) Cut a circular ring frame from more painted coredinations pierce & stitch it with black thread (every other stitch.) Fill in between with faux stitches in black multiliner; then, smooge the stitches with white paint to distress them.
Cheap trick: Tracing circle stuff from around the house is great if you have no circle cutter (or no clue which box it's still packed in. hehehe)

Step 6) Make a scallop-type frame for under the stitched ring
--this one was made by:
A) Drawing a circle as a guide to doodle two curvy bracket shapes
B) Cutting the bracket shapes out to make a paper jig (to trace)
C) Tracing another circle on a piece of white cardstock
D) Laying the "jig" over the circle & tracing the bracket shapes all around it
E) Cutting it out with scissors & erasing the pencil line
F) Filling in the brackets with hand printed "Happy" repeated in pencil
G) Edging it in silver marker (from the dollar store)
H) Roughly cutting out the center (so it won't show under the Core-dinations frame)

Step 6) Cut out some images. (These images are from some paper my supah sweet best friend Kimmy gave me so I'm not sure if it's still available, but it's called: Nursery Boy RP 78 paper by the Bottled Image Paper Co.

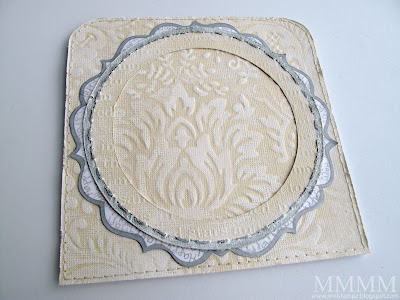
Step 7) Adhere the 2 frames to the card.

Step 8) Make some flowers.
( If you'd like to see more on how these flowers were made, please see these 2 tutorials: this one for the Mod Podge book page texture & this one for altering the 5-petal EK Success punch.)

Step 9) Add some flower centers.
These ones are wee homemade felt flowers:

To make some easy peasy cheap-o felt flowers:
A) Glue any old felt to cardstock.
B) Draw or stamp a flower on the back of the cardstock (or you could print digital ones before gluing the felt on, instead.)
C) Cut them out.
(I just doodled circles on the back of my white felt cardstock--to make 5 petals around a center--and cut it out. Pierced a hole in the middle & shaped them with my hands.)

Step 10) Make some leaves. These are Fred She Said leaves (from a Dancing Daisies digital set I bought here.) They were made like this...
A) Printed this silk flower vintage text on white 100lb cardstock
B) Printed the FSS leaves right over it
C) Coloured them with a Putty Copic marker
D) Doodled on the leaf vein lines with silver gel pen
E) Smooged over it all with white paint on my finger tip
F) Shaped them a little with my hands

Step 11) Adhere the Mod Podge & the felt flowers & stitch them on with silver bugle beads. Pierce and stitch the inside of the circular frame.

Step 12) Make a 3D sentiment flag shape:
A) Paint a piece of the Core-dinations with white paint
B) Cut into into 3 pieces: Cut one middle rectangular piece & fold it so it sits like a staple &
Cut two flag-type sides (to look like the ends of ribbon with V's cut in them)
C) Adhere the two flag bits to the back of the folded middle piece
Cut a sentiment from patterned paper (or stamp it) & glue it on

Step 13) Embellish an image. I glued the smaller image onto the larger, pierced around the edge & stitched.

Step 14) Adhere the stitched image inside the frame.

Step 15) Adhere the sentiment flag & pierce it along the sides.
...and then you have some monochromatic-ness:

Thanks for taking time to visit;
hope your day is filled with happy!
(Please click if you'd like to visit the blogfrom an email or reader)


0 comments:
Post a Comment