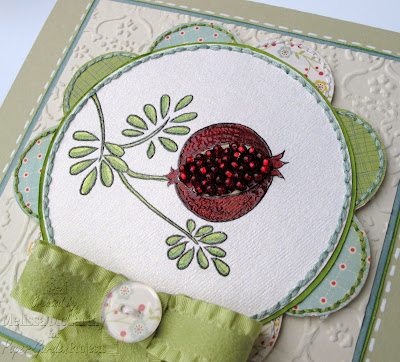
I love pomegranates madly, so I drew this one.
They feel wintry to me (for the PGP Winter Wonderland hop)
since they are in season then & we always nosh on them at Christmas.
The 2 cards here have seed beads sewn on the pomegranate...They feel wintry to me (for the PGP Winter Wonderland hop)
since they are in season then & we always nosh on them at Christmas.


1...Paper Garden Projects Blog Hop & prize info
2...how to...beaded pomegranate card
3...Pomegranate digital image freebie
-1-
 (and get a better look at the Frosty Prize)
What you'll need to do to win :o)
1) Follow the hop order (below)--visit the Paper Gardeners' blogs
2) Make a little list with the designers and their treats on it
3) Email to custserv@papergardenprojects.com by midnight-EST Nov 24
2) Make a little list with the designers and their treats on it
3) Email to custserv@papergardenprojects.com by midnight-EST Nov 24
-2-

...stitch a beaded pomegranate card
- Neenah White cardstock
- Vanilla Cream Prism cardstock
- Intense Kiwi Prism cardstock
- Heavy weight Vellum cardstock
- Clear embossing powder & heat gun
- White Souffle pen (faux stitches)
- Tombow Monomulti & Scor-tape
- Dimensional foam tape
- BasicGrey Porcelain paper pack (6x6)
- Paper piercer, & needle (thin for beads & regular)
- Red, green, & cream embroidery thread
- Green May Arts ribbon
- Cuttlebug Textile embossing folder
- Clear button, circle punch & Cosmo paper scraps
- CCM Antique label -in chip board (medium weight)
- Paper Temptress Incandescent cardstock
Step 1) Print & emboss the digital pomegranate image (It's linked below for free, if you like it.) I've printed it on Paper Temptress Incandescent cardstock & embossed with clear embossing powder.)
Step 2) Colour with Copic markers. I've used these Copic markers: Lipstick Red R-29; Cadmium Red R-27; Cardinal R-59; New Leaf YG-23; Moss YG-67; Abyss Green BG-75.

Embossed red Copic marker... Not sure if you can tell by this photo, but I added some clear embossing powder to the wet copic marker to give the pomegranate rind some texture & shine. The PT Incandescent paper is one of those semi non-porous papers that will let Copics stay wet for embossing. It just requires working in stages to be quick enough to get powder on before the Copic ink dries.
You could use the image as it is after colouring, of course,
or you could bead the pomegranate seeds:

Step 3) Pierce holes in the image on either side of the each pomegranate seed section. (I like two holes for each bead so that the bead lays flat on its side--instead of showing the hole side.)

Step 4) Stitch seed beads on with needle & thread

Step 5) Mat & embellish the image. Cut the image into a circle, add it to a green mat (this is Intense Kiwi Prism cardstock), and pierce around for white stitches.

Step 6) Add a scallop detail:
A) Punch circles (these are scraps of Cosmo Cricket papers.
B) Add the circles as scallops around under the mat
C) Adhere it to a piece of Vanilla Cream Prism cardstock
D) Pierce around each scallop circle
E) Stitch with different coloured thread
F) Trim around the scallops leaving a bit of an edge
G) Mount the whole thing on dimensional foam tape:
The Cuttlebug embossing background is simply a section of more
Vanilla Cream Prism cardstock (using the Provo Craft Textile folder.)
Vanilla Cream Prism cardstock (using the Provo Craft Textile folder.)

I cheated to get a tidy bow...
(since ribbon is not always my friend):
A) Cut a strip of ribbon about 4 inches or so
B) Make the main bow shape--Fold it in on the ends--to the middle and adhere it
C) Add a small middle piece (cut to about 1 inch, wrapped around, & adhered)
D) Cut two tails & adhere them to the back of the bow
E) Stitch it all together for strength
F) Add a clear button with patterned paper glued to the back of it
....and here's a mostly white on white version:

The pomegranate for this white card was....
- ...printed & embossed on Heavy weight Vellum cardstock with clear embossing powder.
- Coloured (with the same Copics listed above) & Beaded the same way.
- put on a label (Antique label -in chip board (medium weight) from Creative Cuts & More. (It was painted white, covered with white cardstock, heat'n'stick powder & white Martha Stewart glitter.)
- The light green filgree patterned paper is BasicGrey Porcelain paper pack
-3-

Please click the links below the pomegranate
to download, if you would like to use it:

Personal use only, please. (Creative Commons Copyright)
The pomegranate PNG is here
The pomegranate PDF is here
Blogger photos (click to see them big...
in case the Flickr ones up top are misbehaving)

And for your list to win:
my word is Frosty (& i'm mel)
Hope you're feeling fabulous today!my word is Frosty (& i'm mel)

P.S. Stuff is on sale at Paper Gardens.
LOTs of it! All That Glitters Sale!


 Please start the hop on Cathy's blog


0 comments:
Post a Comment