Happy Holidays!
May your days be blessed with LOTs of love & laughter.
A very very Merry Christmas to those who celebrate it.
A very very Merry Christmas to those who celebrate it.
I've been missing in computer land due to a big crash, but it seems to be fixed. Whew! I was just a bit panicky about that, but thank goodness it's resolved. Things have been happily crazy around here--you know, the holiday norm... I'm feeling extra blessed and more thankful than ever this Christmas. Wishing you & yours an incredibly Happy Holidays and New Year!
Lots of love,


1...Caardvarks--Hero Arts Digital challenge!
2...Digital Stuff from Hero Arts
3...heat-embossed digital paper and some other schtuff
4...cheap tricks (custom colouring paper with pencil crayons)
5...how to make a scallop-edged 5.5 inch square Easel Card
-1-
This is the tutorial for the card that I made for the
Caardvarks Hero Arts Digital Challenge.
It's over now, but the entries rocked digi in a big way!
You can see the Digital standouts
made by 'Varks AWEsome readers here:
Caardvarks Hero Arts Digital Challenge.
It's over now, but the entries rocked digi in a big way!
You can see the Digital standouts
made by 'Varks AWEsome readers here:
-2-
from Hero Arts
This uses the

Dictionary page:

It's printed in two colours--turquoise & tan by
altering the colour balance in PhotoShop
and its heat embossed too...
-3-

Images:
Hero Arts Digital: Dictionary page
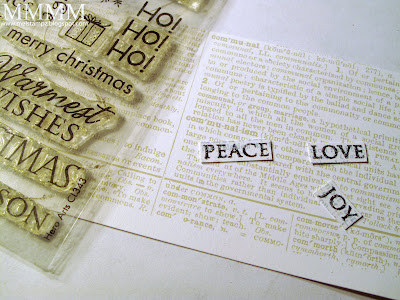
Hero Arts stamps: Antique Brocade Cling stamp & Holiday Sayings
Other digital: The ledger paper to make the trees is from Lazar Studio Werx & I wish I could remember the digital store that the tree came from. I searched & searched to link it, sorry. :o)
Misc:
Computer & Printer
Neenah White cardstock
Matte Medium & brayer or paint brush
Clear embossing powder & heat gun
Black & White pigment inks
Vanilla embossing powder & Glittered clear e.p.
Circle cutter (or something round to trace)
Paper piercer, needle, & thread.
Seed beads
Quickie glue pen & glitters (listed below)
Blue Organza ribbon & vintage button
Martha Stewart snowflake punch

Step 1) print & heat emboss the digital Hero Arts Dictionary Page:
1A) Brayer or brush Matte Medium (or gesso) onto your cardstock
2A) Let the Matte Medium dry & prepare embossing powder, tray, & heat gun
3A) Print the Hero Arts digital Dictionary page (I like the standard setting)
4A) Quickly, sprinkle the wet printer ink with clear embossing powder
5A) Melt embossing powder with a heat gun.
The digital embossing may have "distressed" coverage, but it adds great texture.
If you are having a hard time getting the powder on speedily enough to emboss the wet printer ink, maybe try printing in half sheets of cardstock. The ink will stay wet longer since a half sheet prints twice as fast. Sprinkle embossing powder starting at the top of the cardstock where it printed first (since that area will dry first.) :o)

Step 1) Prepare the circle with the embossed digi paper & mat...
2A) Cut circle.
2B) Add a mat of blue Core-dinations cardstock (ROYGBIV.)
2C) Pierce & stitch with embroidery thread.

Step 3) Print & cut trees, stick them on the circle & add glitters (using a sakura quickie glue pen. This uses two varieties of clear glitter & Martha Stewart White Gold glitter (the darker one.)

Step 4) Pierce holes to add seed bead snow (two holes for each bead, if you'd like the beads to lay on their sides. One hole each if you want to see the center of the bead.)

Step 5) Sew on seed beads for snow.

Step 6) Stamp HA background (Antique Brocade Cling stamp in white pigment ink heat embossed with Vanilla embossing powder)

Step 7) Make ribbon bits by Printing ledger paper (Lazar Studio Werx) and adhering organza ribbon over it. Tie a bow.

Step 8) Stitch the ribbon bits and adhere them--Add another colour of the dictionary page (beige text) with a scallop edge & stitching--Adhere the ribbon bits & stitch on the bow with a button.
(The button is a vintage clear centered button with some of the Hero Arts dictionary page text & a Martha Stewart snow flake glued onto the back of it with Crystal Lacquer.)

Step 9) Stamp the words LOVE, PEACE, & JOY (Hero Arts Holiday Sayings.) I've embossed them in glitter embossing powder--on a weird blend of white & black pigment ink-applied with finger tips to get gray ink with no mess on the pigment ink pads.

Step 10) Adhere the words to wee sentiment tags cut from ledger paper & pierced and strung onto thread. Tie it around the button. Adhere the round image and mat to the front of the card with dimensional tape.
-4-
To get custom coloured mats, try colouring
them with a bit of Prismacolour or other pencil crayon.

(It's a sneaky way to get your cardstock to match ribbons etc.) ;o)
I wanted this perty Core-dinations periwinkle blue
cardstock to have some turquoise to match the organza ribbon.

them with a bit of Prismacolour or other pencil crayon.

(It's a sneaky way to get your cardstock to match ribbons etc.) ;o)
I wanted this perty Core-dinations periwinkle blue
cardstock to have some turquoise to match the organza ribbon.

This sentiment Warmest Wishes is also from Hero Arts Holiday Sayings. I pierced and stitched around it and added it to the inside of the card on dimensional tape (to hold the easel front of the card.)
-5-
...to make a scallop edged
5.5 inch square Easel Card.
5.5 inch square Easel Card.
(this was way easier than I thought it'd be. Uses a bit of cardstock, but it was loads of fun to try a different style of fold) :-D

- 1 piece of standard cardstock
- 1 piece of 12x12 cardstock (cut)
- dimensional bit (I used the Hero Arts "Warmest Wishes" saying above)
B) Cut a piece of cardstock to measure 12" x 5.5")
C) Score it at 5.5 & 11 & crease the folds with a bone folder.
D) Scallop the end if you like (the skinny 1" part created by the scoring)
E) Adhere the 1" section to the back of your card front.
F) Add a dimensional piece to hold the easel up when the card is open.
and that's it...
The easel style is SO fun to make!
Thank you SO much for stopping in &
I hope your holidays are simply divine,


0 comments:
Post a Comment