...I couldn't resist making something baby-themed.
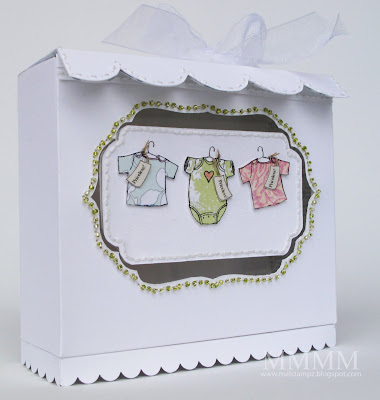
It wound up as a large gift box--a baby shop window box
with a lined awning "roof"...
It wound up as a large gift box--a baby shop window box
with a lined awning "roof"...
The new box templates for this are basic, but hopefully useful. The box is made with 4 parts (all printable) for a nice large size 6 inches wide by 5 high. (Hopefully, you fellow makers of large cards might find it useful for a big card box too!) If you prefer small cards, you could just scale all the parts down to suit your needs. :o)

1... Caardvarks Challenge (Hero Arts digital!)
2... Digital stuff: KIT from Hero Arts (+a freebie by moi)
3... how to make wee chipboard baby clothes (embossed paper piecing)
4... Templates for a 6" x 5" x 2" box (+roof lid and base templates)
5... how to make the box
6... materials used here
-1-
This is for the Hero Arts Challenge. If you haven't seen all the spotlights on the Caardvarks designers & guests, then you are in for a treat and a half! :o)

There's more stuff I made there (which will have tutorials & templates to be posted here throughout the next week) BUT the real jackpot is
page after page of incredible work by the team.
&

from Hero Arts/ Two Peas

Special Delivery
& Hero Arts Dictionary page

(for the box lining):

Digi Freebie

Teensy Tags (by me)

These wee tags say "Priceless!"
& theyare mirrored (in case you'd like double-sided tags)

Downloads:
Teensy "Priceless" Tags PNG
Teensy "Priceless" Tags PDF
(embossed digital paper piecing)

Embossed digital paper pieces turned into DIY chipboard...
(a new obsession I can't resist, LOL)


Emboss on patterned paper by wiping or painting on Matte Medium
(It's clear, easy to apply & great at keeping the inkjet printer ink wet for embossing powder.
Two ways to emboss on patterned paper:

Step 3) Cut out baby clothes. To get the three colours, I just printed them 3 times. Takes only a minute or two, even with preparing the Matte Medium for embossing, but extras are handy for speedy baby clothes (or you could make 3 boxes at one time)

Step 4) To get chipboard strength with paper scraps: adhere embossed paper pieces to scraps of cardstock (until it is the desired thickness) I like to stick the image on one layer of scrap paper at a time (100 lb cardstock)--and cut only one layer at a time--so cuts are easier to make & more accurate.
Step 5) You can undercut on an angle under the image so layers don't show (and they go faster that way as well.) I used two layers here & they feel like pricey chipboard! :o) teehee

Step 6) Print just the hangers & adhere the baby clothes chip board pieces

Step 7) Make wee knotted tag threads:
A) Thread a needle & tie a knot in the end. (This is kraft coloured quilt thread.)
B)Pierce hole by hanger & thread through to back, so the knot is showing. Go back into cardstock--so that your needle is at the back...


Free Template for a 6" x 5" x 2" box
Please click links if you'd like to
Download the template PDF/PNG:
(or click photos here & save as for the JPG versions)

5x6 BOX template (no score lines) PNG
5x6 BOX template (no score lines) PDF


Teensy Tags (by me)

These wee tags say "Priceless!"
& theyare mirrored (in case you'd like double-sided tags)

Downloads:
Teensy "Priceless" Tags PNG
Teensy "Priceless" Tags PDF
-3-
make wee 'chipboard' baby clothes(embossed digital paper piecing)

Embossed digital paper pieces turned into DIY chipboard...
(a new obsession I can't resist, LOL)

Step 1) Print the Hero Arts digital baby clothes (I used the brushes from that set Special Delivery set. It's so easy to size them however you want right down to the pixel & use them in any colour!)

Emboss on patterned paper by wiping or painting on Matte Medium
(It's clear, easy to apply & great at keeping the inkjet printer ink wet for embossing powder.
Two ways to emboss on patterned paper:
A) Print on the whole piece (the blue one cut to an 8.5 inch width to fit in the printer) with a section of the paper covered with Matte Medium.
or B) Use up your scraps. Glue a scrap of patterned paper to a piece of acid free copy paper so it's the perfect size for the printer.
FAVOURite Lil' TiP: Cutting sheets in half (so they measure 8.5 x 5.5 makes the printing go faster & the ink stay more wet for the embossing. :o)

Step 2) Print wee "priceless!" tags & emboss them
or B) Use up your scraps. Glue a scrap of patterned paper to a piece of acid free copy paper so it's the perfect size for the printer.
FAVOURite Lil' TiP: Cutting sheets in half (so they measure 8.5 x 5.5 makes the printing go faster & the ink stay more wet for the embossing. :o)

Step 2) Print wee "priceless!" tags & emboss them
Some papers may not need matte medium to keep ink wet enough for embossing--more non-porous papers are great without treating them at all.
This Incandescent paper from Paper Temptress is the perfect example of embossable paper. You can emboss straight out of the printer. I drew the teensy tags, scanned them, and then printed & embossed them on the Incandescent paper. Here's an example of an image coloured with Copics on that PT paper. Clear embossing powder is just fine with your Copics (according to the official site.)

Step 3) Cut out baby clothes. To get the three colours, I just printed them 3 times. Takes only a minute or two, even with preparing the Matte Medium for embossing, but extras are handy for speedy baby clothes (or you could make 3 boxes at one time)

Step 4) To get chipboard strength with paper scraps: adhere embossed paper pieces to scraps of cardstock (until it is the desired thickness) I like to stick the image on one layer of scrap paper at a time (100 lb cardstock)--and cut only one layer at a time--so cuts are easier to make & more accurate.
Step 5) You can undercut on an angle under the image so layers don't show (and they go faster that way as well.) I used two layers here & they feel like pricey chipboard! :o) teehee

Step 6) Print just the hangers & adhere the baby clothes chip board pieces

Step 7) Make wee knotted tag threads:
A) Thread a needle & tie a knot in the end. (This is kraft coloured quilt thread.)
B)Pierce hole by hanger & thread through to back, so the knot is showing. Go back into cardstock--so that your needle is at the back...

Step 8) Make the thread pieces that will hold the wee tags. (Come up through the front with your needle)

here's a view of the thread close up

here's a view of the thread close up
Step 9) Trim the thread ends & glue the tags on them (sandwiching the threads to hold the tags on) Of course, you can vary the length & twist the tags however you like.


Step 10) Glue the tags down for perfect placement, if you like. Since this was quilting thread, the tags bounced up too much, so I glued em down.

Step 11) Trim corners of the paper decoratively & pierce around image

Step 12) Stitch around the image
-4-
Step 11) Trim corners of the paper decoratively & pierce around image

Step 12) Stitch around the image

Free Template for a 6" x 5" x 2" box
Please click links if you'd like to
Download the template PDF/PNG:
(or click photos here & save as for the JPG versions)

5x6 BOX template (no score lines) PNG
5x6 BOX template (no score lines) PDF

5x6 BOX template (WITH dotted score lines) PNG
5x6 BOX template (WITH dotted score lines) PDF

Base & Lid template (NO score lines) PNG
Base & Lid template (NO score lines) PDF

Base & Lid template (WITH dotted score lines) PNG
Base & Lid template (WITH dotted score lines) PDF
5x6 BOX template (WITH dotted score lines) PDF

Base & Lid template (NO score lines) PNG
Base & Lid template (NO score lines) PDF

Base & Lid template (WITH dotted score lines) PNG
Base & Lid template (WITH dotted score lines) PDF
-5-

...make the 6x5" box
(with roof/awning & base)

This is a really simple process with a whole lotta steps, LOL
(using all templates, so no measuring for the box with lid & base)
It will give you a box that measures:
- 6 inches wide
- 5 inches high
- 2 inches (from front to back)
cards --with room for envelopes--or for giving a gift in.)
1) Print the box template two times (choose template either with or without dotted lines)
2) Score each template (the template with no dotted lines has little tick marks showing where to score but leaves no messy lines)
3) Cut them both out (using a paper cutter for quick cuts or cutting free hand)
4) Embellish, however you like.
5) Assemble the box sticking it together--unless, you'd like a window....
To add a window:
1) Before assembling, cut a shaped hole for the window in the box front.
2) Embellish it if you like.
3) Add an inset piece for the image by cutting 12 pieces of cardstock to measure 5" by 1/2".
4) Adhere the pieces in a frame on the cut cardstock or acetate. Layering them on each other so they are 3 strips thick (or use dimensional tape if you prefer.)
5) Stick the image on that window
6) Add the back of the box
To add a lid & base: Print, Score & cut the same way as the box. Scallop however you like & Adhere the base & lid.
the box:

Step 1) Print cut score & fold two box templates (same template x2)
The size of the box just means that the template had to have 2 sides in order for me to share it with you. It has the added benefit of making the box really sturdy & letting it stand nicely because of the weight. :o)
a roof (lid)
(or awning)

Step 2) make a roof:
roof A) Print the roof template, Cut it, Score it, & Fold it.

roof B) Adhere scallop & trim away bits from the roof template underneath (that way you can match your own scallop, but if you'd like a free scallop (hand-drawn) template for this scallop size, there's one here.

roof C) pierce the roof lid, if you'd like to faux stitch or sew...

roof D) Stitch the roof lid

roof E) line the roof lid with patterned paper (hides the back of the stitching as well.)

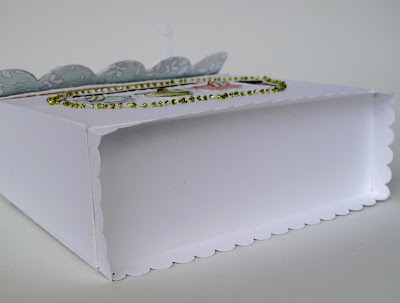
Adhere the roof lid to the backside of the back half of the box.
the lining:
(and speedy ribbon ties for the top)

Step 3) Add a lining inside the box
lining A) Add lining & ribbon ties:
1) Print Lining (this is Hero Arts Dictionary page embossed on paper that was covered with a thin coat of Matte Medium. I changed the text to blue & embossed it in clear embossing powder.)
2) Cut the lining to fit the inside side & bottom (2 sides--measuring just under 5 x 2 inches and then 1 bottom piece--just under 6x2 inches) Adhere ribbon to inside of lining

lining B) Glue the side lining pieces with the ribbon in. [Two pieces measuring roughly 5 x 2 inches.] These side pieces sandwiches the ribbon ties for the box top nicely & hides the smaller side flaps.
lining C) Glue the bottom liner piece in. [One piece measuring roughly 6 x 2 inches.]

Here's the back half of the box with the roof, the liner, & ribbon ties.
the window:

Step 4) Put in a window...
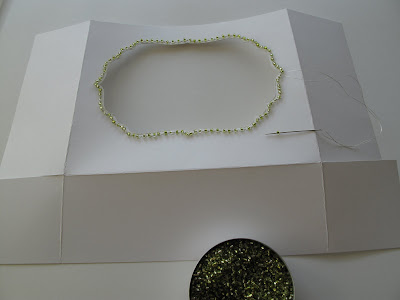
Step 1) Cut a shaped window into the box front & embellish it if you like (I pierced this one to add seed beads stitched around the window)

Step 2) Stitch seed beads around the window

Step 3) Make a raised frame and create a recessed window
3A) Cut sixteen 5 x 1-2 inch strips
+Dry+fit+%26+trim+the+pieces+for+a+perfect+fit.+Adhere+12+of+them+to+the+box+front+%28layering+3+deep+to+make+the+recessed+window+%28or+you+could+use+dimensional+foam+tape%29.JPG)
3B) Dry fit & trim the pieces for a perfect fit. Adhere 12 of them around the inside to the box front (around the open window) layering 3 deep to make the recessed window.
Obviously, you could use dimensional foam tape but I like the cost savings & sturdiness of paper strips. :o)
+Cut+a+piece+of+thick+acetate+to+just+a+bit+under+5x6+inches+and+adhere+on+top+of+the+frame+of+strips.JPG)
3C) Cut a piece of thick acetate & adhere it. (This piece is cut to measure just a little bit under 5 x 6 inches and is adhere on top of the frame of paper strips.)
+Before+your+adhesive+sets+up,+make+sure+your+box+will+fold+up+properly+%28without+the+acetate+blocking+the+bottom+%26+sides%29--ask+me+how+I+know+to+do+this--hehehe.JPG)
3D) Before your adhesive sets up, make sure your box will fold up properly (without the acetate blocking the bottom & sides)--ask me how I know to do this--hehehe
+Cover+the+adhesive+to+hide+the+mess+by+adhering+the+4+remaining+strips.JPG)
3E) Cover the adhesive, to hide the mess, by adhering the 4 remaining strips.

Step 5) Add the image to the window
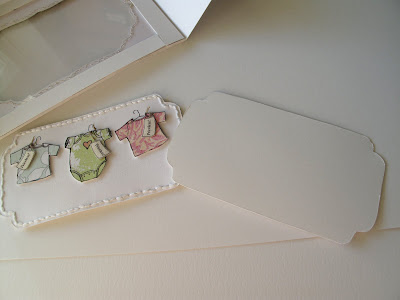
image A) Trace the image onto a piece of cardstock (to get a matching shape) & cut it out.
+Adhere+the+image+to+the+acetate+window.JPG)
image B) Adhere the image to the acetate window
+Adhere+the+matching+shape+on+the+back+of+the+acetate--to+hide+any+mess+on+the+inside+of+the+box.JPG)
image C) Adhere the matching shape on the back of the acetate--lining it up to hide any mess on the inside of the box.
main box assembly:

Step 6) Stick the box together:
A) To put the two halves of the box together: Cover the outside of the back piece with adhesive (sides & bottom only not the big area of the very back)
Adhesive suggestion: I love Tombow Monomulti for this. It's quick, with great hold, but a little extra time to wiggle it about for a great fit; however, it can be a bit messy.)

B) Nestle the front of the box on top of the adhesive covered back (the front over back gives very clean lines on the front corners.
the base:

Step 7) Add a base to the bottom:
base A) Print, Cut, Score, & Scallop the decorative box base template. This takes the weight of the box so a nice thick cardstock (at least 80 lb) may be a good idea.

base B) Trim corners of decorative box base so they are tidy.

base C) Adhere the base to the bottom of the box
finishing touches:

Step 8) Finish it off:
A) Make trim to tidy up the front edge of the inside of the box. Cut a piece of cardstock to measure 6 inches by 1 inch. Score down the middle. Pierce & stitch it.

B) Adhere the stitched trim piece & an extra thin strip of cardstock for dimension:
-6-
- Hero Arts Digital: Kit Special Delivery & Dictionary page
- Incandescent paper from Paper Temptress
- Misc patterned papers & Neehah White cardstock (for the box & liner)
- Matte Medium (by Golden), Computer & Printer
- Clear embossing powder & heat gun
- Sead Beads (these were clear, dyed green with Copic & Alcohol inks)
- Paper piercer, needle, & thread (white & kraft coloured quilting thread.)
- Tombow Monomulti, Pink Copic marker
- Nestabilities label 4 (die cut, traced, scanned blown up... & cut.)
- Scallop template (large) and punch (small)
- White Organza ribbon

Hope your day is a sweet as new born Babe,

P.S. Dear bad Flickr, I bought your glam year's membership, to post big photos, and you are all breaking up on me. Why you wanna play me like 'dat? It's you, not me! hehehe


0 comments:
Post a Comment