


Was this You & Yours this morning?
By the by, this is post two for today--here's today's first post. :o)
(I'm tryin' to make up for lost time! hehehe)
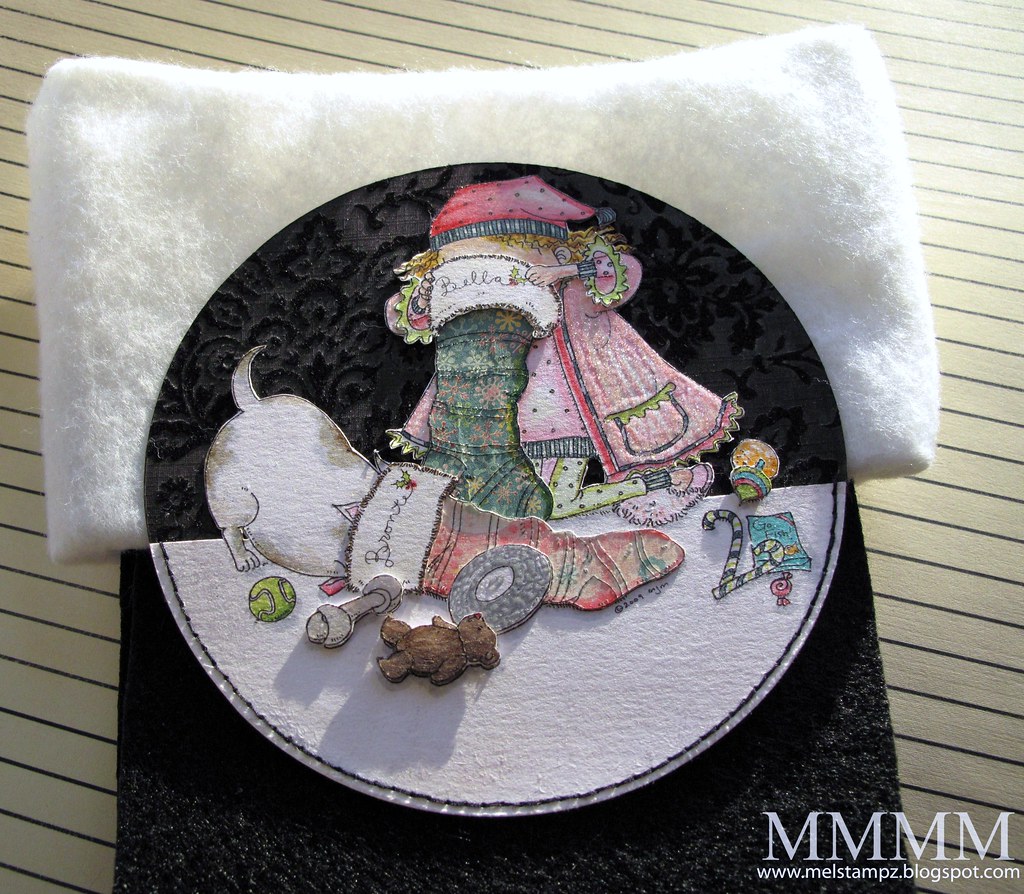
This round doohickey is a Christmas stocking topper. Admittedly--thanks to my big bad crash--this tutorial comes a tad late for you to make your own stocking topper this year, but perhaps you can use the wall paper or the faux fabric paper-piecing ideas, anyhow? :o)

1...the digi image from Mo's Digital Pencil
2...making layered paper piecing (+custom wallpapering)
3...create faux fabric paper piecing


+Print+%26+emboss+and+colour+image+%28this+is+printed+on+metallic+paper+from+Paper+Temptress+that+lets+you+emboss+on+it,+if+you+sprinkle+the+embossing+powder+on+quickly+when+it%27s+out+of+the+printer%29+-+Copy.JPG)
Step 1) Print the image & emboss it. (This is printed on Quartz metallic cardstock from Paper Temptress that lets you emboss on it from the inkjet printer, if you sprinkle the clear embossing powder on quickly when it's out of the printer and heat set it.)
+Added+glitter+to+Bella%27s+coat+by+covering+with+a+Sakura+Quickie+glue+pen+%26+sprinkling+it+on..JPG)
Step 2) Add glitter to Bella's coat by covering with a Sakura Quickie glue pen & sprinkling it on.
+Paper+Temptress+metallic+paper+%26+coloured+with+copics.+The+patterned+stockings+are+embossed+on+scraps+of+paper+coated+in+Matte+Medium+to+keep+printer+ink+wet..JPG)
Step 3) Make all the paper piece layers. These are coloured with a combination of Copic Markers & Prismacolour pencil crayons. The patterned stockings are embossed on scraps of paper from a Cosmo Cricket catalogue which I coated in Matte Medium to keep printer ink wet (There's a full tutorial for that cheap little trick at the bottom of this post.) :o)
+Draw+a+line+along+to+create+a+floor+line.JPG)
Step 4) To add the patterned paper wallpaper: Draw a line along a ruler to create a floor line
+Cut+away+on+top+of+the+line.JPG)
Step 5) Cut away on top of the line. (I found that cutting with a hobby blade and scissors worked well.)
+Adhere+layers+to+the+Mo%27s+Digital+Pencil+Christmas+Morn+image.JPG)
Step 6) Adhere the layer pieces to the Mo's Digital Pencil Christmas Morn image. I wrinkled the stocking to make them look like fabric. I also distressed the "floor" with a wee spritz of water & sandpaper for some texture.
+Dimension+of+the+Mo%27s+Digital+Pencil+Christmas+Morn+Layers.JPG)
+Make+custom+wall+paper+%28this+is+GCD+Paris+Nights+paper+coloured+with+a+black+marker.+The+marker+may+need+heat+setting+or+drying+depending+on+the+paper+%26+marker+%28this+GCD+paper+has+a+less+porous+texture%29.JPG)
Step 7) Make custom wall paper (this is GCD Paris Nights paper cut in a semi circle and coloured with a black marker.) The marker may need heat setting or drying depending on the paper & marker types. (This GCD paper has a less porous texture, so waterbased marker needed the heat setting.)
Of course, you could use any colour.... Copics are great for this, but I prefer to paint Copic refill colour on to keep from smudging the paper or getting ink on the Copic tips.
+Adhere+wall+paper.JPG)
Step 8) Adhere the wall paper to the back of the image.
This tutorial was written for digital images, but obviously it would work for stamping too; though, it might take a few tries to stamp a smooth one given the folds. :o)
+print+stockings+on+any+acid+free+paper.JPG)
Step 1) Print stockings on any acid free paper & cover with glue
+Cover+stocking%28s%29+with+a+scrap+of+patterned+paper+%28I+added+extra+paper+%26+wrinkled+it+a+little+to+look+like+fabric%29.JPG)
Step 2) Cover the printed stockings with a scrap of patterned paper. I added extra adhesive & wrinkled the thin paper a little to try get it to look like fabric folds.
The pre-printing step might seem weird, you could just print the stockings on a whole sheet of patterned paper, but I wanted to use scraps and wrinkle it by sandwiching a layer of glue--Tombow Monomulti which sets fairly quickly.
+to+emboss+the+digital+image,+apply+matte+medium+over+the+patterned+paper+%26+let+dry.JPG)
Step 3) To emboss the digital image, apply matte medium over the patterned paper & let it dry
+Print+the+image+%26+sprinkle+embossing+powder+over+the+wet+printer+ink.JPG)
Step 4) Print the image with an ink jet printer & quickly sprinkle embossing powder over the wet printer ink. {I much prefer the standard or mid-range quality printer setting.}
+Heat+set+the+powder+with+a+heat+gun.JPG)
Step 5) Heat set the powder with a heat gun
+Adhere+faux+fabric+paper+pieced+stockings+to+the+Mo%27s+Digital+Pencil+Christmas+Morn+image.JPG)
Step 6) Cut the stockings out & stick them on with a wet adhesive like Tombow Monomulti and wrinkle the paper to make it look like it has fabric folds.
Add more layers of paper under them, if you like. (I made the toys chipboard-like for dimension).

Merry Christmas!!!!

P.S. Thank You ever so much to those who answered in the poll on whether you like the large photos. I'm trying to include both the large flicker photos (at the top) & a blogger photo version (at the bottom) identical pics to have both options and suit everyone's liking. Wish Blogger would just allow bigger photos! :o)
P.P.S. Little Paper Shop has is sharing the sweetest Christmas gift--a PDF with a year's worth of sketches--here.


1...the digi image from Mo's Digital Pencil
2...making layered paper piecing (+custom wallpapering)
3...create faux fabric paper piecing
-1-

-2-

do some layered paper piecing
(and custom wallpapering) ;o)
(and custom wallpapering) ;o)
+Adhere+wall+paper.JPG)

- Mo's Digital Pencil image Christmas Morn
- Printer & Computer
- Paper Temptress Quartz metallic cardstock
- Patterned paper scraps
- Clear embossing powder & heat gun
- Copic markers & Prismacolour Pencil Crayons
- Circle cutter (or something round to trace)
- Ruler, pencil, hobby blade, and scissors
- Quickie glue pen & glitter
- Tombow monomulti
- GCD Paris Nights paper & black marker
+Print+%26+emboss+and+colour+image+%28this+is+printed+on+metallic+paper+from+Paper+Temptress+that+lets+you+emboss+on+it,+if+you+sprinkle+the+embossing+powder+on+quickly+when+it%27s+out+of+the+printer%29+-+Copy.JPG)
Step 1) Print the image & emboss it. (This is printed on Quartz metallic cardstock from Paper Temptress that lets you emboss on it from the inkjet printer, if you sprinkle the clear embossing powder on quickly when it's out of the printer and heat set it.)
+Added+glitter+to+Bella%27s+coat+by+covering+with+a+Sakura+Quickie+glue+pen+%26+sprinkling+it+on..JPG)
Step 2) Add glitter to Bella's coat by covering with a Sakura Quickie glue pen & sprinkling it on.
+Paper+Temptress+metallic+paper+%26+coloured+with+copics.+The+patterned+stockings+are+embossed+on+scraps+of+paper+coated+in+Matte+Medium+to+keep+printer+ink+wet..JPG)
Step 3) Make all the paper piece layers. These are coloured with a combination of Copic Markers & Prismacolour pencil crayons. The patterned stockings are embossed on scraps of paper from a Cosmo Cricket catalogue which I coated in Matte Medium to keep printer ink wet (There's a full tutorial for that cheap little trick at the bottom of this post.) :o)
+Draw+a+line+along+to+create+a+floor+line.JPG)
Step 4) To add the patterned paper wallpaper: Draw a line along a ruler to create a floor line
+Cut+away+on+top+of+the+line.JPG)
Step 5) Cut away on top of the line. (I found that cutting with a hobby blade and scissors worked well.)
+Adhere+layers+to+the+Mo%27s+Digital+Pencil+Christmas+Morn+image.JPG)
Step 6) Adhere the layer pieces to the Mo's Digital Pencil Christmas Morn image. I wrinkled the stocking to make them look like fabric. I also distressed the "floor" with a wee spritz of water & sandpaper for some texture.
Here's a shot of the dimension of the layers...
+Dimension+of+the+Mo%27s+Digital+Pencil+Christmas+Morn+Layers.JPG)
(I glued the paper pieced images to scrap cardstock & undercut around 'em for thicker layers.)
+Make+custom+wall+paper+%28this+is+GCD+Paris+Nights+paper+coloured+with+a+black+marker.+The+marker+may+need+heat+setting+or+drying+depending+on+the+paper+%26+marker+%28this+GCD+paper+has+a+less+porous+texture%29.JPG)
Step 7) Make custom wall paper (this is GCD Paris Nights paper cut in a semi circle and coloured with a black marker.) The marker may need heat setting or drying depending on the paper & marker types. (This GCD paper has a less porous texture, so waterbased marker needed the heat setting.)
Of course, you could use any colour.... Copics are great for this, but I prefer to paint Copic refill colour on to keep from smudging the paper or getting ink on the Copic tips.
Step 8) Adhere the wall paper to the back of the image.
-2-
...create faux fabric paper piecing:
This tutorial was written for digital images, but obviously it would work for stamping too; though, it might take a few tries to stamp a smooth one given the folds. :o)
- Christmas Morn digital image
- Patterned paper scraps
- Glue (I used Tombow Monomulti)
- Matte Medium & brush/brayer
- Printer & Computer
- Clear embossing powder & heat gun
+print+stockings+on+any+acid+free+paper.JPG)
Step 1) Print stockings on any acid free paper & cover with glue
+Cover+stocking%28s%29+with+a+scrap+of+patterned+paper+%28I+added+extra+paper+%26+wrinkled+it+a+little+to+look+like+fabric%29.JPG)
Step 2) Cover the printed stockings with a scrap of patterned paper. I added extra adhesive & wrinkled the thin paper a little to try get it to look like fabric folds.
The pre-printing step might seem weird, you could just print the stockings on a whole sheet of patterned paper, but I wanted to use scraps and wrinkle it by sandwiching a layer of glue--Tombow Monomulti which sets fairly quickly.
+to+emboss+the+digital+image,+apply+matte+medium+over+the+patterned+paper+%26+let+dry.JPG)
Step 3) To emboss the digital image, apply matte medium over the patterned paper & let it dry
+Print+the+image+%26+sprinkle+embossing+powder+over+the+wet+printer+ink.JPG)
Step 4) Print the image with an ink jet printer & quickly sprinkle embossing powder over the wet printer ink. {I much prefer the standard or mid-range quality printer setting.}
+Heat+set+the+powder+with+a+heat+gun.JPG)
Step 5) Heat set the powder with a heat gun
+Adhere+faux+fabric+paper+pieced+stockings+to+the+Mo%27s+Digital+Pencil+Christmas+Morn+image.JPG)
Step 6) Cut the stockings out & stick them on with a wet adhesive like Tombow Monomulti and wrinkle the paper to make it look like it has fabric folds.
Add more layers of paper under them, if you like. (I made the toys chipboard-like for dimension).
...and that's it!

Merry Christmas!!!!
P.S. Thank You ever so much to those who answered in the poll on whether you like the large photos. I'm trying to include both the large flicker photos (at the top) & a blogger photo version (at the bottom) identical pics to have both options and suit everyone's liking. Wish Blogger would just allow bigger photos! :o)
P.P.S. Little Paper Shop has is sharing the sweetest Christmas gift--a PDF with a year's worth of sketches--here.


0 comments:
Post a Comment