


A couple of Caardvarks projects made with Clear and Simple stamps:
a matchbox with a sugar shaker:
and an invitation tin with an eensy place setting:

a matchbox with a sugar shaker:
and an invitation tin with an eensy place setting:

a personal note (where on earth have i been?)
1...Caardvarks latest Challenge
2...how to make the place setting
3...how to make the matchbox (sugar shaker)
4...New matchbox template
a little personal note:
(M.I.A. me--the saga continues, LOL)
Well, it's been a crazy week--with two kinds of hacking, if you'll pardon the expression. ;o)
Stuff that's been up: Cleaning turned into carpet cleaning which did in my lungs & made breathing a struggle. Cough cough hack hack! I'm allergic to even mild hand soaps lately, so the carpet cleaning chemicals were a stretch--ugh, but it needed to be done & looks so much better now. Wish I had the energy to better balance the work around the home--that I have to do--with the work on the blog--that I'd rather do, hehehe.
The major thing that kept me away, though, was a computer virus and a hacker that kept trying to access our computers (starting with Charles's), so I couldn't even turn mine on for fear they'd try to get into it as well. Nastiness! That's all fixed up now though--I hope. Who does these creepy things & why, hey?
Anywho, enough blabbing about why I've been missing. Let's just say, Thank You for your patience, yet again.
xox mel
-1-

The team has made some stunning circular
projects for the latest...
projects for the latest...

Challenge
Circle of Friends
sponsored by
I used this sweet Clear and Simple set
to make both these projects...

click the pic if you'd like to go
peek at Bon Appétit
-2-

...make the place setting:
Please click these photos, if you'd like a closer view:
This is a whole lot of recyled bits. It was a fun way to use scraps...
Step 1) Stamp the silverware & cut it out (These are embossed in silver & then coloured in with a silver gel pen)
Step 2) Cut a piece of paper to make your placemat (this was a scrap of gesso resist paper made by covering a wooden batique block in gesso, stamping on paper, & inking the paper with grey reinker.)
Step 3) Embellish the placemat: Pierce & stitch around the placemat. Darken the outside edge if you like (I used a dark grey Copic maker)
Step 4) To make the plate:
A) Cut a circle out of paper (This is Smoothie lustre cardstock from Paper Temptress. Looks like pearly ceramic.)
B) Punch out a smaller circle of any heavy cardstock & use it as a guide to deboss the plate. I just went round & round the punched circle pressing into the plate with a stylus. Then added lines radiating out (by freehand.)
Step 5) To make the napkin/serviette & napkin ring:
A) Cut a wee square of paper towel or cloth
B) Fold it like a napkin & add dots of marker, if you like
C) Make a napkin ring: Cut a short length of wire about 2 inches. Slide buggle beads onto it to make a ring & then twist it closed. Slide over the paper towel & hide the twisted wire when you adhere the napkin to the plate.
Step 6) Emboss the sentiment (also from the Clear and Simple Bon Appétit set) & add it to the top of the placemat.
Step 7) Cut another circle of patterned paper for the table cloth & mount that onto a tin (this used to be a tin for margarita salt) :o)
-3- Step 2) Cut a piece of paper to make your placemat (this was a scrap of gesso resist paper made by covering a wooden batique block in gesso, stamping on paper, & inking the paper with grey reinker.)
Step 3) Embellish the placemat: Pierce & stitch around the placemat. Darken the outside edge if you like (I used a dark grey Copic maker)
Step 4) To make the plate:
A) Cut a circle out of paper (This is Smoothie lustre cardstock from Paper Temptress. Looks like pearly ceramic.)
B) Punch out a smaller circle of any heavy cardstock & use it as a guide to deboss the plate. I just went round & round the punched circle pressing into the plate with a stylus. Then added lines radiating out (by freehand.)
Step 5) To make the napkin/serviette & napkin ring:
A) Cut a wee square of paper towel or cloth
B) Fold it like a napkin & add dots of marker, if you like
C) Make a napkin ring: Cut a short length of wire about 2 inches. Slide buggle beads onto it to make a ring & then twist it closed. Slide over the paper towel & hide the twisted wire when you adhere the napkin to the plate.
Step 6) Emboss the sentiment (also from the Clear and Simple Bon Appétit set) & add it to the top of the placemat.
Step 7) Cut another circle of patterned paper for the table cloth & mount that onto a tin (this used to be a tin for margarita salt) :o)
...make the sugar shaker
The spoon in Bon Appétit wanted to be a wooden one
and then I just had to gp cheesy kitch for mon coeur en sucre
Warning high caloric intake! ;0)
Please click these photos, if you'd like a closer view:
Open with some goodies in it:
(my Sweetie likes sweets) ;o)
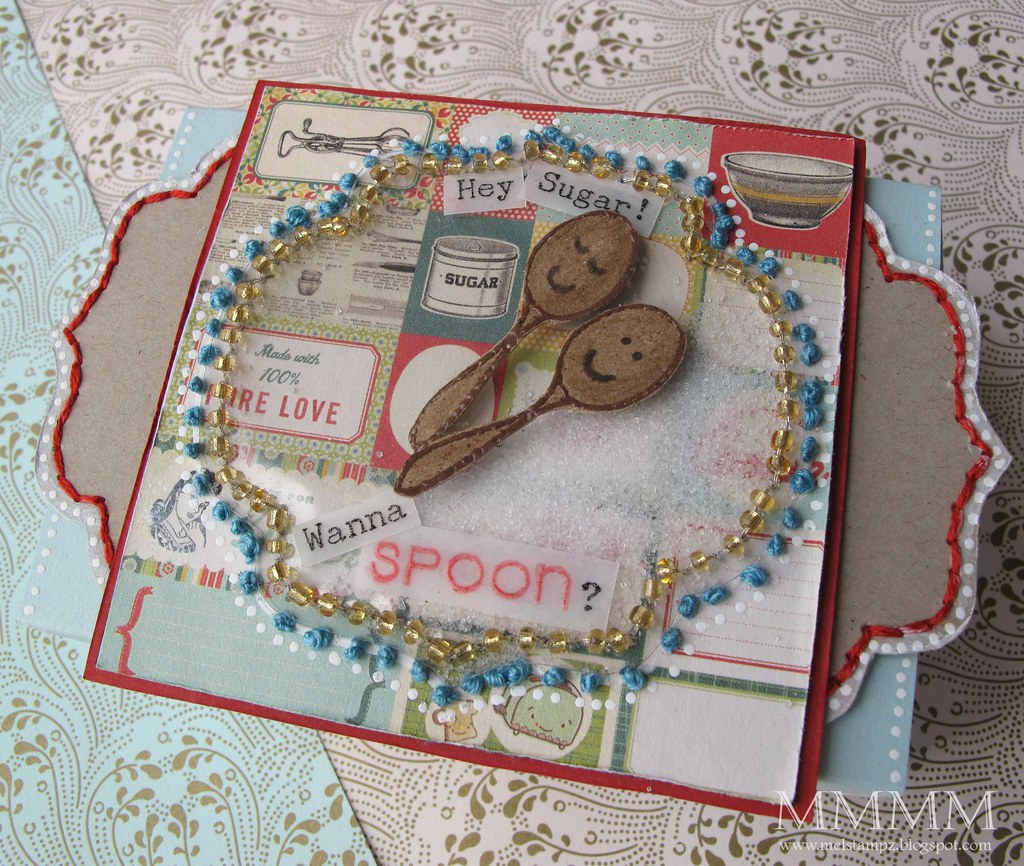
Detail of the sugar shaker:
To make the sugar shaker:
Step 1) Cut a piece of patterned paper (this is a little section gleaned from Cosmo Cricket's Summer 2009 catalogue.)
Step 2) Cut a cardstock mat to match (this is Wild Cherry cardstock from Paper Temptress)
Step 2) Cut a cardstock mat to match (this is Wild Cherry cardstock from Paper Temptress)
Step 3) Die cut a label shape out of acetate (this is recycled plastic packaging.)
Step 4) Add a little pile of sugar (in the center of your patterned paper)
Step 5) Glue around the edge of your acetate label & adhere it to your cardstock (Just applying glue around the edges of the acetate & taking care to not disturb the sugar as you adhere it)
Step 6) Pierce around the template edge, following the shape (piercing through the cardstock too)
Step 7) Stitch around the acetate label shape & add beads, if you like.
Step 8) Embellish with stamped images & sentiments. The Spoons are from the Clear and Simple Bon Appétit set. I just embossed them on kraft paper to make wooden spoons & drew faces on them:
The word "spoon" is from Bon Appétit as well & the black text is embossed on vellum, straight out of the printer.
-4-

This matchbox measures 2 and 3-4inches x 3 and 3-4 inches
(and it's 1 and 1/8 inch tall)
Took a while to get the fit of the lid for this, just right so it slides free nicely. (I've never made a matchbox before) But now I'm quite happy with how it sits, so hopefully you will be too!
the matchbox inside:


Templates for direct printing (no dotted line "mess"
but there are tick marks for easy scoring):
Matchbook template INSIDE JPG
Matchbook template INSIDE PDF
Score guides: (with dotted lines):
Matchbook Score Guide INSIDE JPG
Matchbook Score Guide INSIDE PDF
but there are tick marks for easy scoring):
Matchbook template INSIDE JPG
Matchbook template INSIDE PDF
Score guides: (with dotted lines):
Matchbook Score Guide INSIDE JPG
Matchbook Score Guide INSIDE PDF
the matchbox outside:


Templates for direct printing (no dotted line "mess"
but there are tick marks for easy scoring):
Score guides: (with dotted lines):
Thank You so much for visiting! but there are tick marks for easy scoring):
Score guides: (with dotted lines):
If you have any questions about how to assemble the matchbox,
please don't hesitate to ask,


0 comments:
Post a Comment