The whole month of September is the Cuttlebug Challenge Birthday Palooza! Each member of the design team is picking a different party theme for the month's challenges. Hopefully, You fab readers & challenge participants will play along too! There are all kinds of great prizes and exciting things planned. You can read all about it here.
The theme I chose for the month is a Stamping Party (I'm plannin' a surprise for my cousin Shealagh, since happily all of the gals in my family like to craft.) And of course the focus of all the stampin' fun will be on Cuttlebugging. :-D
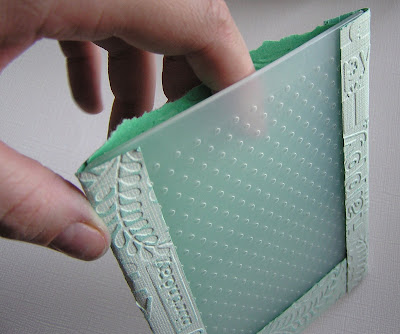
Pocket Card Invitation made from a
Provo Craft Embossing Folder:
For a strange little twist, the pocket invitation to Shea-Shea's stamping birthday party is a wrapped Cuttlebug embossing folder. (It's designed to be a gift and to be taken apart by the recipients--who can use the embossing folder & use the leaves as card candy.)
Most of the embossing folders will fit in a standard acrylic card box with room for any information (a map?) or treats you'd like to add--the acrylic box also protects the folder invitation (so that you can mail it in a bubble mailer if you like.)
Most of the embossing folders will fit in a standard acrylic card box with room for any information (a map?) or treats you'd like to add--the acrylic box also protects the folder invitation (so that you can mail it in a bubble mailer if you like.)

1...Cuttlebug Challenge Blog: Be Inspired Wednesday challenge (Invites)
2...make a pocket card invitation (from a Cuttlebug embossing folder)
3...embossed damask leaves
-1-
Cuttlebug Challenge Blog
Be Inspired Wednesday #47 (Birthday Invitations)
-2-
...make a pocket card invitation
(from a Cuttlebug embossing folder)

Paper: Graph paper: Cosmo Cricket's Girl Friday Collection (Wednesday.); Core'dinations Whitewash cardstock
Colour: Distress inks (Peeled Paint & Broken China), Tempting Turquoise Craft ink (SU), Glimmer mist (Garden Fairy), White Sakura Souffle pen
Stamps: Leigh Hannan Damask leaves (Paper Gardens Projects)
Tools: Provo Craft Embossing Folder as card base (Swiss Dots); Provo Craft Embossing Folders (Happy Birthday & Floral Fantasy); and a Cuttlebug Machine
Miscellaneous: Tim Holtz ink applicator & foam pad, clear embossing powder & heat gun; Wax paper/non-stick mat; Stampin' Up! Birds & Blooms sizzix dies; Acrylic card box

Step 1} Cut various pieces to fit one of the older smaller sized Provo Craft embossing folders (of course you could make a card like this with the new larger sized embossing folders; it just won't fit in the standard size acrylic card box.)
This card uses pieces cut to the following sizes:
- Bottom: 1 strip measuring 4-5/8" wide x 2-1/2" high
- Sides: 2 strips measuring 1" wide x 5-3/4" high
- Back: 1 piece measuring the the full folder size: 4-5/8"wide x 5-3/4" high

Step 2} Add the bottom piece (stuck on the front)
A) Emboss the Bottom strip (1" wide x 5-3/4") of Whitewash in a Cuttlebug folder
B) Sand it & fold in half.
C) Put adhesive on the back of one half & adhere it to the top of the Cuttlebug folder (to hide the text)

Step 3}
A) Emboss & sand the full back panel (4-5/8" wide x 5-3/4" high.)
B) Lay the panel over the back of the folder (with no adhesive on the large full panel at all.) C) Adhere the back of the bottom strip to it.

Step 4} Emboss the two side strips (1" wide x 5-3/4" high.) Sand them & fold them in half.

Step 5} Adhere the side panels to the front of the folder.

Step 6} Wrap the two side pieces around the back (onto the full back panel.) Then you've made a frame on the front & a pocket on the back.

Step 7} Create the pocket card (with the party information on it) to slide in the pocket. I embossed the text on Core'dinations Whitewash straight out of the printer (just sprinkle clear embossing powder on it while the printer ink is wet & heat with a heat gun.)
-3-

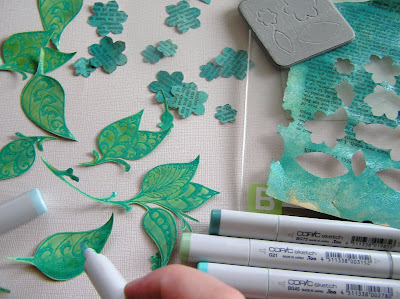
Step 1} Stamp & Emboss Leigh Hannan Damask leaves (an acrylic stamp set I bought at Paper Gardens Projects.) The Graph paper is from Cosmo Cricket's Girl Friday Collection (specifially, Wednesday.)

Step 2} Ink Damask leaves with Distress inks (Peeled Paint & Broken China)

Step 3} Spritz leaves with Glimmer Mist (This is Garden Fairy-a lovely soft green)

Step 4} Add more colour using Tim Holtz's "wrinkle free distressing" technique (add Distress Ink & Glimmer Mist to wax paper & press image on it to pick up colour)

Step 5} Cut the leaves out & shade them with Copic markers to add dimension

Step 6} Add White Sakura Souffle pen details.
and put it all together...


0 comments:
Post a Comment