She's sittin' pretty over the city. :o)

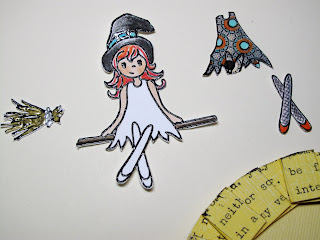
1...preview peek of the new Little Paper Shop Set {Jena Witch}
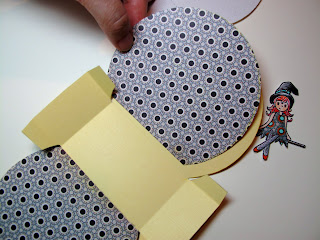
2...pictorial for how to make a moon treat box
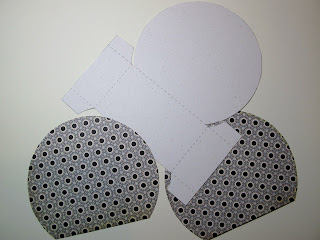
3...the round box template
(new LPS Set {Jena Witch})
This lil' witch is flyin in on Tuesday
(her release day at LPS)
This lil' witch is flyin in on Tuesday
(her release day at LPS)
Nothing like a cute new stamp to fire up your mojo, hey? I'm so stoked about today's sneak preview {Jena Witch}. I flip for Halloween. I've dressed up as a witch a few time (and a vampire, princess Leia, an alien, a bunny wabbit, a crow... you get the idea...I lurve Halloween madly!)
-2-

...make a moon treat box


Step 1} Trace, cut, & score the round box template.

Step 2} Sand Core'dinations cardstock to distess it & remove the dust.

Step 3} Make the ruffled edge. This is a trick I learned from the Brilliant Nathalia; her fantastic tutorial is here. These are made this way...
A) Print Halloween text onto the sanded Core'dinations cardstock
B) Let the printer ink dry for a couple seconds
C) Cut it into strips
D) Score it & fold it (I scored it every half an inch)
E) Adhere the folds to themselves--curving it to fit the circular box.
(This text is Edgar Allen Poe's The Black Cat typed in MSword in Underwood Champion a free font from dafont

Step 4} Adhere the folded text strips around the circle & trim them (using the box circle edge as a cutting guide)

Step 5} Pierce & stitch through the folded strips.

Step 6} Cut a city (this was cut with the Cricut Expression & the cartridge that comes with it Plantin Schoolbook) (For more details on how this city was made please see this post.)

Step 7} Stamp {Jena Witch} in Black ink & emboss her with clear embossing powder. She's coloured with a mix of Prismacolour pencils, Copic markers, & Sakura pens. I paper pieced her dress using BasicGrey Ambrosia paper.
Her fishnet stockings are my favourite part (she's sassy! heehee) A pencil crayon seemed the easiest way to get a thin, soft line on them.

Step 8} Trace & cut two semi circles to line the box with. This is more of that BasicGrey Ambrosia.

Step 9} Adhere the liner pieces inside the box. (Dear Tombow, I loves ya too much!)
Step 10} Glue the paper pieces onto {Jena Witch} & stick her to the top of the moon box.

...make a moon treat box


- {Jena Witch} stamp set (Coming soon to the Little Paper Shop!)
- Round box template (linked below)
- Core'dinations cardstock (Roy G Biv Super Assortments-2 yellows)
- Sandpaper
- Printer & text file (details below)
- Strong adhesive (I used Scor-tape & Tombow)
- Scissors & paper cutter
- Scor-pal (or another scoring tool)
- Paper piercer, black thread, & needle
- Black ink, clear embossing powder, & heat gun
- Prismacolour pencils, Copic markers, & Sakura Souffle pens
- BasicGrey Ambrosia paper (6x6 pack)
- Copic Spica (clear) & Silver Zigpainty pen

Step 1} Trace, cut, & score the round box template.

Step 2} Sand Core'dinations cardstock to distess it & remove the dust.

Step 3} Make the ruffled edge. This is a trick I learned from the Brilliant Nathalia; her fantastic tutorial is here. These are made this way...
A) Print Halloween text onto the sanded Core'dinations cardstock
B) Let the printer ink dry for a couple seconds
C) Cut it into strips
D) Score it & fold it (I scored it every half an inch)
E) Adhere the folds to themselves--curving it to fit the circular box.
(This text is Edgar Allen Poe's The Black Cat typed in MSword in Underwood Champion a free font from dafont

Step 4} Adhere the folded text strips around the circle & trim them (using the box circle edge as a cutting guide)

Step 5} Pierce & stitch through the folded strips.

Step 6} Cut a city (this was cut with the Cricut Expression & the cartridge that comes with it Plantin Schoolbook) (For more details on how this city was made please see this post.)

Step 7} Stamp {Jena Witch} in Black ink & emboss her with clear embossing powder. She's coloured with a mix of Prismacolour pencils, Copic markers, & Sakura pens. I paper pieced her dress using BasicGrey Ambrosia paper.
Her fishnet stockings are my favourite part (she's sassy! heehee) A pencil crayon seemed the easiest way to get a thin, soft line on them.

Step 8} Trace & cut two semi circles to line the box with. This is more of that BasicGrey Ambrosia.

Step 9} Adhere the liner pieces inside the box. (Dear Tombow, I loves ya too much!)
Step 10} Glue the paper pieces onto {Jena Witch} & stick her to the top of the moon box.
-3-

(round box template at 80%)
For now it's just a traceable template...

I tried to make a new whole template with 2 round ends, but my technical skill is rather limited, so I couldn't get it to work & had to give up, for now. (I need tech support! LOL)
Used at this percentage, this makes a 4.5 inch diameter box.
For the original 5.5 inch box template, please see this post.
Thanks for flyin' by!


0 comments:
Post a Comment