StampznewBright

  • Subscribe to our RSS feed.
  • Twitter
  • StumbleUpon
  • Reddit
  • Facebook
  • Digg

Tuesday, 22 September 2009

Caardvarks Sketchfest TUESday (+ Glassy Cuttlebug technique)

Posted on 00:20 by Unknown
caardvarks Studio Calico TUESday melstampz

Don't you love how a sketch can take you out of your "everyday" ways?
These Caardvarks Sketchfest sketches are mojo helpers BIG time--
especially since I'm what you might call "layout challenged!"


1...The Challenge: Caardvarks Sketchfest
2...how to get glassy Cuttlebug embossing

-1-


Today is day 3 of Caardvarks Sketchfest with Studio Calico!


All of the crews cards were made with the contents of
Studio Calico's gorgeous "Director's Cut" kit.
Their September kit is HOT too! & this add-on has me a droolin'

This is the sketch for today
(TUESday)
:
It's made by Heidi!

You're sure to LOVE the cards
by the crew & Davinie HERE.


Details on how to enter to win:


-2-

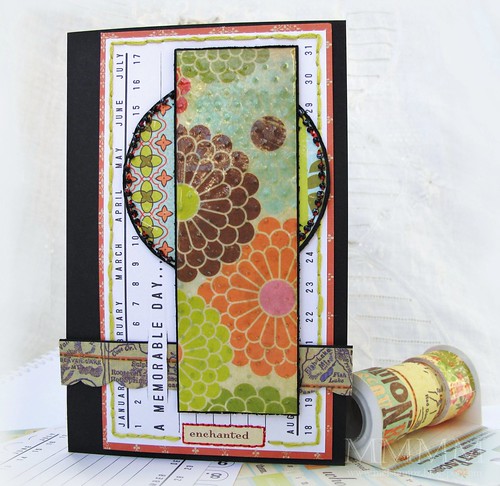
...get glassy Cuttlebug embossing

The crow in me likes shiny raised texture on patterned paper SO much:
083

Not sure if this is a new Cuttlebug technique-Who knows anymore in the fabulous free-for-all that is crafting? Who cares, right? LOL. But maybe this will be new to you & you can have some fun with it.

It couldn't be simpler:
just add clear embossing to an embossed piece of patterned paper.


  • All of these papers & embellishments are from the Studio Calico "Director's Cut" kit. I don't know how they pack so many nifty goodies in one kit, but I'm mighty thankful!
  • Versamark (or other clear embossing ink)
  • Paint brush
  • Provo Craft (or other embossing folder)
  • Cuttlebug (or other machine)
  • U.T.E.E. (Ultra Thick Embossing Powder) or regular clear e.p.
  • Heat gun
  • Paper piercer, needle, green & red thread, & black seed beads
  • Black cardstock
  • Corner rounder punch (for scallops) & exacto blade


Step 1)
Apply a thick coat of Versamark (or other clear embossing ink) onto a Cuttlebug embossing folder (I like painting it on from the refill bottle, since that protects my Versamark pad from wear & gets lotsa juicy Versamark on the folder.) ;O)

If you don't like messing up your folders, you could just emboss the paper in an ink free folder (like you normally do) and then apply the Versamark to the embossed paper instead of the folder. I think I just need to make a mess to feel like I'm crafting & I wanted lots of Versamark colouration soaked in the paper.


Step 2)
Cut your patterned paper to size & lay it in the Versamark area of your folder. (The sticky Versamark holds it in place quite nicely.)


Step 3) Dry emboss the paper by running the folder through the Cuttlebug.


Step 4) Add U.T.E.E. (Ultra Thick Embossing Enamel) to the dry embossed (and now Versamark covered) paper.


Step 5) Melt the U.T.E.E. with a heat gun.


Step 6)
If you'd like the glassiness to be nice & thick, add more Versamark...


Step 7) ...and add more U.T.E.E.


Step 8)
Heat it with the heat gun again. You may get a bit of curling but a bit of strong adhesive will fix that (or you can set it under a stack of books for a while to un-curl)

Optional, stick your glassy embossing in the freezer & crack the clear embossing glaze if you like. You can ink the cracks too.


Step 9) To make the mat, I stitched on some of the "Little Yellow Bicycle" Journal tablet Everyday labels from the Studio Calico kit & one of the stickers too...with green & red thread. Those labels are such nifty card elements. I'm hooked on those puppies!


Step 10) The glassy Cuttlebug piece is mounted on black cardstock & then a circle (cut from the same patterned paper in the Studio Calico kit.) Then, it's stitched with black seed beads and red thread.


Step 11) To make the Decorative strip, I did this stuff:

A) Stuck a piece of the MakingMemories Great Escape masking tape onto black cardstock
B) Trimmed it & then used a corner punch to scallop it.
C) I used an exacto blade to cut a slit (to keep the word "memorable" from being covered up.)

You can colour this masking tape with Copic markers too, to get any colour you like.

Step 12) Stick it all on a black card:


Of course, you could also use plain cardstock to do the glassy Cuttlebug thing--or stamped paper, or whatever your heart desires! If you don't have a Cuttlebug, but you'd like to try it, you could buy pre-embossed paper & add clear embossing to it.


Thank You sooooooh much for taking time out
of your busy day.
Hope you find time to play!


P.S. my Sunday & Monday Sketchfest cards are here:
Email ThisBlogThis!Share to XShare to FacebookShare to Pinterest
Posted in Caardvarks, cheap-tricks, Faves, techniques, Tutorials | No comments
Newer Post Older Post Home

0 comments:

Post a Comment

Subscribe to: Post Comments (Atom)

Popular Posts

  • free Butterfly Silhouette .studio cut files (in 3 styles)
    Hi, All! Here are those butterfly Silhouette .studio cut files. They are for only for the Silhouette machine... But I do hope to share other...
  • DIY digital paper (some freebies)
    The lull in posts (over the last couple of days) was for me to finish up this looooong post I've been wanting to share with you for eons...
  • New Popcorn Box template set (pretty stamp room storage) :o)
    Are you in the mood for a template or two? I was going to wait until I had really good photos and a full pictorial, but then I would take fo...
  • Missing with a migraine, Craft room BEFORE pics, & LINKs for Organizing the craft room
    Edited to add: Sorry guys. I feel like I was hit by a truck. Migraine's lasted so long... but I will be back with a post by tomorrow eve...
  • Graphics Fairy Inspiration (+vintage printables)
    Thank You all so much for your wonderful comments about the papers I've been obsessed with. Your kind words make me grin so big that I g...
  • "Honey, I shrunk the stationery!" (Hero Arts typewriter notebook)
    Still trying to make more of my cards into little gifts. This Hero Arts typewriter card is another take on the card turned refillable notebo...
  • 3 Clean And Simple cards (with SRM stickers)
    You guys may know that I was tragically born without the gene that let's you achieve a C lean A nd S imple card. ;-) Not sure why I find...
  • Making Your Own Colour Shimmer Sprays--Links & Info
    Info & Links Links for how to Mak e yo ur o w n Sh im mery s prays: (These are for you sweet Beth! oxo) ( more info on these colours in...
  • over 100 free pattern overlays ... at a glance
    Would you believe that the free overlay total is at 139 overlays and counting? (I might have a wee little addiction) ;-) Since overlays can ...
  • Felt-based cards (Rock-a-Bye Baby tutorial)
    New idea, Old projects.... I've been debating whether or not to post some older projects/tutorials since the big bad insecurity beast...

Categories

  • 'Mouse'-the-cat (10)
  • *TEMPLATEs (98)
  • 3D-projects (144)
  • A-Day-For-Daisies (7)
  • Amber Ink (9)
  • Angel's-Landing (2)
  • BASICS (47)
  • Blogging-tips (7)
  • Caardvarks (48)
  • Cat's-Pajamas (2)
  • cheap-tricks (224)
  • Christmas (33)
  • Claire-Keay (2)
  • Cricut (3)
  • cut-file (2)
  • Cuttlebug (45)
  • decor (6)
  • Digital-Images (131)
  • Distress-Inks-etc (14)
  • DIYstamps (1)
  • Eat-Cake-Graphics (11)
  • Faves (207)
  • Fred-She-Said (5)
  • Freebies (77)
  • GESSO (9)
  • Halloween (10)
  • Heather Ellis (3)
  • Hero-Arts (14)
  • ISC (7)
  • Jessica-Sprague (2)
  • Just-Rite (2)
  • LPS (63)
  • Mo's-Digital-Pencil (16)
  • My-Favorite-Things (33)
  • organizing (7)
  • Other-People's-Tutorials (36)
  • Paper-Garden-Projects (54)
  • Paper-Temptress (39)
  • Punches (21)
  • Purple-Onion-Designs (23)
  • S.U. (1)
  • SCOR-PAL (4)
  • silhouette (4)
  • Skipping-Stones-Design (7)
  • Squigglefly (6)
  • SRM-Stickers (8)
  • techniques (191)
  • templates (26)
  • Tiffany-Doodles (4)
  • Tutorials (252)

Blog Archive

  • ►  2013 (16)
    • ►  July (4)
    • ►  June (4)
    • ►  May (3)
    • ►  April (1)
    • ►  March (1)
    • ►  February (3)
  • ►  2012 (53)
    • ►  December (2)
    • ►  November (2)
    • ►  October (1)
    • ►  August (3)
    • ►  July (2)
    • ►  June (5)
    • ►  May (7)
    • ►  April (8)
    • ►  March (9)
    • ►  February (13)
    • ►  January (1)
  • ►  2011 (74)
    • ►  December (1)
    • ►  November (5)
    • ►  October (10)
    • ►  September (9)
    • ►  August (12)
    • ►  July (5)
    • ►  June (9)
    • ►  May (2)
    • ►  April (6)
    • ►  March (7)
    • ►  February (4)
    • ►  January (4)
  • ►  2010 (84)
    • ►  December (7)
    • ►  October (1)
    • ►  September (6)
    • ►  August (1)
    • ►  June (1)
    • ►  May (7)
    • ►  April (21)
    • ►  March (3)
    • ►  February (17)
    • ►  January (20)
  • ▼  2009 (234)
    • ►  December (16)
    • ►  November (21)
    • ►  October (11)
    • ▼  September (23)
      • Angel's Landing Purse Box
      • The last Caardvarks Sketchfest Sketch!
      • Caardvarks' Friday sketch & Pic Pics/wider Blogger...
      • Caardvarks THURSday sketfest sketch!
      • Resist with a Twist--Cuttlebug Challenge Birthday ...
      • Caardvarks Sketchfest TUESday (+ Glassy Cuttlebug ...
      • Night Sky {Jena Witch} Treat box
      • "Ho Ho Holidays" Faux Gatefold card (with Angel's ...
      • myGrafico retirement challenge (floating flamingo ...
      • Caardvarks Sketchfest!!! --1 of 4 posts today--:o)
      • Beaded Faux Window P.O.D. Card
      • Angel's Landing Blog Hop (New Release Peeks!!!)
      • Caardvarks G.C.D. Blog Hop! (& new purse box templ...
      • UH OH! all those ghosties & those witchies have be...
      • {Boo} LPS release (& DIY grungey text Halloween pa...
      • Digital Découpage Embossing (myGraphico recipe cha...
      • {Jena Witch} Over the Moon box (an LPS peek)
      • Speedy round gift bag (Challenge 2 for the Palooza!)
      • Templates & Pictorial over at the Paper Temptress...
      • The Baby Train (An Angel's Landing Project)
      • LPS Sketch Challenge: Waterlilies card
      • You're invited to the Cuttlebug Challenge Birthday...
      • Teresa Collins "Journal it Girl" purse box & calen...
    • ►  August (29)
    • ►  July (26)
    • ►  June (10)
    • ►  May (16)
    • ►  April (26)
    • ►  March (22)
    • ►  February (27)
    • ►  January (7)
  • ►  2008 (39)
    • ►  December (14)
    • ►  November (25)
Powered by Blogger.

About Me

Unknown
View my complete profile