


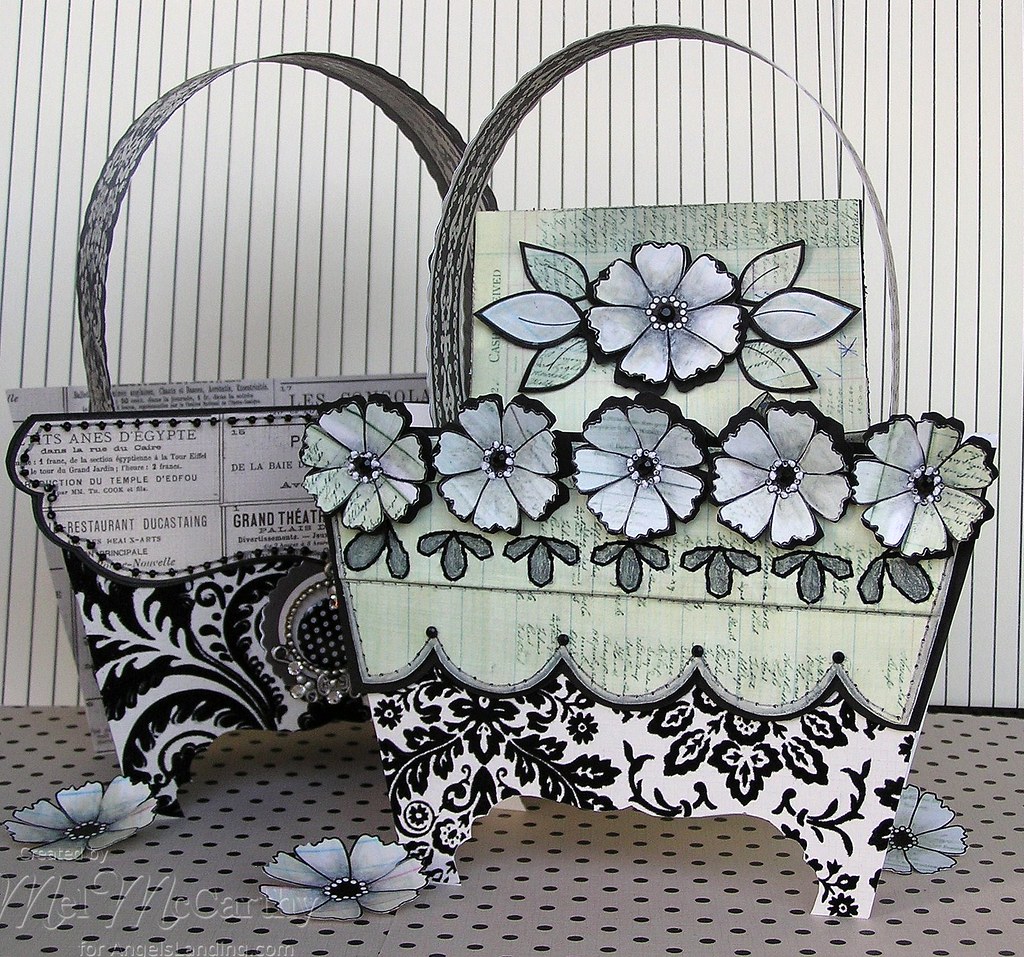
I'm trying to get a start on Christmas gifts with this purse box & A2 cards. It's embellished with Angel's Landing digital sets! Simply Flowers (for the homemade 3D flowers & leaves & the Pierced Backgrounds set (as a speedy piercing template for the decorative stitching.)
Here's the matching card with a large Angel's Landing flower:

This digital set has many flower types, but I loved this stunning flower image. Of course, since it's digital you can get a huge variety of flowers--especially since each bloom can be all different sizes (so your projects are all matchy-poo.) ;o) You could even enlarge these flowers to make big shaped card templates, if you were so inclined.

clickable photos of these thingers (for enlarged views) and...
1...creating the 3D flowers & leaves
2...the stitching template
3...building the purse box
4...digital stuff (A new ledger paper image)
5...the template for the purse box

clickable photos of these thingers (for enlarged views) and...
1...creating the 3D flowers & leaves
2...the stitching template
3...building the purse box
4...digital stuff (A new ledger paper image)
5...the template for the purse box


Please click these pictures, if you'd like bigger views of the details
of the card & two boxes (front, side, inside...blah blah blah)


of the card & two boxes (front, side, inside...blah blah blah)


The papers etc. are all from the GCD collection Paris Nights
& the dotted sticker is from GCD Shades of Black stickers
& the dotted sticker is from GCD Shades of Black stickers
-1-

...create the 3D flowers & leaves
(Simply Flowers digital set)

The flowers & leaves were speedy to print: I just pasted a whole bunch of them in a file for quick printing & paper saving. I printed that same file at 80 percent for the smaller versions. (So fast!) I just may have to make a whole bunch of flowers as card candy & fridge magnets to give to family & friends!

Step 1)
A) Print ledger paper & paint with gesso wash.
B) Print Angel's Landing 'Simply Flowers bloom (the smaller series of 5 was printed at 80% in Photoshop--The large one for the card was printed at 100%)
C) Emboss the wet ink jet printer ink with clear embossing powder & heat gun it to melt.
Step 2) Shade the petals (towards the middle of the flower) with grey Copic markers & Prismacolour pencil--or your favourite colouring medium--though if you are using gesso you may want to experiment with what has staying power.)
Step 3) Colour the flower center black. (I used a Copic since it's a rich deep black & it stays put on the gesso.)
Step 4) Cut out a black shadow for underneath the flowers (just black cardstock roughly cut to bigger than the flower itself.)
Step 5) Repeat the process for the leaves. Also from Angel's Landing 'Simply Flowers' set.
Click this thumbnail to
see a BIG version:

see a BIG version:

Since I never know when to stop messing about,
I pierced the flowers & added embroidery thread knots:

I pierced the flowers & added embroidery thread knots:

...and black gems too:

-2-
...use the Pierced Backgrounds as a
stitching template (hand sewing/faux)


F) Hand stitch or faux sew the pattern.

stitching template (hand sewing/faux)


- the Pierced Backgrounds set
- paper piercer or needle
- for hand stitching: needle & thread
- or for faux sewing: a marker/glaze pen...

A) Print the Pierced Background (enlarge it if you like to suit your project)
B) Lay the background over your project (Anchor it with pins to keep it in place while you pierce--I use 2 pins & work on a fun foam mat--made with 4 layers of fun foam.)
C) Test your positioning: I find it helps a lot to check out the two holes where you have your anchor pins to judge if you have the patterned lined up the way you want it. :o)
D) Pierce it (goes so quickly!)

F) Hand stitch or faux sew the pattern.

G) Colour the pattern in, if you like......and then add the flowers on the top.
-3-
build the purse box


I had fun with lots of layers on this, but
you could simplify/alter these directions however you like-of course
It is just...

I had fun with lots of layers on this, but
you could simplify/alter these directions however you like-of course
- a rectangular box (and 2 side pieces)
- with 2 shaped pieces for the front and back
- a curvy label like piece for the purse flap
- & the fastest handle from the GCD Paris Night Collection!
- GCD Studios Paris Nights collection & their black and white stickers
- Black cardstock (100 lb+ is nice)
- Pencil, paper cutter/scissors
- Adhesives of your choice (I used Scor-Tape & Tombow)
- Paper piercer, seed beads, needle & thread

Step 1} Print & cut out the templates: the rectangle box base, the curvy footed piece (to trace for the front & back), & the purse flap piece.
There are two exact pieces for the front & back in case you want to save a step or two & print them directly on cardstock then cut 'em out (instead of tracing the one purse shape)....but then you may very well find the feet need some extra cardstock to make them strong. :0)
For the flowered Angel's Landing purse I used this scallop template to make the scalloped edge of the purse flap instead:
Please click the photo for the JPG:
_melstampz.jpg)
click here if you prefer PDF
(The box templates are all linked below)

Step 2} Trace the purse shapes onto the Paris Night Collection paper & cut them out.

Step 3} Adhere the shapes to black cardstock to strengthen for the crazy purse feet. I love 100 lb or more for sturdy feet (these have high arches, ynuk ynuk!) ;o)

Step 4} Cut the purse pieces out of the black cardstock (it will have a fuzzy velvet paper side & a black cardstock side now)

Step 5} Adhere the black cardstock side to the text patterned paper (also from Paris Night--you can only see the back of the text DP here which is a lovely low-contrast black-grey damask.)

Step 6} Cut 'em again

Step 7} Trace the box template & cut it out (I used black cardstock then lined it with more perty text paper.)
Make 4 side pieces each measuring a hair over 2-1/2" x 3 1/8" (Two to match the lining & two to match the outside velvety-ness.)

Step 8} Make the handle by gluing a thin Paris Nights scallop die cut piece onto a thick one.

Step 9} Adhere the handle in between the side pieces.

Step 10} Stick the front & back onto the rectangular box (so that it sits up behind the full part & the feet show blank space between them.)

Step 11} Trace & cut the purse flap. Bead it & stitch it.

Step 12} Adhere the flap to black cardstock, trim around it to frame it (and to hide the stitches.)

Step 13} Make a decorative label (this uses CGD Shades of Black stickers, more Paris Nights die cuts (2 scallop circles back to back), with a dollar store fancy metal frame piece adhered to them, & some swarovski crystals stuck on that.)

Step 14} Affix the fancy label embellishment on the box....
or as in the case of this box's country cousin....
flowers & the stitched scallloped ledger paper panel:
flowers & the stitched scallloped ledger paper panel:

-4-

The ledger paper used for the purse flap & flowers & leaves
(with nice small script & blue pen):

script ledger JPG available here
Script ledger PDF available here
-5-

Rectangular Box Base:
(measures 4.5 inches wide &
fits standard A2 cards & envelope)
+copy.jpg)
+copy.jpg)
Cut these size rectangles for the side pieces on the rectangular box:
4 side pieces each measuring a hair over 2-1/2" x 3 1/8"
(Two to match the inside lining & two to match the outside.)
(for a visual, please refer to the photo in Step 7 up above)
Purse Shape & Flap:
(fits on the rectangular box base above)


PDFs are also available, here:
Box Base (no score lines)
Box Base (score guide)
Purse Flap
Purse Shapes
Thank You so much for stopping in.
If You try this template, I'd love to see your work!
If You try this template, I'd love to see your work!


0 comments:
Post a Comment