StampznewBright

  • Subscribe to our RSS feed.
  • Twitter
  • StumbleUpon
  • Reddit
  • Facebook
  • Digg
Showing posts with label Paper-Temptress. Show all posts

Thursday, 28 April 2011

Mother's Day card (my ol' doodled digi flowers)

Posted on 02:50 by Unknown
Oops, sorry for not posting this week. We've both had a wickedly funky flu, but thankfully it's on the way out and now Charles and I are headed to the island to visit his Marvellous Mom & Delightful Dad and meet their two new huge Newfie dogs: Cody & Floyd.

Today's post: just a little rehash of an old flower doodle
that I did in honour of Mother's day quite a while back...

doodled flowers embossed on vellum mel stampz

Details of the card: It's a 5 and a 1/2 inch square card. The flower image is embossed from the printer on vellum (just printed on standard & sprinkled with clear embossing powder while the ink is still wet). It's coloured with Copic markers and a white gel pen. Then hand stitched onto layers of speckled cream cardstock (that were inked a bit for distressing).

If you like the flowers, you can find more digi freebies with them
and see more projects with them in these old posts:

A matching basket for the card above
linked on Paper Temptress blog here:


Another odd little box
(with template & tutorial) linked here:


A Mother's Day card & digi paper files:


JPEG files
If you'd like these, please just click on the image to enlarge.
Then right click & choose "save image as..." to save them:

Five flowers:


Five flowers (with three for paper piecing at top):


Four (identical) flowers:

Three flowers:


Three paper piecing flowers:
(or for 3D flowers?)


Some PDFs are also available on SCS here

Clickable blogger photo:


Hope you're having a wonderful week!

Read More
Posted in cheap-tricks, Digital-Images, Freebies, Paper-Temptress | No comments

Friday, 31 December 2010

Winter B-day Basket (à la Mo) + a wee CATastrophe

Posted on 00:01 by Unknown
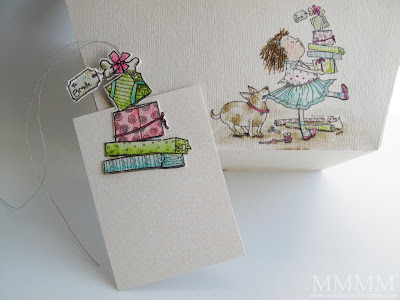
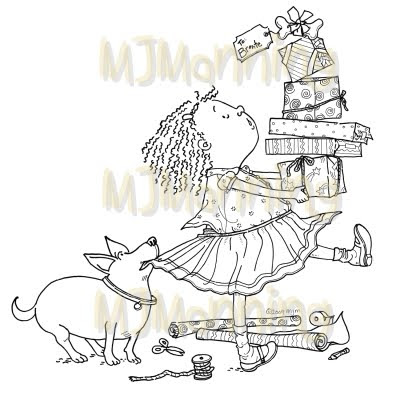
a playful image....

detail bronte wants it now

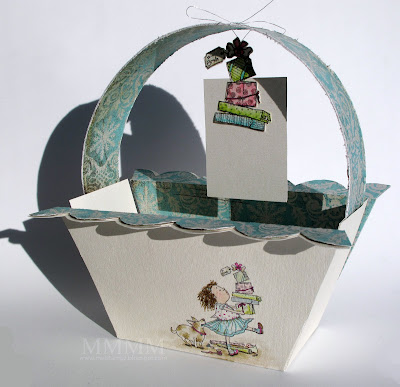
....printed and embossed on a basket:

Mo's Digital Pencil Bronte Wants it Now basket by mel stampz
(to wrap a winter birthday gift)

...and a little perty on the inside:

Bronte Wants it Now basket INSIDE

The full-view picture of this basket up there is kind of botched,
but I have a good excuse, I swear! ;o) Can you guess what it is?...


teeheeheehee


1...the image
2...how-to add images to a 3D box template
3...in a word, catastrophe
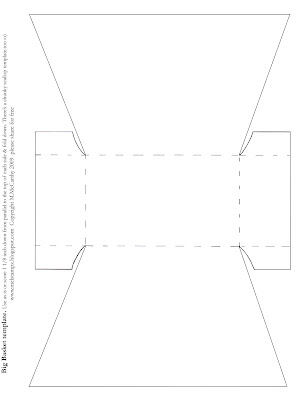
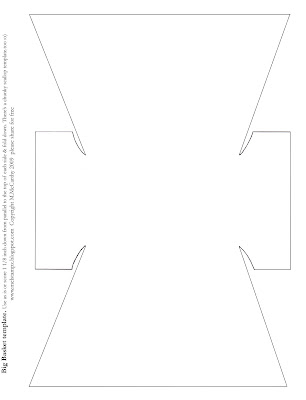
4...free template for a BIG Basket (an oldie)
-1-


Mo's Digital Pencil Bronte Wants it Now
(A flexible image since it's adorable for Christmas or birthdays.)


It was fun to cut the gift stack out digitally and use it as an element
for the tag & inside of the basket too. (Bonus!) ;o)

-2-


Print a digital image on a 3D template
& build this basket

This cheap trick of printing your image at the same time as
you print a 3D template might be a fun way to do several
treat-bags for a child's birthday party. Faster than stamping!


  • Digital image Mo's Digital Pencil Bronte Wants it Now
  • Candido Incandescent cardstock
  • Clear embossing powder, & heat gun
  • Copic Markers
  • BasicGrey snowflake paper (retired)
  • Silver thread
  • Adhesive
  • A crazy cat

Step 1) Add the image to the template file:


1A) Open the digital image of your choice (You could use free clip art or colouring pages. Your own doodle or a child's drawing would be so special for this!)

1B)You could paste the image sized as it is, or you could turn the image into a photoshop brush to have control over the size. (I always like to make sure I label photoshop brushes that are made this way with the artist's name so I can always make sure to follow copyright and give due credit) :o)

Front & back: I used Photoshop, and rotated the image to get it printed right-side-up on the front & back of the basket.


Step 2) Print the image & emboss it, if you like. This Candido Incandescent cardstock from Paper Temptress is embossable straight out of the printer [using clear embossing powder and a heat gun (just print in an inkjet printer (the high quality setting is usually perfect); then, sprinkle the embossing powder quickly when it comes out of the printer & heat set with the heat gun.]


Step 3) Score, and cut out the the basket. The blue lines, in the photo above, indicate the score lines.


Step 4) Print, score, cut & assemble a liner out of patterned paper. (To get a liner, for any box, I just print it again at 98.5%)


Step 5) Colour the image with Copic markers (or whatever you prefer).

If you are using the
Candido Incandescent cardstock from Paper Temptress to emboss, you will want a marker with some permanence, since it is glossy and water-based markers might not set well on it.

Copics
work wonderfully on it, since they float and are very forgiving. (You can even go back and fix colouring "mistakes" days later)

AND the incandescent cardstock gives your
copic colours a pretty sparkle:


(The watercolour paper texture of it is nice too.)


Step 6) Assemble the basket and its bits:

6A) Fold & adhere the basket.

6B) Add the liner to the inside of it.

6C) Create 4 side pieces for the basket (The sides aren't included on the template in order to get a BIG basket in the printer on a 8.5" wide paper, but they're just plain rectangular pieces that are easy to cut).

To make the sides, cut 4 pieces of cardstock to measure:
2 and 6-8 inches by
just a hair under 2 and 1-2 inches


I also added images inside of the basket by using photoshop:


A) Cut the stack of gifts from the image digitally.
B) Make a copy of it reversed for the other side of the basket (inside)
C) Print & cut the 4 ide pieces (2 patterned 2 plain)
D) Attach the 4 side pieces to the basket

(P.S. Can you see the "foreshadowing of imminent catastrophe" in the photo above? HINT: Furry Mouse shadow.... giggle giggle)


Step 7) Make a matching tag:


8A) Print 2 of the gift stack image on more Incandescent cardstock, emboss them, & colour them in.


8B) Adhere the two images to a piece of cardstock (sandwiching silver thread inside to make a string for the tag)

And then, you have a gift basket & tag:


with that cute image on the front & back:


perfect for a little someone to sabotage...


"catastrophe"

Someone
decided to crawl right into this basket:


and she went straight through!:


(no kitties were harmed in the mauling of this basket)

She even got the tag in her mouth & sat in the basket
for a second
; man, I wish I got a shot of that!

Do you think Mouse may have a thing against dogs?:

hehehe

-4-

for a BIG Basket

There's a tutorial with details on how to
assemble the basket template here

and


Please click this link if you'd like to
download the templates

(or click the photos for JPG versions):


I printed this one with no dotted lines right
onto the cardstock & patterned paper for this project:


When finished, the basket measures:
  • width: 6" (at the basket top) and 4 2/8" at the basket bottom
  • height: 2 6/8" (for the basket height) and (7" high, with the handle)
  • depth: 2 1/2" (from basket front to basket back)
To make sides cut 4 pieces to measure:
2 and 6-8 inches by
just a hair under 2 and 1-2 inches


Thanks for visiting!


P.S. Thank you so much for your kind well wishing,
C is still in relative agony but healing more & more each day!

P.P.S. This post is unsolicited, but I was formerly on the
design team for Mo's Digital Pencil & Paper Temptress, two fabulous ladies!
Read More
Posted in 'Mouse'-the-cat, *TEMPLATEs, 3D-projects, cheap-tricks, Freebies, Mo's-Digital-Pencil, Paper-Temptress | No comments

Friday, 5 February 2010

Squigglefly Bubbly Baby! (and a very personal note & future blogcation plans)

Posted on 14:15 by Unknown
On a very personal note: Well today (this week, the last couple of months....) have been interesting to say the least. After some testing & waiting in the last while..today, I heard the magical word benign! Thank You God! sniff sniff, sighhhhhhh. I'll spare you the details, but let me tell you, I did me the HAPPY dance!!! (Still doing it) :-D As you can imagine, I am ever so grateful & relieved.

Moving & Imminent Blog Vacation plans... We found out that we're moving unexpectedly for March, but it'll be more than nice to get away from the constant loud highway traffic & evil smog... BUT unfortunately, that means I'll have to schedule a short blog-vacation or two for packing (and moving) since we have WAY too much stuff. LOL.

Camera Jazz: Now, most critically for immediate blogginess, I think I fixed whatever was wrong with my camera (Canon G10). It wasn't working at all--no focus whatsoever & I only had the close shots of this card done, since it's been a week of work like crazy to catch up... Must've been a funny button I pushed. It's easy to hit funny buttons, then symbols from some lost alien civilization show up & I no speaky the language. I'm still not used to the settings--must make time to learn more and avoid future calamity...

Sorry, if that was all T.M.I. (too much information) for you, I just feel so close to y'all (I mean, with my blogmania, you're my life pretty much! heehee) and I had to shout it off rooftops (or burst!) Plus, I wanted to let you all know the blog vacation & camera scoop. All in all, Mr migraine still comes and goes as he chooses (the big ol' jerk!) ;o), but life is sooooooooh amazingly SWEET!

....And now to celebrate--with some bubbly, Baby!!!

Squigglefly Bubbly Baby Bath
(teeheehee)

Friends of ours just had their first baby: a healthy 9lb bouncin'
bundle of boy! (so I have babies on the brain.)

This cutie is a digital image from Squigglefly.
It's called Baby Bathing:

the artist is Eline Pelinkhoff.

When you buy the image, you get the image flipped both ways for you, --so that you can use either direction without any work on your part (or you could use both the mirror image & original at the same time! Imagine the cute reflection you could make with this and a watery floor!?!)

This lil' baby is heat embossed on metallic cardstock...

Squigglefly digital image Bathing Baby embossed on paper temptress quartz metallic cardstock

Heat Embossing a digital image
(on metallic cardstock):

Step 1)
Gather embossing supplies (clear embossing powder, large tray, heat gun)

Step 2) Cut a half sheet of your semi non-porous paper (For this card, I used Quartz Stardream cardstock from Paper Temptress, but many metallic papers will work & I love using vellum cardstock too.)

The cutting is done to get it to print more quickly: so that it's still 8.5 inches wide but shorter for faster print time.) You can experiment with other paper types of course, but the stardream is a fave of mine for the sparkle.

Step 3) Print the image (I find standard printing setting the best--quick enough to keep the ink wet enough to hold the embossing powder, without sacrificing too much in the way of quality.

Step 4) Sprinkle clear embossing powder on right after printing & heat set it with a heat gun.

Step 5) Colour your image (I find Copic markers have the best staying power on more non-porous papers.)

You can also emboss digital images by painting
Matte Medium on any paper...
More about embossing with matte medium in this tutorial here.
&
some notes on matte medium embossing in this tutorial too

After embossing him, baby was embubbled ooops...
...I mean embellished! ;o)

Squigglefly Baby in the Bath

Making the bubbles was super easy (don't pass out on me, but there was no sewing involved!) I just glued on nice shiny clear dew drops & some wee pearlized clear seed beads (you saw the bead thing coming from a mile away, hey?) I used Crystal Lacquer to stick them on, so any overflow of adhesive just looks like water.

Of course, I had to add some stitching. The gold seed beads were sewn on:

Squigglefly Bubbly Baby Bath CLOSE

This next photo is sort of so-so, but I'd hoped it would show you the
tile texture & the shiny water:

squigglefly embossed tiles

The baby is all shiny too (so squeaky clean he sparkles!) ;o) ...since he's embossed on that metallic cardstock.

To make the shiny tiles
(and the rest of the bathroom decor):

Step 1) Punch some squares of patterned paper (This paper is from BasicGrey's Porcelain 6x6 pack fittingly enough.)

Step 2) Cut a Nestabilities label or a shape you like (this one is label 9 in white cardstock.)

Step 3) Adhere the squares onto the label shape (leaving a slight gap for tile grout.) :o) Trim off the ends of the squares that stick off the label. You could die cut it with the Nesties again, but I just used scissors...

Step 4) Stamp it with your favourite texture stamp (mine is this 2010 Vintage Calendar Stamp from Purple Onion Designs & I stamped it in pale turquoise to tie in the water colouring)

Step 5) Cover it in versamark, sprinkle with clear embossing powder & heat gun it.

Step 6) Add a floor (this one is made from more Porcelain paper coloured with a BG72 Ice Ocean Copic marker)

Step 7) Add baseboards (this one is a piece of the PT Quartz cardstock cut in a strip & scored with lines using a paper piercer & Tim Holtz ruler.


Thank You so much for taking time to visit,
& for sharing in my oh so fortunate news!

P.S. Click-able Blogger photos (to enlarge, if you like):


Read More
Posted in Digital-Images, Paper-Garden-Projects, Paper-Temptress, Squigglefly, techniques | No comments
Older Posts Home
Subscribe to: Posts (Atom)

Popular Posts

  • free Butterfly Silhouette .studio cut files (in 3 styles)
    Hi, All! Here are those butterfly Silhouette .studio cut files. They are for only for the Silhouette machine... But I do hope to share other...
  • Graphics Fairy Inspiration (+vintage printables)
    Thank You all so much for your wonderful comments about the papers I've been obsessed with. Your kind words make me grin so big that I g...
  • New Popcorn Box template set (pretty stamp room storage) :o)
    Are you in the mood for a template or two? I was going to wait until I had really good photos and a full pictorial, but then I would take fo...
  • "Honey, I shrunk the stationery!" (Hero Arts typewriter notebook)
    Still trying to make more of my cards into little gifts. This Hero Arts typewriter card is another take on the card turned refillable notebo...
  • Making Your Own Colour Shimmer Sprays--Links & Info
    Info & Links Links for how to Mak e yo ur o w n Sh im mery s prays: (These are for you sweet Beth! oxo) ( more info on these colours in...
  • over 100 free pattern overlays ... at a glance
    Would you believe that the free overlay total is at 139 overlays and counting? (I might have a wee little addiction) ;-) Since overlays can ...
  • Felt-based cards (Rock-a-Bye Baby tutorial)
    New idea, Old projects.... I've been debating whether or not to post some older projects/tutorials since the big bad insecurity beast...
  • Circle Overlays (to revamp your papers!)
    Can you ever have too many ways to use your stash? No card today, just popping in with a cheap trick for revamping your "old" pat...
  • Everything I've Ever Made (at a glance)
    This post is a visual overview of my blog history-- with thumbnails that are linked to tutorials & templates for pretty much everything ...
  • 3 Clean And Simple cards (with SRM stickers)
    You guys may know that I was tragically born without the gene that let's you achieve a C lean A nd S imple card. ;-) Not sure why I find...

Categories

  • 'Mouse'-the-cat (10)
  • *TEMPLATEs (98)
  • 3D-projects (144)
  • A-Day-For-Daisies (7)
  • Amber Ink (9)
  • Angel's-Landing (2)
  • BASICS (47)
  • Blogging-tips (7)
  • Caardvarks (48)
  • Cat's-Pajamas (2)
  • cheap-tricks (224)
  • Christmas (33)
  • Claire-Keay (2)
  • Cricut (3)
  • cut-file (2)
  • Cuttlebug (45)
  • decor (6)
  • Digital-Images (131)
  • Distress-Inks-etc (14)
  • DIYstamps (1)
  • Eat-Cake-Graphics (11)
  • Faves (207)
  • Fred-She-Said (5)
  • Freebies (77)
  • GESSO (9)
  • Halloween (10)
  • Heather Ellis (3)
  • Hero-Arts (14)
  • ISC (7)
  • Jessica-Sprague (2)
  • Just-Rite (2)
  • LPS (63)
  • Mo's-Digital-Pencil (16)
  • My-Favorite-Things (33)
  • organizing (7)
  • Other-People's-Tutorials (36)
  • Paper-Garden-Projects (54)
  • Paper-Temptress (39)
  • Punches (21)
  • Purple-Onion-Designs (23)
  • S.U. (1)
  • SCOR-PAL (4)
  • silhouette (4)
  • Skipping-Stones-Design (7)
  • Squigglefly (6)
  • SRM-Stickers (8)
  • techniques (191)
  • templates (26)
  • Tiffany-Doodles (4)
  • Tutorials (252)

Blog Archive

  • ▼  2013 (16)
    • ▼  July (4)
      • A Triple-stamped Fancy-cut Flower card
      • Flying by to say ... 'hello'
      • a Silhouette Challenge project
      • Silhouette Cameo - Sketch pen Camera card
    • ►  June (4)
    • ►  May (3)
    • ►  April (1)
    • ►  March (1)
    • ►  February (3)
  • ►  2012 (53)
    • ►  December (2)
    • ►  November (2)
    • ►  October (1)
    • ►  August (3)
    • ►  July (2)
    • ►  June (5)
    • ►  May (7)
    • ►  April (8)
    • ►  March (9)
    • ►  February (13)
    • ►  January (1)
  • ►  2011 (74)
    • ►  December (1)
    • ►  November (5)
    • ►  October (10)
    • ►  September (9)
    • ►  August (12)
    • ►  July (5)
    • ►  June (9)
    • ►  May (2)
    • ►  April (6)
    • ►  March (7)
    • ►  February (4)
    • ►  January (4)
  • ►  2010 (84)
    • ►  December (7)
    • ►  October (1)
    • ►  September (6)
    • ►  August (1)
    • ►  June (1)
    • ►  May (7)
    • ►  April (21)
    • ►  March (3)
    • ►  February (17)
    • ►  January (20)
  • ►  2009 (234)
    • ►  December (16)
    • ►  November (21)
    • ►  October (11)
    • ►  September (23)
    • ►  August (29)
    • ►  July (26)
    • ►  June (10)
    • ►  May (16)
    • ►  April (26)
    • ►  March (22)
    • ►  February (27)
    • ►  January (7)
  • ►  2008 (39)
    • ►  December (14)
    • ►  November (25)
Powered by Blogger.

About Me

Unknown
View my complete profile