StampznewBright

  • Subscribe to our RSS feed.
  • Twitter
  • StumbleUpon
  • Reddit
  • Facebook
  • Digg
Showing posts with label ISC. Show all posts

Wednesday, 13 January 2010

Cuttlebug Challenge Blog (new(?) 'bug techniques & folder stuff)

Posted on 06:10 by Unknown
Does texture make you feel all giddy?


Messing about with unpredictable textures gives me such a thrill!

The Cuttlebug embossing texture on this bookmark is...

mel_mccarthy_Cuttlebug_Challenge_#66 bookmark (2)

...all painted up to grace a pocket card:

mel_mccarthy_Cuttlebug_Challenge_#66 Bookmark pocket card

Don't you just adore paint?

This acrylic paint Cuttlebug technique has me ultra excited about sharing with you today, because it's supremely satisfying!!! LOL It's a tad messy (YAY paint!) but no brushes to clean, so it's relatively fast and easy.

It also gives you some new options to suit the newest styles of Provocraft folders (which have a lot more scenes to colour and treat with painty texture.)
I hope you'll like it....

All you need is:
  • Your favourite Cuttlebug supplies
  • Your usual colouring supplies (Copics or ink or whatever)
  • and a bit of white acrylic paint or gesso


1...Cuttlebug Challenge Blog: Be Inspired Wednesday #65
2...project dimensions
3...materials list
4...assembling & embellishing stuff for this pocket front card
5...bookmark--Cuttlebug Acrylic Paint Fresco technique (works with gesso too)
6...cheap tricks: cutting up stamps & DIY tassels on the cheap

-1-

Cuttlebug Challenge Blog

This is for the Cuttlebug Challenge Blog's Be Inspired Wednesday #66

OOPSY! Somehow, I missed the fact that this challenge was supposed to have red as the main colour, but I did get the pocket & Asian embossing folder part in there. Thankfully, part of my New Year's resolution is to not keep berating myself about my frequent little mess-ups. (It's all those paint fumes... No no no... I know...really, secretly the colour turquoise is conspiring to take over my brain! Yeah, that's the ticket!) ;o)

Hope You can join the challenge!

Be Inspired Wednesday #66 (Pocket Cards!)

-2-

  • Main card (a normal side-fold card): 5" wide x 6-1/2" high
  • Top embossed section (lanterns) 4-3/4" x 3-3/8"
  • Bottom Pocket (stamped with branch in blossom) 5" wide x 3-2/8"
  • Bookmark (Geisha figure) 6-3/8" x 2-1/2"
-3-

  • Cuttlebug machine & embossing folder: I used 2 of the soon to be available Provo Craft folders: Kimiko 5x7 Embossing folder & Lanterns A2 Embossing folder. You can see the whole Asian line on the Cuttlebug Challenge Blog hereas well as some stunning inspiration using them in the previous challenge (#65) here
  • White Strathmore 100lb Bristol Vellum (akin to heavy white cardstock)
  • Copic markers/other colouring medium. (Copics bleed less with the paint)
  • White acrylic paint (+cardstock scraps to spread it around)
  • Distress inks: Antique Linen; Peeled Paint; Broken China
  • Painting: brush, water, & paper towel/rag to blot
Other supplies:
  • Sewing: paper piercer, needle, thread, seed beads
  • Tassels (made from embroidery thread & a button)
  • Cardstock: Medium & light turquoise and cream coloured
  • Embossing: Versamark; clear & white embossing powder; heat gun
  • Stamps: Tranquility from ISC
-4-

...assemble the pocket card

Link

Step 1) Make the top lantern piece:

A) Cut a piece of cardstock to measure 4-3/4" x 3-3/8"
B) Pressure emboss it in the Cuttlebug (or Big Shot or what-have-you)
C) Swipe white acrylic paint on (or gesso) using a scrap of cardstock to spread it
D) Sponge inks on (used here, Distress ink mix: Antique Linen; Peeled Paint; Broken China)

A subtle amount of ink gives you a soft antiqued fresco look:
1b Cuttlebug folder acrylic paint & ink wash mel stampz

E) Pierce & Stitch it, if you like...


Step 2) Adhere the lantern piece to a card:

A) Cut a piece of cardstock to measure 10" x 6-1/2"
B) Score at 5 inch point (in the middle)
C) Stick the embossed piece on the top of it

(The card will be 5" wide x 6-1/2" high when folded)


Step 3) Finish the card:

A) Cut & stamp a section of coloured cardstock I used medium turquoise to measure 5" wide x 3-2/8".
B) Add a button tassel.

Please see "cheap tricks" below for details on the stamped branch image & button tassel.

-5-

the bookmark
Cuttlebug Acrylic Paint Fresco technique


This works with gesso too & if you don't have copics you might like to try paint washed on or other markers. I just find Copics bleed out less with the paint.


Step 1) Emboss, colour, & cover the image in white acrylic paint

A) Cut a piece of cream cardstock to measure 6-3/8" x 2-1/2"
B) Emboss it with a Cuttlebug folder to create an image you'll want to colour
C) Colour it with pale Copics (C3 Frost Blue; Cool Gray No3, B00; YG91 Putty) No need to have perfect colouring. To be honest this look pretty ICKy until the next step, when paint went on...
D) Swipe the entire surface with a light coating of acrylic paint


Step 2) Paint an ink wash around it. (This is an mix of water & River Rock reinker)

The paint resists & gives you a neato antique texture:


You can touch up small areas with white paint on a brush, if you like.


Step 3) Pierce & stitch around the image (I added beads at the top)
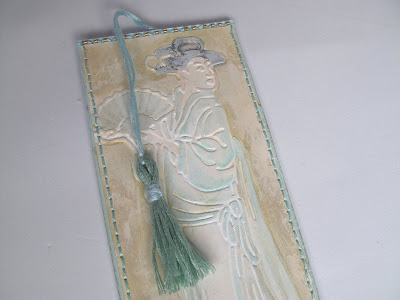


Step 4) Add a tassel & finish the back of the bookmark... by sandwiching the tassel between the image & a backing piece of cardstock the same size as the image.

-6-

Cutting up stamps & DIY tassels on the cheap


This blooming branch is stamped using the stamp set Tranquility from ISC (Innovative Stamp Creations.) I cut apart the flowers (just trimming between the image of the rubber stamp, so that it's easy to get all kinds of natural and various flower shapes. Of course, cutting up stamps is nothing new, but maybe it's a good trick for beginners? :o)

The flowers are embossed in clear & white embossing powders. The leaves are coloured with a New Leaf Copic marker. The branch is stamped & then shaded with a Dark Bark Copic marker.

The centers of the flowers have knots:


DIY embroidery thread tassel:


I followed this great video on how to make a basic
tassel with embroidery thread

and that's it:
(Click photos to enlarge them in Blogger if you like)

Thanks for visiting! If you try this out,
I hope you have as much fun as I did, :o)


(click to visit me from an email or reader)
Read More
Posted in cheap-tricks, Cuttlebug, ISC, techniques, Tutorials | No comments

Wednesday, 1 April 2009

Embossed faux watercolour: ISC "Men of Wisdom" (CAR)d

Posted on 01:31 by Unknown
Happy April Fool's Day to You! No tricks up my sleeve today (other than the usual silliness), but this is something a wee bit out of the ordinary, a rare beast around here: a boy card!


This classic car stamp is from Innovative Stamp Creations' stamp sheet "Men of Wisdom." It's the perfect masculine stamp (a stamp genre that I, for one, never ever have enough of!) I thought it'd be especially nice for my wonderful Papa who really likes vintage cars. To colour this cool car for a (CAR)d, I tried an embossing variation of the faux watercolour technique.

The basic steps to this kind of faux watercolour are usually:
Step 1) Colour on the stamp with markers
Step 2) Spritz with a fine mist of water
Step 3) Huff on the stamp (breathe out heavily)
Step 4) Stamp it

I've just added a heat-embossing step:

Step 5) Sprinkle clear embossing powder on the wet image & heat-gun to melt it.

The water picks up the embossing powder in places, so you get a funky texture--just like water beading on a car that just went through the car wash. ;O)

Embossed Faux Watercolour
(with Markers & Water):


Supplies:
  • A Stamp (this is ISC's Men of Wisdom)
  • Any Water-based Markers (colours here below)
  • Water in a spritzer/mister
  • Clear embossing powder
  • Heat-gun
Optional: Versamark. For Detailing: Copic markers (turquoise, grey, & leather colours); Silver pen; Crystals (headlights.)

Variation: Replace clear embossing powder with an e.p. that has glitter mixed in (like SU's Iridescent Ice) or a little bit of metallic e.p. mixed in. It's so fun to mix your own embossing powders (It helps to write down basic recipes on the bottle if you make custom e.p., so you can recreate them.)


Step 1)
Colour on the stamp with markers:

These are Stampin' Up! water-based markers: Tempting Turquoise, Not Quite Navy, & Night of Navy coloured in a gradiation (dark on bottom to give the image weight.)

TIPs:

A) Cover your stamp with Versamark before colouring to extend your working time.
B) Your markers won't get discoloured if you start with the lightest colour marker & finish with the darkest colour. You can huff on the marker periodically to keep the ink moist.


Step 2) Spritz your markering with a fine mist of water

Step 3) Huff on the stamp (breathe out heavily on the markered stamp, making a "Huuuuh" noise.)


Step 4) Stamp the image (and huff on it again quickly)...

Step 5) Immediately sprinkle clear embossing powder on


Step 6) Heat-gun to emboss the image.

Adding Details:

The nifty part about embossing with water is that since the embossing will be in speckles where the water was, you can still add shading to the solid parts of the image with marker.

Waterbased Marker versus Alcohol-based Marker Detailing:


Water: If you want to use water-based markers, just wipe the excess ink where the embossing will resist it.
Alcohol: Copic markers seem to work especially well for this, IMHO since even the embossed parts will pick up their colour.


Colouring the wheels. Since I was cutting this out, there was no worry about blurring. I used an aquapainter over a grey waterbased marker to try & get a paint-y look on the wheels.


Copic marker over the body of the car- to even out the colour & give it more intensity.


This stamp is perfect for adding silver (or other metallic) details to (on the wheel rims, the steering wheel, the lights & other neato hardware in the image.)


Swarovski crystals for headlights (adhered with Crystal lacquer.) It's so fun to sneak bling onto a boy card. :O)


This classic car image has that funky intricate look, but it was actually really easy to cut out.

The "Happy Birthday" sentiment is also from
the ISC stamp sheet "Men of Wisdom."
Luv that font; it's classic & modern (and so very guy-ish) :O)


To make a Lacquer
Hardware Sentiment:


This is a fun way to change up hodge podge or other hardware, looks just like glass!

Supplies:
  • Crystal Laquer
  • Any hardware, paper, & sentiment
  • Pencil & scissors
  • optional: thread & needle & silver Zig Painty pen

Step 1) Emboss sentiment onto paper (or stamp in very waterproof ink) This keeps the lacquer from making the ink run.

Step 2) Trace hardware. Place hardware temporarily over sentiment & trace it with a pencil. Remove hardware

Step 3) Cut inside of your pencil line.

Step 4) Dry fit to see if the paper is the right fit (or if it needs trimming)

Step 5) Adhere paper to back of hardware (I like to use Crystal Lacquer for that.) An Option: You can add dots of metallic to light hardware with a Zig Painty pen (I added silver dots) :O)

Step 6) Optional: Embellish it. Stitch details if you like (or add gel or glitter pen or maybe actual glitter...) I added a couple of french knots under the phrase for somethin' different.

Step 7) Pour Cystal Lacquer into the frame of the hardware & use something to move it to the edges of the hardware. Removing bubbles as you go. Set to dry in a flat relatively dust-free area.

If your lacquer has bubbles you can't remove, one trick to hide 'em is to distress the lacquer when it's dry (prick the dry lacquer with a pin or paper piercer to create a dot pattern. This will hide the bubbles & add a neat texture... Here's an example of that variation:

Click the pic to see it up close:

For this card post please click here.

Embossing Text Weight Papers:

Hopefully you can get some idea from this photo of the snifty Noir Sparkle Text paper that the road is made of. (Click to see a close up of the sparkle):


(Sparkle Text paper from Paper Temptress.)

Woohoo! A whole new world of affordable paper; it's new to me, anyhow. I used to be snobby about not using text weight (more is more right?) but surprise surprise. Less is more!... Who knew? You probably already knew, but text weight dry embosses with such crisp detail.

PT's sparkle text is 25 cents a sheet & makes for nice, light weight, mailable layers. You can browse the whole Sparkle group here. It comes in lots of colours (and cardstock weight too.) Purists may want to note that it's not acid free.

Like the sounds of Text Weight Papers? Here are other varieties:
  • Sorbet Text Package & Individual Sheets
  • Iridescent Text Package & Individual Sheets
  • Mica & Metallic Text Packages & Individual sheets

Other card info: The road is dry embossed with the Argyle cuttlebug folder & the white lines on it are embroidery thread stitches. Patterned papers retired from Stampin' Up! (Notebook). Card: SU Very Vanilla cardstock (cut to 6x6). Embellishments: Swarovski crystals for headlights. White & Turquoise embroidery thread. Hodge Podge Hardware from SU & silver brads.


BLOG:
There are all kinds of gorgeous projects posted at Innovative Stamp Creations Blog & Sneak peeks of their upcoming releases too! <--You can check it all out there

ISC PCP GROUP
:
You can also join the ISC group on Paper Craft Planet! :O)

STORE:
Browse goodies at ISC store here.


Hope you are feelin very CRAFTY today!!! ;O)


P.S. Want a last minute April Fool's trick? Here are some cute ideas. I think I hafta make Charles some of these Reese's Sneezes, ICK! But better than a pretend parking ticket or cat litter cake, heeheeheehee.
Read More
Posted in cheap-tricks, Faves, ISC, Tutorials | No comments

Thursday, 19 March 2009

ISC Delicate Roses Basket

Posted on 14:23 by Unknown


The Rose Stamp:

I knew as soon as I saw Claire's basket template (deets below) that I had to make one with the lovely new rose stamp sheet from ISC! The set is called Delicate Roses and in case you're not familiar with ISC, they are Innovative Stamp Creations. You may wanna check em out! The rubber of their stamp sheets is exceptionally thick quality & deeply etched.

I love how this rose is a beautifully stylized but still realistic flower & it's got the nicest combo of solid leaves but with a bloom that's done in line art. The perfect design that lets you marker (or double-colour ink it) and then lets you colour it in too. (me likey that ususal combination; usually it's one or t'other--solid or line...)

The stem makes the perfect little wave too. Wouldn't it be sweet repeated for a band of roses across a large card or scrapbook pages?

You can find the whole
Delicate Roses stamp sheet here.

Claire's Beauty of a Basket Template:

Claire has created the most brilliant template I've ever seen. When Claire makes a template she perfects it. I was blown away by her other templates too.

This basket template is so clever and easy to use. She made both a basket & a liner. The original template (a 2-pager) is sweetly mini. I enlarged it to print at 179% for the basket & 178% for the liner to make it honkin' big. You can find the template & her great tips for using it here on her stunning blog.

Here's how I embellished this basket & card...

The Basket:


Step 1)
Create the embossed Roses:

A) Cover Delicate Roses stamp with Versamark
B) Colour stamp with markers
C) Huff on it & stamp
D) Sprinkle with clear detail embossing powder
E) Remove excess e.p. & heat gun it


Step 2) Colour rose blooms in. I have been loving blending my copics with water based markers. (I have two sets of them & only a couple dozen Copics.)

To colour with a blend of
water-based
markers & Copics:


A) Just scribble the water-based marker on an acrylic block (or any plastic/glass surface that you don't mind getting Copic-y)
B) Pick up the scribbled water-based marker on your copic (a close colour works well or your colourless blender.
C) Test colour on a scrap of paper
D) If you're happy with the colour, apply to your image
E) Work the colour in with a mid-tone (of another Copic or water-based marker)

Obviously, this can add some colour & other marker to your Copics; I find most colours clean of like magic when you apply Copic refill to them. Copic purists everywhere are cringing! But I feel like the savings & the flexibility in colour possibilities amazing [I'm a crazy Copic colourer though and probably don't do it the "right way" Good thing I don't believe in one right way, huh? ;o)]


Step 3) Cut Rose out (no need to cut too close) if you add them white on white...

Step 4) Cut handle (a band 12 inches long by 1 and 2-8 inches wide)


Step 5) Pierce holes in handle for stitching


Step 6) Stitch handle. (I love that you can stitch the handle once & it will show through both side of it.) To hide the ends for this project, just follow these steps:

A) Make sure to thread your needle with long enough thread to go all the way across you handle (double the length of the handle is a safe bet)
B) Adhere your thread end on one of those ends
C) Stitch away...

Of course, you could always just faux stitch or not stitch at all if you like...


Step 7) Glue Roses onto handle

(as you can see by the pics, I did the steps backwards: stitched after gluing (since I never create with a strict plan) but it's probably more logical to glue them on after sewing so I've ordered them that way here, blahblahblah huh?) :O)


Step 8) Print basket template cut score & assemble. Isn't it so cool how the dotted lines on Claire's basket's template are hidden by the liner!?! Claire ROCKS! (please note: I've printed her mini template for the basket bottom at 179%)


Step 9) Create the liner: Print liner, cut, score & scallop it. [If you print Claire's liner template enlarged to 178% as I have here, you just need to measure out even lines for your scalloped edges (since they print off the edge of the paper.) This is Basic Grey's new Porcelain Designer Paper: Chintz Porcelain Por-1614.


Step 10) To add the handle, make slits in sides of the liner (anlong the dotted line about 1 and 1/2 inches long)


Step 11) Slip handle ends through slits & adhere


Step 12) Adhere liner inside basket

The Matchin' card:


Step 1) Stamp Delicate Roses background onto card


Step 2) Create tag shape mat & stitch it


Step 3) Adhere rose to tag


Step 4) Add sentiment (also from the Delicate Rose's stamp sheet.) It fits perfectly in the word window punch from SU. The whole tag is adhered with foam tape for dimension. :O)

Thanks so much for checkin' this out!


P.S. Last but not least, Thank You all SOOoooh very much for all of your fun & super sweet comments about my lil' piggy-sty Stamp room, hehehe. I'm lovn' all you kindred stampers who are huricaners too! I'll be postin' again on Saturday (Still digging out! hehehe.) :O)
Read More
Posted in *TEMPLATEs, 3D-projects, ISC, Tutorials | No comments
Older Posts Home
Subscribe to: Posts (Atom)

Popular Posts

  • free Butterfly Silhouette .studio cut files (in 3 styles)
    Hi, All! Here are those butterfly Silhouette .studio cut files. They are for only for the Silhouette machine... But I do hope to share other...
  • Graphics Fairy Inspiration (+vintage printables)
    Thank You all so much for your wonderful comments about the papers I've been obsessed with. Your kind words make me grin so big that I g...
  • New Popcorn Box template set (pretty stamp room storage) :o)
    Are you in the mood for a template or two? I was going to wait until I had really good photos and a full pictorial, but then I would take fo...
  • "Honey, I shrunk the stationery!" (Hero Arts typewriter notebook)
    Still trying to make more of my cards into little gifts. This Hero Arts typewriter card is another take on the card turned refillable notebo...
  • Making Your Own Colour Shimmer Sprays--Links & Info
    Info & Links Links for how to Mak e yo ur o w n Sh im mery s prays: (These are for you sweet Beth! oxo) ( more info on these colours in...
  • over 100 free pattern overlays ... at a glance
    Would you believe that the free overlay total is at 139 overlays and counting? (I might have a wee little addiction) ;-) Since overlays can ...
  • Felt-based cards (Rock-a-Bye Baby tutorial)
    New idea, Old projects.... I've been debating whether or not to post some older projects/tutorials since the big bad insecurity beast...
  • Circle Overlays (to revamp your papers!)
    Can you ever have too many ways to use your stash? No card today, just popping in with a cheap trick for revamping your "old" pat...
  • Everything I've Ever Made (at a glance)
    This post is a visual overview of my blog history-- with thumbnails that are linked to tutorials & templates for pretty much everything ...
  • 3 Clean And Simple cards (with SRM stickers)
    You guys may know that I was tragically born without the gene that let's you achieve a C lean A nd S imple card. ;-) Not sure why I find...

Categories

  • 'Mouse'-the-cat (10)
  • *TEMPLATEs (98)
  • 3D-projects (144)
  • A-Day-For-Daisies (7)
  • Amber Ink (9)
  • Angel's-Landing (2)
  • BASICS (47)
  • Blogging-tips (7)
  • Caardvarks (48)
  • Cat's-Pajamas (2)
  • cheap-tricks (224)
  • Christmas (33)
  • Claire-Keay (2)
  • Cricut (3)
  • cut-file (2)
  • Cuttlebug (45)
  • decor (6)
  • Digital-Images (131)
  • Distress-Inks-etc (14)
  • DIYstamps (1)
  • Eat-Cake-Graphics (11)
  • Faves (207)
  • Fred-She-Said (5)
  • Freebies (77)
  • GESSO (9)
  • Halloween (10)
  • Heather Ellis (3)
  • Hero-Arts (14)
  • ISC (7)
  • Jessica-Sprague (2)
  • Just-Rite (2)
  • LPS (63)
  • Mo's-Digital-Pencil (16)
  • My-Favorite-Things (33)
  • organizing (7)
  • Other-People's-Tutorials (36)
  • Paper-Garden-Projects (54)
  • Paper-Temptress (39)
  • Punches (21)
  • Purple-Onion-Designs (23)
  • S.U. (1)
  • SCOR-PAL (4)
  • silhouette (4)
  • Skipping-Stones-Design (7)
  • Squigglefly (6)
  • SRM-Stickers (8)
  • techniques (191)
  • templates (26)
  • Tiffany-Doodles (4)
  • Tutorials (252)

Blog Archive

  • ▼  2013 (16)
    • ▼  July (4)
      • A Triple-stamped Fancy-cut Flower card
      • Flying by to say ... 'hello'
      • a Silhouette Challenge project
      • Silhouette Cameo - Sketch pen Camera card
    • ►  June (4)
    • ►  May (3)
    • ►  April (1)
    • ►  March (1)
    • ►  February (3)
  • ►  2012 (53)
    • ►  December (2)
    • ►  November (2)
    • ►  October (1)
    • ►  August (3)
    • ►  July (2)
    • ►  June (5)
    • ►  May (7)
    • ►  April (8)
    • ►  March (9)
    • ►  February (13)
    • ►  January (1)
  • ►  2011 (74)
    • ►  December (1)
    • ►  November (5)
    • ►  October (10)
    • ►  September (9)
    • ►  August (12)
    • ►  July (5)
    • ►  June (9)
    • ►  May (2)
    • ►  April (6)
    • ►  March (7)
    • ►  February (4)
    • ►  January (4)
  • ►  2010 (84)
    • ►  December (7)
    • ►  October (1)
    • ►  September (6)
    • ►  August (1)
    • ►  June (1)
    • ►  May (7)
    • ►  April (21)
    • ►  March (3)
    • ►  February (17)
    • ►  January (20)
  • ►  2009 (234)
    • ►  December (16)
    • ►  November (21)
    • ►  October (11)
    • ►  September (23)
    • ►  August (29)
    • ►  July (26)
    • ►  June (10)
    • ►  May (16)
    • ►  April (26)
    • ►  March (22)
    • ►  February (27)
    • ►  January (7)
  • ►  2008 (39)
    • ►  December (14)
    • ►  November (25)
Powered by Blogger.

About Me

Unknown
View my complete profile