StampznewBright

  • Subscribe to our RSS feed.
  • Twitter
  • StumbleUpon
  • Reddit
  • Facebook
  • Digg
Showing posts with label Cat's-Pajamas. Show all posts

Thursday, 1 September 2011

Lovey-Dovey Mushrooms & a bit of sky?

Posted on 18:00 by Unknown
A random lovey-dovey mushrooms card?


Cat's Pajama's Lovey-Dovey mushrooms


For some reason, I thought these two little mushrooms

needed to snuggle up next to each other.


I left the sentiment off, for now, hoping to use it

for any of this stuff: "Miss You" or "Love You"

or "Happy Anniversary" or even simply "Hi Friend!"


And I'm curious,

do you do hybrid?


It's the only type of card I seem to make lately.

(The mushrooms & the heat-embossed background are stamped

the sky is a digital image printed & stitched.)


1...the mushroom stamps: Cat's Pajamas stamp set "Blow"

2...free digi (a bit of sky-cropped from The Graphics Fairy)

3...cheap tricks:distressed heat embossing & a fringed mat...


-1-


The 'shrooms are stamps from

this Cat's Pajamas stamp set:


mushrooms-Cat's Pajamas BLOW


They got gussied up this way:


1) Stamped in Night of Navy craft ink (SU)

2) Heat embossed in clear embossing powder

3) Coloured with Copic markers in shades of turquoise, brown, & beige.

4) Dotted with White Signo gel pen.

5) Cut out & stuck on the stitched sky background.


The sky background was made using this digital graphic

that I thought you might be able to use sometime for something...


-2-


(from The Graphics Fairy)


...a bit of sky:


PDF on Acrobat here


...which is cropped from this castle image:


Courtesy of Karen-The Graphics Fairy

who has the best free digital things

& such generosity of spirit!

(Please credit & link Karen, if you use these.)


To download these as PNGs or JPEGS:


1) Click the picture you want & it will enlarge.

2) Then right click & select "save as PNG" (or as JPEG/all files)


or click the links to go to Acrobat to download the PDFs


more info on How to Download files types

& terms of use here


-3-


(Old faves: Distressed heat embossing

& fringe-cut mat)


distressed embossing


For lack of a better name, I call this heat emboss texture

'distressed heat embossing':


It uses regular old clear embossing powder. Here's how:


1) Stamp Hero Arts Antique Brocade in White pigment ink.

2) Sprinkle on some clear embossing powder.

3) Heat it with a heatgun until you see some areas get darker.


Variation: You can even colour over it with a copic marker to get a

coordinating bit of coloured embossed paper:


white ink clear E P on SU river rock & coloured with brown copic


The dark brown band is made by colouring over the distress embossed

river rock cardstock with Copic Markers (Dark Bark & Black).


Fringe mat:


cheap tricks-fringe mat


Just cut little slits in the mat for texture &

ruffle them a little with your finger to separate.

Cheap, quick, fun.


Hope your day is turning out to be a lovely one,


P.S. This post is pure unsolicited craft-y love. :-)

Read More
Posted in BASICS, Cat's-Pajamas, cheap-tricks, Digital-Images, Freebies, techniques | No comments

Saturday, 9 April 2011

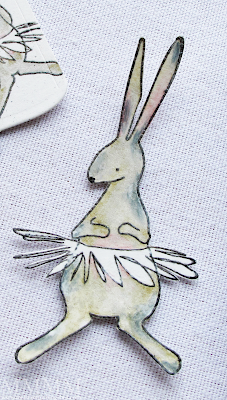
The Prettiest Bunny Bottom (Tutu Much)

Posted on 17:15 by Unknown
cat's pajamas Tutu Much bunnies mel stampz

Okay, if you blush easily then whatever you do
don't read this patterned text paper...

prettiest bunny bottom

It says "and a provokingly short petticoat
to display the prettiest..."

then it cuts off.

So, you might ask,
"to display the prettiest..." what?

I guess, it's the prettiest bunny bottom:


(I did not plan this "cheekiness," honest!)

The text paper is actually Halloween paper with
the story from Sleepy Hollow.

Weird!

The only thing a little bit different with this card from the usual
(other than that accidentally silly text)
is the layered shadow stamp part:


It was such fun to stamp a little differently.

Well, and the tutu is a little out of the ordinary, for me
(it's made by stitching on ribbon):

cat's pajamas Tutu Much card ribbon tutu mel stampz

Whenever I get to make anything mini it gives me the giggles. :o)

Here's the inside of the card:

cat's pajamas Tutu Much bunnies INSIDE


I don't usually buy stamps (Lately, I stick with the instant gratification of digital images since I'm impatient & usually sloppy at stamping) but when I saw the bunny sets at Cat's Pajamas I knew I had to have them. They just feel artsy on top of being cute...

This clear stamp set has a bunch of dancing bunnies
(even the name of the set is too stinkin' cute):

Tutu Much! heehee

I found myself drooling over
the amazing cards that the
Cat's Pajamas design team made.
All that gorgeous colour!


...make this Ballerina Bunnies card:


  • Tutu Much clear stamp set from The Cat's Pajamas
  • Archival Black Ink (Ranger)
  • Cardstock: Black, Speckle cream, River Rock, Gray
  • Spellbinders Nestabilities die Label 5
  • Misc. patterned papers
  • Clear embossing powder & heat gun
  • Copic markers, Prisma Colour pencil crayons,
  • White gel pen, Sakura glitter pen, black permanent marker
  • Silver thread, needle, paper piercer
  • Sticker sentiment from SRM Stickers
  • Black & silver organza ribbon


Step 1} Cut nesties label 5 die shape. Then trim it (I used two nesting shapes: one for image one for mat).


Step 2} Stamp and heat emboss a bunny, colour her & cut her out. I used Copic markers: Putty and a mix of Warm Gray & Cool Grays.


Step 3} Stamp three more bunnies on the white shape and colour them too. To make a shadow for the star of the Bunny Wabbit Ballet,colour it in with a dark gray marker (I used Copic marker: cool gray no 7).


As you can see from the image above, I overlapped the stamping. Since the front bunny is coloured in with a dark colour it's okay to overlap. Gives a little depth to it. :o)


Step 4}
Adhere the die cut mats to some patterned papers.

I just cut a piece of of paper in weird shapes. Though somehow, in hindsight, it ended up looking like a bunny tail. I covered it with a bow, cause it just looked odd!


Step 5}
Pierce around the mat, if you want to faux-sew or hand stitch. (You guessed it! I'm hand stitching...)


Step 6} Sew around the mat, if you like. This is silver metallic thread


Step 7}
Stitch some sheer organza ribbon onto the bunny's tutu (To give the ribbon a little curl, I melted it very very gently with a lighter first-especially the ends to stop them from fraying.) Add glitter pen to the other two tutus.


Step 8} Assemble the card:

A) Stick the bunnies onto the label shaped mat.
B) Add a little white hello sticker (SRM sticker sentiment)
C) Cut and add a scallop (top & bottom) punched from gray cardstock
D) Doodle on the scallop White gel pen then glitter pen & little black hearts
E) Add a mat (River Rock S.U. cardstock)
F) Stitch on a bow
G) Stick all of that onto a folded card (This one is a piece of black cardstock cut to 6-1-4 x 6-3/4. Scored down the middle & folded it makes a 6-1/4 by 3-3/8 card to fit a really common envelope size from the office supply store).


Step 9} Stamp a few bunnies on light cardstock for the inside of card. [I stamped in light gray ink on River Rock cardstock & coloured with pencil crayons (white and beige)]

...and that's it!

Blogger thumbnails for those who like to click 'em:


Thanks for hopping by! ;o)


P.S. These bunny bottom antics are unsolicited. Just stamps I couldn't resist buying.
Read More
Posted in Cat's-Pajamas, cheap-tricks, Tutorials | No comments
Older Posts Home
Subscribe to: Posts (Atom)

Popular Posts

  • free Butterfly Silhouette .studio cut files (in 3 styles)
    Hi, All! Here are those butterfly Silhouette .studio cut files. They are for only for the Silhouette machine... But I do hope to share other...
  • Graphics Fairy Inspiration (+vintage printables)
    Thank You all so much for your wonderful comments about the papers I've been obsessed with. Your kind words make me grin so big that I g...
  • New Popcorn Box template set (pretty stamp room storage) :o)
    Are you in the mood for a template or two? I was going to wait until I had really good photos and a full pictorial, but then I would take fo...
  • "Honey, I shrunk the stationery!" (Hero Arts typewriter notebook)
    Still trying to make more of my cards into little gifts. This Hero Arts typewriter card is another take on the card turned refillable notebo...
  • Making Your Own Colour Shimmer Sprays--Links & Info
    Info & Links Links for how to Mak e yo ur o w n Sh im mery s prays: (These are for you sweet Beth! oxo) ( more info on these colours in...
  • over 100 free pattern overlays ... at a glance
    Would you believe that the free overlay total is at 139 overlays and counting? (I might have a wee little addiction) ;-) Since overlays can ...
  • Felt-based cards (Rock-a-Bye Baby tutorial)
    New idea, Old projects.... I've been debating whether or not to post some older projects/tutorials since the big bad insecurity beast...
  • Circle Overlays (to revamp your papers!)
    Can you ever have too many ways to use your stash? No card today, just popping in with a cheap trick for revamping your "old" pat...
  • Everything I've Ever Made (at a glance)
    This post is a visual overview of my blog history-- with thumbnails that are linked to tutorials & templates for pretty much everything ...
  • 3 Clean And Simple cards (with SRM stickers)
    You guys may know that I was tragically born without the gene that let's you achieve a C lean A nd S imple card. ;-) Not sure why I find...

Categories

  • 'Mouse'-the-cat (10)
  • *TEMPLATEs (98)
  • 3D-projects (144)
  • A-Day-For-Daisies (7)
  • Amber Ink (9)
  • Angel's-Landing (2)
  • BASICS (47)
  • Blogging-tips (7)
  • Caardvarks (48)
  • Cat's-Pajamas (2)
  • cheap-tricks (224)
  • Christmas (33)
  • Claire-Keay (2)
  • Cricut (3)
  • cut-file (2)
  • Cuttlebug (45)
  • decor (6)
  • Digital-Images (131)
  • Distress-Inks-etc (14)
  • DIYstamps (1)
  • Eat-Cake-Graphics (11)
  • Faves (207)
  • Fred-She-Said (5)
  • Freebies (77)
  • GESSO (9)
  • Halloween (10)
  • Heather Ellis (3)
  • Hero-Arts (14)
  • ISC (7)
  • Jessica-Sprague (2)
  • Just-Rite (2)
  • LPS (63)
  • Mo's-Digital-Pencil (16)
  • My-Favorite-Things (33)
  • organizing (7)
  • Other-People's-Tutorials (36)
  • Paper-Garden-Projects (54)
  • Paper-Temptress (39)
  • Punches (21)
  • Purple-Onion-Designs (23)
  • S.U. (1)
  • SCOR-PAL (4)
  • silhouette (4)
  • Skipping-Stones-Design (7)
  • Squigglefly (6)
  • SRM-Stickers (8)
  • techniques (191)
  • templates (26)
  • Tiffany-Doodles (4)
  • Tutorials (252)

Blog Archive

  • ▼  2013 (16)
    • ▼  July (4)
      • A Triple-stamped Fancy-cut Flower card
      • Flying by to say ... 'hello'
      • a Silhouette Challenge project
      • Silhouette Cameo - Sketch pen Camera card
    • ►  June (4)
    • ►  May (3)
    • ►  April (1)
    • ►  March (1)
    • ►  February (3)
  • ►  2012 (53)
    • ►  December (2)
    • ►  November (2)
    • ►  October (1)
    • ►  August (3)
    • ►  July (2)
    • ►  June (5)
    • ►  May (7)
    • ►  April (8)
    • ►  March (9)
    • ►  February (13)
    • ►  January (1)
  • ►  2011 (74)
    • ►  December (1)
    • ►  November (5)
    • ►  October (10)
    • ►  September (9)
    • ►  August (12)
    • ►  July (5)
    • ►  June (9)
    • ►  May (2)
    • ►  April (6)
    • ►  March (7)
    • ►  February (4)
    • ►  January (4)
  • ►  2010 (84)
    • ►  December (7)
    • ►  October (1)
    • ►  September (6)
    • ►  August (1)
    • ►  June (1)
    • ►  May (7)
    • ►  April (21)
    • ►  March (3)
    • ►  February (17)
    • ►  January (20)
  • ►  2009 (234)
    • ►  December (16)
    • ►  November (21)
    • ►  October (11)
    • ►  September (23)
    • ►  August (29)
    • ►  July (26)
    • ►  June (10)
    • ►  May (16)
    • ►  April (26)
    • ►  March (22)
    • ►  February (27)
    • ►  January (7)
  • ►  2008 (39)
    • ►  December (14)
    • ►  November (25)
Powered by Blogger.

About Me

Unknown
View my complete profile