StampznewBright

  • Subscribe to our RSS feed.
  • Twitter
  • StumbleUpon
  • Reddit
  • Facebook
  • Digg
Showing posts with label Eat-Cake-Graphics. Show all posts

Tuesday, 14 June 2011

Emboss & Colour Fabric (one fish, two fish, old fish, new fish...)

Posted on 18:20 by Unknown


Hello there, You!
Today, a fish-themed card or two.
One fish old and one fish new.
(Sorry, channeling Dr.Seuss today for some reason) ;)

This older card was never blogged, but it uses a
technique that was massively fun to play around with...

Cuttlebug Koi fabric card  mel stampz

...pressure embossing & colouring fabric
(that's been adhered to cardstock to give the fabric stability).


And here's the inside:

Cuttlebug Koi embossed on fabriccard  INSIDE  mel stampz

The papers are BasicGrey 6x6 papers that
I got from Paper Garden Projects back in the day.

Nook & Pantry: turquoise pattern; turquoise
weave; and yellow doily pattern.
Porcelain: yellow flower pattern

I stitched on some gold metallic seed beads
and added a whack of hand sewing.

There's matching envelope with more stitching:

Cuttlebug Koi embossed on fabric card mel stampz

It's so nice to change up & colour something
other than paper and outline images for a change.
Note to self: have to try this out again, soon.


...emboss & colour fabric

  • Fabric
  • Cardstock
  • Glue (Mod Podge if you've got it)
  • Colouring medium (I used Prismacolour pencils & Copic markers)
  • An embossing folder (I used Provocraft Asian embossing folder Koi)
Step 1) Cut a piece of fabric & a piece of cardstock (in matching sizes that fit your embossing folder. You may want the fabric to be a bit bigger than the cardstock if you like a frayed edge look. I made my paper about 1/4" smaller than the fabric.

Step 2) Glue the fabric onto the cardstock (I like Mod Podge since it adds stability or stiffness to the fabric -acid free Mod Podge, if you have it & prefer archival).

Step 3) Let it dry & then run it through your pressure embossing machine.

Step 4) Colour any areas you like. I found Prismacolour pencil crayons & Copic markers to be a great combo (using the markers first & the pencil crayons second to avoid clogging Copic marker tips). You can also add details with a permanent marker. The eyes on these guys are dotted on with a Copic Multiliner.

Little Tip: Using the folder as support for the fabric while you colour is handy to keep the embossing nice and raised & crisp: just keep it under the embossed image (To keep it from shifting, you can tape it on, in place, if you like).

If you just colour without supporting it, the embossing does become less emphasized but you get nice soft looking colouring.

One of the Koi fish here is
cut out & adhered over top:
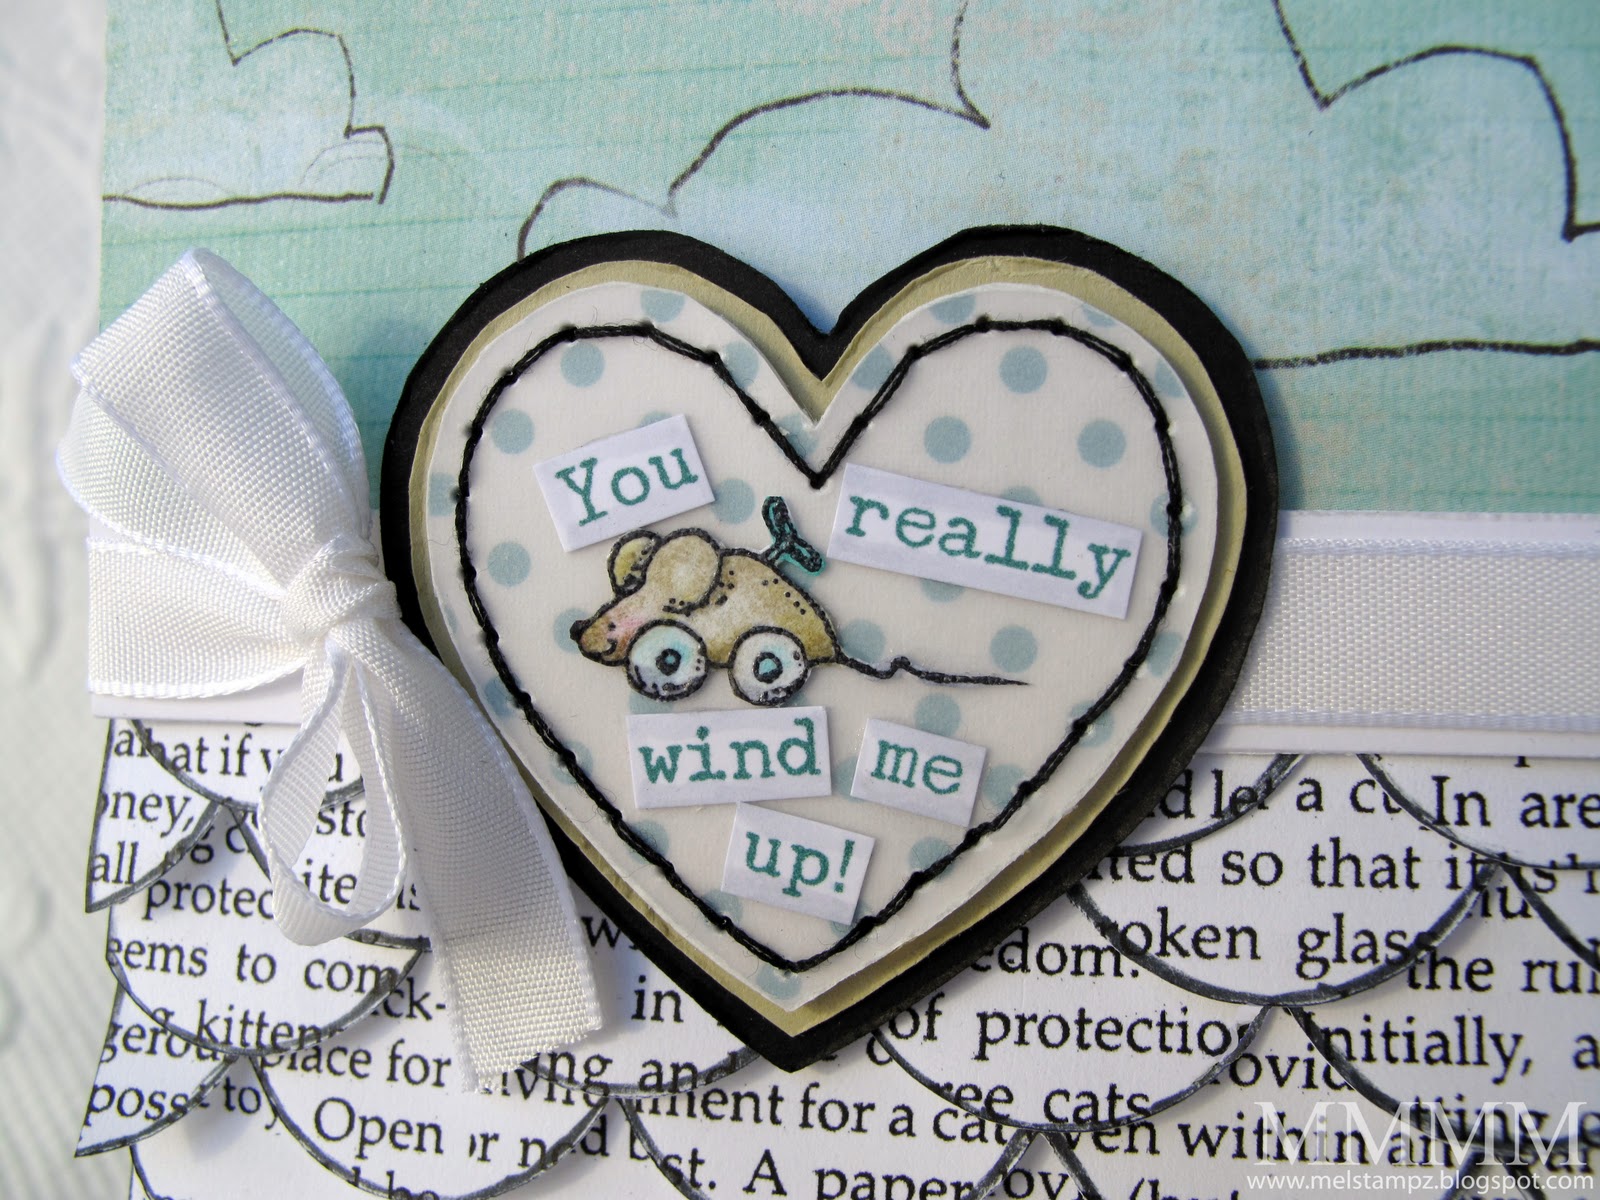
Cuttlebug Koi fabric CLOSE  mel stampz

And the new fish...
(a romantic manly card for my Fella
who loves fishin' with his Dad):

eat cake fish love note

The little wee fishy is one of the first stamps I ever bought
from Eat Cake Graphics
. He's teeny at 1 x 0.4
inches
but he is too cute, n'est pas?

eat cake fish close

Just look at that smile on his lil' fishy face! giggle giggle


The fish net under the heart is a piece of fusible webbing that came with
curtains from Ikea. The blue heart was cut on a Cricut Expression
(Plantin School book cartridge more about that here)

The background stamp for the texture on the waves
is an old fave: a Penny Black stamp called Paisley Swirls.

Most of the bits of paper are coloured with Copic markers,
but the blue cardstocks are old S.U. colours: baja breeze & soft sky.


The fish dictionary definition text freebie is here if you'd like it:

Click the images & right click and save as for JPEGs or Click the links to go to JPEGs (and PDF links) on Flickr. (I printed a high contrast version to get bright white paper)


fish dictionary definition text paper
on Flickr (with PDF link)

as a snippet:

fish dictionary definition snippet
on Flickr (with PDF link)


Clickable blogger thumbnails:


Hope your day is going just swimmingly!


P.S. no affiliations with these companies, just schtuff i like.
Read More
Posted in Cuttlebug, Eat-Cake-Graphics, techniques | No comments

Monday, 31 January 2011

Have a Heart: E.C.G. Valentines (+ Cricut ideas)

Posted on 15:00 by Unknown
okay, so not "ECG" as in electrocardiogram...
(though being Valentine's Day cards there are
a couple of hearts around here)

(heeheehee) ...but rather E.C.G.
as in
Eat Cake Graphics

some teensy weensy stamped
eat cake graphics images on a couple
of Valentine's cards:


One is a standard A2 card (4 1/4" x 5 1/2")...

(with a tiny wind-up mousie)
I've been trying to make more standard-sized cards for
mailability. Which kinds of cards do you prefer: standard,
or square, or round, or strange folds, or fill-in-the-blank?

The other card I made is a littler guy (3"x 3")...
(one of my favourite sizes)
(with a wee bee!)

both cards have scallops and hearts
(which I shall soon ramble incessantly about
in hopes that it might be interesting to somebody) heehee


1...the stamp images & card details
2...digital paper (kitty text) freebie
3...tool talk: Cricut chatter
4...free templates for hand cutting options

-1-


Some big pics of the wee stamped
Eat Cake Graphics images:


The Wind up Mouse stamp can be found here.
(This little fellow measures in at: 1 inch by 0.5 inches)

The heart was cut on the cricut (details below); it's layered with vellum over it, pierced and stitched with black thread.

The sentiment is printed from a word document onto Paris Bleedproof cardstock (which lets you heat emboss out of the inkjet printer, if you are fairly quick. Instructions on digital heat embossing on Paris Bleedproof in my post here.)

The cloud patterned paper is some older stuff from the Prima Marketing Animal Bash Collection called "Eager"
-2-


The black & white kitty text paper is a digital one I made by scanning an old book about cats (I love the look of using real book pages, but printed ones are acid free AND I can share the files with You!) :o)

Here is the kitty text paper freebie,
if you'd like to download it it:


(Click on the image above it will open full size then you can save it
or click here to visit Acrobat.com to Download it)


The Buzzle Bee stamp can be found here
(it looks enormous here, but it's only
a wee 0.8 inch x 0.7 inch)

The sentiment is printed on Vellum
(which also lets you heat emboss out of an ink jet printer)

The patterned papers are: GCD Party it Up collection (dotted paper)
BasicGrey Urban Prairie 6x6 paper-Wild Flowers (honeycomb flower paper)

-3-

Trendy things to make using the
Cricut (and the Plantin Schoolbook cartridge
that comes with it).

Have no cricut? No worries. I've linked up scallop and heart templates as well (for those who enjoy cutting by hand and free stuff.)

Confession time!!! I am ashamed to say that my Cricut Expression cutting machine has been sitting in a drawer unused for a VERY long time (almost 2 years, GASP!) It felt like such a waste to let something like that sit idle when so many people long to own one of their own, but I'd not been feeling well enough for all of the experimenting. I had even received SCAL as a gift but have still never cut a thing with it (I can't figure it out, WEEP!) That's one of my more materialistic New Year's resolutions.

I do have 2 cartridges (the plantin schoolbook that came with it and a farm animals one which was a gift from a lovely reader who is far too generous.) So..... yesterday I vowed to get it out & make it work.

Turns out that there are a couple of "trendy" things that the "old school" Plantin Schoolbook cartridge has on it--that (if you're a little like me) you might not have realized:

1) Scallops (for layers of beautiful lovely fat or wee scallop edges!)

2) Hearts (I've always wanted a heart punch. Who knew?) The hearts above were cut on the cricut, but I wasn't pleased with the way the different Cricut-cut sizes nested, for some reason, so I cut the mat layers underneath them free-hand with scissors.

These little scallops were cut from light-weight white paper:


They were made this way...

1) Cut ten scallops at 3/4" size (if memory serves) I believe that is the measurement of the scallop, but I could be wrong. ;o)
2) Make 3x3 note card (cut some white cardstock to measure 3" x 6" & score in the center
3) Adhere the ten scallops to the note card
4) Trim off the edges with scissors
5) Distress the edges of all the scallops (I used my fingernail) though I did get one wee paper-cut. And I'm guessing distressing with blood instead of ink is not likely to be the new trend. CREEPY! ;o)

Scallop and Heart


If you rather cut things by hand:

my free BIG scallop template is a PDF on SplitCoastStampers here
&
heart template Google image search here

Thanks so much for popping by!


P.S. I'm not affiliated with Eat Cake Graphics. I bought these wee stamps 4 years ago & just had to use 'em on Valentines this year. :o)

P.P.S. Thinking of buying a Cricut? Before you do, might I play devil's advocate and suggest reading this article? I've never used a Silhouette, but long-time meticulous crafter Kristina Werner has me wishing I'd tried one out! (I have no affiliation with Silhouette at all, sadly LOL) ;O)

P.P.P.S. If you wanted, you could use the hearts to make this...

...gorgeous 3D heart banner
Photo & tutorial from How about Orange
(You could use either machine-cut hearts or hand-cut ones, of course)

P.P.P.P.S. Oops, I think I have the chatties, sorry!
Read More
Posted in Cricut, Digital-Images, Eat-Cake-Graphics, Freebies, Other-People's-Tutorials, techniques, templates | No comments

Friday, 4 December 2009

snowy embossing--PGP Winter Wonderland hat box

Posted on 10:15 by Unknown
PGP snowy embossed Winter Wonderland mel stampz

A little winter scene with stuff from Paper Garden Projects...

PGP snowy embossed Winter Wonderland CLOSE mel stampz

It's on a hat box top:
PGP snowy embossed Winter Wonderland HAT BOX mel stampz
(speedy way to wrap a gift?)


1...Getting limitless Copic pastel colours or
new colours (unique to you) without buying a single coloured marker.
2...make three types of snowy embossing: Background stamp, Souffle pen & e mbop. and sprinkled e.p.
3...finishing touches
-1-

Get limitless Copic pastel colours or
new colours (unique to you) without buying a single coloured marker.


10 - Copy (2)

Granted, this is nothing revolutionary--lots of Copic artistes use the scribble & pick up the colour technique--but trying it out feels AWEsome, because it lets you invent new colours (not to mention the fact that it can save ya a fortune, dagnab it!) ;o)

No Copic markers? You could do still the pastel (or custom colour mixing) thing by mixing water-based markers (or ink refills), and applying with any blender pen (or paint brush) and some blender pen solution (or water.) Again, it's nothing new, but it sure saves moulah!


  • Stamp (This image is by Eat Cake Graphics from Paper Garden Projects Winter Wonderland Rubber Cling set)
  • Cardstock (River Rock)
The Copic supplies
  • Any Copic Markers that you have
  • A colourless blender pen
  • Colourless blender refill
  • A plastic lid or glass plate (or an acrylic block or what have you)
  • Scrap paper
The main aim for this card was to make pastel shades with my dark Copics but you can also mix shades to create a new hue altogether.


Step 1) Emboss the image--this is an eat cake stamp (Winter Wonderland from Paper Garden Projects)-- embossed in white pigment ink with white embossing powder.


Step 2) Scribble Copic colours onto something that will act as your palette: plastic or glass... an acrylic block or whatever you have (a white paper underneath helps you see your colours)


Step 3) Add a little bit of colourless blender as you work (it will evaporate fairly quickly.)

The solution works like the water in painting, of course. It just thins out the deep colours to make lighter shades. Less blender solution gives a medium shade (depending on the marker colour you start with, obviously.) Lots of blender solution can give you pastels as pale as you want to go!

To prevent some of the evaporation, you can add Copic colourless blender solution directly to the tip of your colourless blender & save blender solution that way. (Though I do find one of those refill bottles last a very LONG time.)


Step 4) Mix Copic colourless blender soloution into your palette of scribbled ink colours with a Colourless blender pen. (I have a spare blender pen for this-it dirties it a fair bit) Mixing colours is SO fun! It's like playing with paints and gives you unlimted colours.


Step 5) Test your custom colours on a scrap of paper. If you think it needs it, you can add more blender solution to lighten (or another scribble of marker colour(s) to deepen or change the shade) and get it exactly how you like it.


Step 6) Colour away! The shade will soften as it dries & the blender evaporates, but of course you can layer to make it more intense and shade and do all you would with normal copics

10 - Copy (2)

Step 7) Since the pastel shades are light, you can add the dark marker (that you used to make your new pastel colours in the first place) to add shading in more intense, but monochromatic or matching colours shades. Or add patterns...dots, stripes...whatever you like.

-2-

...make three types of snowy embossing:

PGP snowy embossed Winter Wonderland CLOSE mel stampz

The snow on this image is a combination of:

A) Plain old background stamp embossing (to get the pattern)

B) Drawing with a Souffle pen & pouring embossing powder on.

C) Sprinkling embossing powder randomly all over the place
(to get the teeny tiny flakes of snow.)

the snowy ground:
(Plain old background stamp embossing-to get the pattern)


Step 1) Add a base of white (if you're using darker cardstock) by colouring the snow with a white prisma colour pencil crayon.


Step 2) emboss snow with PGP cover-a-card Tapestry 1 background stamp (white pigment ink & white embossing powder)


This Tapestry stamp is my new favourite background stamp ever
It's nice & BIG & comes on Ez mount (love that)
(I use my Cuttlebug plate as a block to put it on)

puffy snow:
(Drawing with a Sakura Souffle pen & pouring embossing powder on.)


To get snowflake dots and a snowy horizon:

Step 1) Gather embossing powder & heat gun, so you can work fairly quickly.

Step 2) Colour Souffle pen on wherever you want snow.


Step 3) White the Souffle pen is still wet, pour white embossing powder on it.

Step 4) Heat set the embossing powder with a heat gun (some bubbling is normal, but a light-ish touch will prevent scorching.) :o)


There are two options for this, texture-wise: Heat the way you usually would heat embossing powder to more to get shine... OR heat it ever so gently to keep some of the snowy texture:


the snowy sky:
(Sprinkling embossing powder randomly all over the place--to get the teeny tiny flakes of snow.)


Step 1)
Sprinkle on embossing powder all over in a fine sprinkle (like snow)


Step 2) Heat the sprinkled embossing powder from underneath your paper (The only trick is not to spill all the embossing powder.) :o) Working in batches is handy for avoiding that.


Step 3) Make the image pop. If you want your image to stand out more, you can go around the outside with any marker. The white embossed outline resists ink (even with copics--for the most part-so it's a fast step to add a lot of contrast.) This is a dark cool grey Copic marker.


Step 4) Add it to a Razzleberry prism cardstock circle (as a mat) & pierce it (if you'd like to add stitches and/or beads)


...finish it up...


Emboss & colour the back of a vellum circle for a mat I used two Copics to get the colour of the Winter Wonder land kidlets in the scene


Emboss a round cardstock base. This is the Cover-a-card Tapestry #1 background (again) :o)


Punch Martha edge punch (for the wee snowflakes)...

and...Stick the snowflakes on the purple mat & the ultra teeny ones on the sky
(I put mine with the marker side down so it was a softer colour):

PGP snowy embossed Winter Wonderland mel stampz


I've also pierced & added knots to the wee snowflakes, sewn beads around the image, and stitched around the edge of the mat & added Gold Ice Stickles around the edge of the white stitching as well as on the itsy bitsy punched snowflakes in the sky

...and finally, stuck it on a hat box with ribbon:

PGP snowy embossed Winter Wonderland HAT BOX mel stampz

Miscellaneous


Heavy weight vellum
Razzleberry Prism cardstock
Martha Snowflake edge punch
White ribbon from the "I want it White" kit
Swarovski gems
Paper piercer, Needle, thread & seed beads
Tombow monomulti
White Souffle pen
White embossing powder, White Pigment ink & heat gun
Gold Ice Stickles


Thanks so much for stopping by!

Hope this was useful to You somehow,


P.S. Haven't entered your name for the PGP blogiversary candy?
Please click here to visit the blog candy post.


Read More
Posted in 3D-projects, cheap-tricks, Christmas, Eat-Cake-Graphics, Faves, Paper-Garden-Projects, Punches, techniques, Tutorials | No comments
Older Posts Home
Subscribe to: Posts (Atom)

Popular Posts

  • free Butterfly Silhouette .studio cut files (in 3 styles)
    Hi, All! Here are those butterfly Silhouette .studio cut files. They are for only for the Silhouette machine... But I do hope to share other...
  • Graphics Fairy Inspiration (+vintage printables)
    Thank You all so much for your wonderful comments about the papers I've been obsessed with. Your kind words make me grin so big that I g...
  • New Popcorn Box template set (pretty stamp room storage) :o)
    Are you in the mood for a template or two? I was going to wait until I had really good photos and a full pictorial, but then I would take fo...
  • "Honey, I shrunk the stationery!" (Hero Arts typewriter notebook)
    Still trying to make more of my cards into little gifts. This Hero Arts typewriter card is another take on the card turned refillable notebo...
  • Making Your Own Colour Shimmer Sprays--Links & Info
    Info & Links Links for how to Mak e yo ur o w n Sh im mery s prays: (These are for you sweet Beth! oxo) ( more info on these colours in...
  • over 100 free pattern overlays ... at a glance
    Would you believe that the free overlay total is at 139 overlays and counting? (I might have a wee little addiction) ;-) Since overlays can ...
  • Felt-based cards (Rock-a-Bye Baby tutorial)
    New idea, Old projects.... I've been debating whether or not to post some older projects/tutorials since the big bad insecurity beast...
  • Circle Overlays (to revamp your papers!)
    Can you ever have too many ways to use your stash? No card today, just popping in with a cheap trick for revamping your "old" pat...
  • Everything I've Ever Made (at a glance)
    This post is a visual overview of my blog history-- with thumbnails that are linked to tutorials & templates for pretty much everything ...
  • 3 Clean And Simple cards (with SRM stickers)
    You guys may know that I was tragically born without the gene that let's you achieve a C lean A nd S imple card. ;-) Not sure why I find...

Categories

  • 'Mouse'-the-cat (10)
  • *TEMPLATEs (98)
  • 3D-projects (144)
  • A-Day-For-Daisies (7)
  • Amber Ink (9)
  • Angel's-Landing (2)
  • BASICS (47)
  • Blogging-tips (7)
  • Caardvarks (48)
  • Cat's-Pajamas (2)
  • cheap-tricks (224)
  • Christmas (33)
  • Claire-Keay (2)
  • Cricut (3)
  • cut-file (2)
  • Cuttlebug (45)
  • decor (6)
  • Digital-Images (131)
  • Distress-Inks-etc (14)
  • DIYstamps (1)
  • Eat-Cake-Graphics (11)
  • Faves (207)
  • Fred-She-Said (5)
  • Freebies (77)
  • GESSO (9)
  • Halloween (10)
  • Heather Ellis (3)
  • Hero-Arts (14)
  • ISC (7)
  • Jessica-Sprague (2)
  • Just-Rite (2)
  • LPS (63)
  • Mo's-Digital-Pencil (16)
  • My-Favorite-Things (33)
  • organizing (7)
  • Other-People's-Tutorials (36)
  • Paper-Garden-Projects (54)
  • Paper-Temptress (39)
  • Punches (21)
  • Purple-Onion-Designs (23)
  • S.U. (1)
  • SCOR-PAL (4)
  • silhouette (4)
  • Skipping-Stones-Design (7)
  • Squigglefly (6)
  • SRM-Stickers (8)
  • techniques (191)
  • templates (26)
  • Tiffany-Doodles (4)
  • Tutorials (252)

Blog Archive

  • ▼  2013 (16)
    • ▼  July (4)
      • A Triple-stamped Fancy-cut Flower card
      • Flying by to say ... 'hello'
      • a Silhouette Challenge project
      • Silhouette Cameo - Sketch pen Camera card
    • ►  June (4)
    • ►  May (3)
    • ►  April (1)
    • ►  March (1)
    • ►  February (3)
  • ►  2012 (53)
    • ►  December (2)
    • ►  November (2)
    • ►  October (1)
    • ►  August (3)
    • ►  July (2)
    • ►  June (5)
    • ►  May (7)
    • ►  April (8)
    • ►  March (9)
    • ►  February (13)
    • ►  January (1)
  • ►  2011 (74)
    • ►  December (1)
    • ►  November (5)
    • ►  October (10)
    • ►  September (9)
    • ►  August (12)
    • ►  July (5)
    • ►  June (9)
    • ►  May (2)
    • ►  April (6)
    • ►  March (7)
    • ►  February (4)
    • ►  January (4)
  • ►  2010 (84)
    • ►  December (7)
    • ►  October (1)
    • ►  September (6)
    • ►  August (1)
    • ►  June (1)
    • ►  May (7)
    • ►  April (21)
    • ►  March (3)
    • ►  February (17)
    • ►  January (20)
  • ►  2009 (234)
    • ►  December (16)
    • ►  November (21)
    • ►  October (11)
    • ►  September (23)
    • ►  August (29)
    • ►  July (26)
    • ►  June (10)
    • ►  May (16)
    • ►  April (26)
    • ►  March (22)
    • ►  February (27)
    • ►  January (7)
  • ►  2008 (39)
    • ►  December (14)
    • ►  November (25)
Powered by Blogger.

About Me

Unknown
View my complete profile