StampznewBright

  • Subscribe to our RSS feed.
  • Twitter
  • StumbleUpon
  • Reddit
  • Facebook
  • Digg
Showing posts with label Jessica-Sprague. Show all posts

Wednesday, 29 February 2012

Ephemera Birthday Card (+ cheap tricks for digi papers)

Posted on 13:05 by Unknown
Happy Leap Day!

ephemera birthday card SU image mel stampz

Finally a card! It's been a while, hey?
This one is a birthday card for someone special,
made with 2 of those ephemera paper freebies

The Hexagon & the Chevron (with a tight zigzag):

7_SAMPLE_JPEG_ephemera_hexagon_DARK_300dpi_melstampz

&


For some odd reason, I actually cut out a bunch of the hexagons and
stuck them on a piece of cardstock and did some faux stitching:

ephemera birthday card  mel stampz

The bow

is made using some vintage seam binding
hat was a gift from my Mom for Christmas:

vintage seam binding

(As you can imagine, I wept for Joy!)

.

The flower has an amber center made from a little antique crystal
from a necklace that broke. The flower itself is a DIY book-page flower
(Template & link to the tutorial here):


(Sanding digital papers)

Do you find that sometimes
when you print a digital element it just needs

a little extra bit of texture?

cheap trick - sand digital paper  free printables mel stampz

Distressing digital papers with sand paper makes them
look like fancy-schmancy papers from a paper pack.


It's so easy to sand digi papers:

Step 1) Print your digi paper image.
Step 2) Let the ink dry a little - if you use an inkjet printer
Step 3) Then simply sand it wherever you like.


And you are not limited to the edges
of the paper, of course:


sanded digi paper lowers contrast

Sanding all over a digital print
can really help reduce the contrast or soften the look
&
it adds lovely texture that can be quite fabric-like:

sanded digi texture

A Little Tip: I like to sand the whole sheet before trimming it, or tape a section of the paper down to a card or flat surface first to prevent unwanted tears or bends during sanding.

Another Little Tip: I have sanding blocks but I prefer a little wee piece of 150 grit sand paper, since it gives more control than a block & the scuff marks it leaves are organic shapes instead of the straight edges that a block can leave. (Not to mention, a bit of sand paper is way cheaper & greener than foam blocks!) :-D


(colouring bits of digital paper)

quick trick add marker to printed  digital elements to customize them

The black measuring tape strip is from
this Echo Park set that I bought at Jessica Sprague...


The numbering was cream, but the blue bow seemed to need something to tie it in, so.... it's coloured with a Pale Blue B32 Copic marker. I printed a bunch of that border (that pasted into another document) to use later -- and they can be coloured any old way.


  • Ephemera paper freebies from this post.
  • White cardstock & an inkjet printer, Sandpaper
  • Echo Park For The Record border coloured with B32 Copic
  • Faux-stitching: Paper piercer & Copic multiliner
  • Retired S.U. birthday cake stamp from Little Hellos
  • Black cardstock, White Color Box pigment ink
  • White & gold Prismacolor pencils
  • Silver Liquid Pearls, White Sakura Souffle gel pen
  • White thread dyed with Antique Linen Distress ink


Thank You ever so much for checking this out.
Hope you're having a the most lovely week,


P.S. Don't worry, I haven't forgotten that I was gonna link up the Graphics Fairy images used to make those ephemera papers. Just thought that it was about time for a card around here, already!
Read More
Posted in BASICS, cheap-tricks, Digital-Images, Freebies, Jessica-Sprague | No comments

Thursday, 27 October 2011

Using digi paper as a focal image - Ghost Family

Posted on 15:45 by Unknown
Another easy hybrid crafting cheap trick you might like:
Bits of digital papers make nice focal images for your projects.
No need to buy extra stamps or traditional digital outline images!
(And it lets you take a break from colouring.)

Family of Four Matilda CC papers mel stampz

My best friend Kim and her hubby have twin girls &
I wanted to make a special Halloween card with the whole family
in it as ghosts. (The four ghosts in the focal image of this card
are a snippet from Cosmo Cricket digital paper.
Don't you just love their little smiling faces?)

---

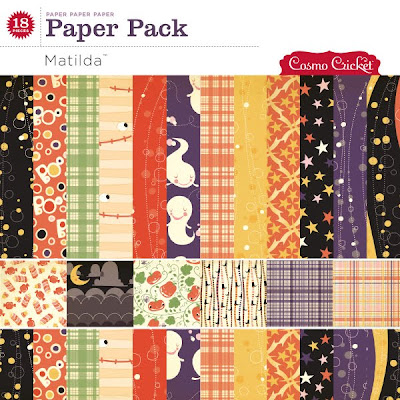
So....... The ghost paper from this
Cosmo Cricket Matilda digital paper pack...


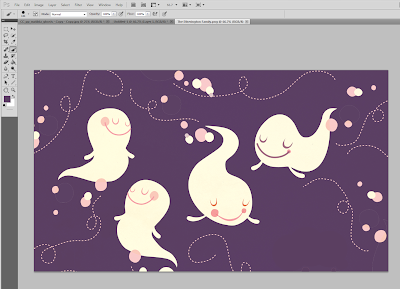
...turned into a family of four ghosties:


(So easy to do it's scary!) ;o)

You can even clear emboss over printed digital paper
snippets for a quick bit of fancy texture:

stamp & heat emboss in clear over printed digi image IO stamp

here's

...tweak digital paper
to create a focal image:


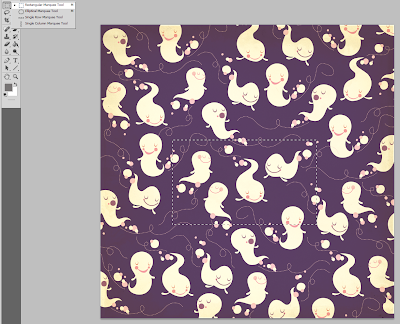
Step 1) Open your digital paper & use the rectangle marquis tool to
select the portion you want to copy. (Hit the Control button
and the C key to copy quickly).

Step 2) Create a new file & paste your selection into it. (Hit Control V
to paste quickly).


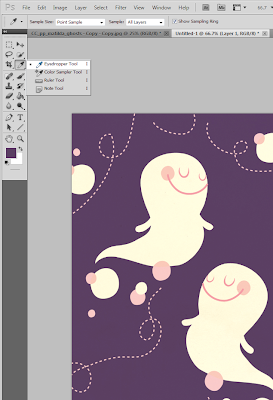
Step 3) If there are areas you want to cover
or fill, you can use the eyedropper tool to
select the fill colour, so that it matches perfectly.


Step 4) Using the new colour that you picked up with
the eyedropper, fill in any areas you like. I used both the paint
bucket or brush in areas. (See the partial ghost head at the
bottom right, above? This was a screenshot of it being erased).

Or customize it even more: If you want the background to be
a different shade, you can fill it with another colour (or even a pattern):


With just one click of the mouse, I used the paint bucket tool and filled the background with black. (Of course, some papers may be trickier than others to alter depending on their style).

4 Print the image -Stamp & heat emboss in clear - Distress with black ink -Layer & embellish

Step 5) Print the image and use it as is or embellish it.

I did this stuff to mine:

A) Stamped over top of the printed image with an
Impression Obsession Funky
background cover a card stamp:

in clear Versamark ink.

B) Heat embossed it with clear detail embossing powder & a heat gun.
C) Distressed the edges with black ink.
D) Layered it on a yellow mat.
E) Added doodled dots in white Sharpie paint pen & black marker.
F) Added a black mat (after I added the "Happy Halloween" flag bits.)

5 Cut bows & a hat from black cardstock & added yellow stitching

G) Cut little bows & a fedora hat out of black cardstock.
H) Added stitched details in yellow embossing thread.
I) Stitched the ghost trails in light violet embroidery thread.

Step 6) Make the sentiments:
"Happy Halloween"
.

1)
Create a word document with "HAPPY HALLOWEEN" in this Graffiti Paint Brush free font
with spaces between the letters to cut tiny flag shape.

You can download my sentiment document here. Please note: the font will not look the same unless you add the same Graffiti brush font that I used to your own collection of fonts, or you can change it up however you like, of course.

2) Print it on 140lb watercolour paper.
3)Quickly heat emboss it with clear embossing powderCut the flag shapes free hand.
4) Colour the flags with Mustard Seed distress ink.
5) Underline the letters with a white Sharpie paint pen.
6) Stick the pieces behind the yellow mat.
7) Add the black mat behind the letters.
"Boo"

Wrap ribbon over cardstock strip - Pierce  holes in letter shapes & stitch

To make the 3 "boo" ribbon tabs:

1) Cut a piece of cardstock the same colour as your ribbon to measure the width of your ribbon
2) Cut the strip into approximately 1 inch long sections - 1 inch for each letter.
3) Glue the ribbon around the cardstock strip (I like to use glue that won't gum up my needle or place my adhesive with the stitching area in mind).
4)
Pierce holes in the shape of a letter. (If you like, you can draw your letters on with a pencil to use as a guide.
5)
Stitch with needle & thread where you pierced the holes.
6) Adhere the thread ends to the back of the ribbon tab.
7) Stick the ribbon tabs under the mat of your image & you're done!

Dry brush pieces of digital paper with white paint & adhere to a black card

Step 7) Add paper to a 5 and 1/2" square top-fold card

This is that paper that I made with the black circle Overlay and different digital papers:

Make custom patterned paper

It's printed on watercolour paper & dry-brushed with white acrylic paint.

Glittered spider web mat

Step 8)
Make a fancy band of white embossed paper.

This one is made using the EK Success Martha Stewart punch around the page Spiderweb punch:

Punch spider web edge for a mat -Top with Cuttlebug embossed paper - Apply versamark heat & stick and glitter

I embossed paper with Cuttlebug textile embossing folder
& stuck it on top. Then added Versamark ink, Heat'n'Stick powder & glitter.

Step 9) Put it all together:


...and that's it!


Thanks for havin' a boo at this!


P.S. Disclosure: This post is unsolicited, but I was lucky enough to receive the EK Success Martha Stewart punch around the page Spiderweb punch for free.
Read More
Posted in cheap-tricks, Digital-Images, Halloween, Jessica-Sprague, techniques, Tutorials | No comments
Older Posts Home
Subscribe to: Posts (Atom)

Popular Posts

  • free Butterfly Silhouette .studio cut files (in 3 styles)
    Hi, All! Here are those butterfly Silhouette .studio cut files. They are for only for the Silhouette machine... But I do hope to share other...
  • Graphics Fairy Inspiration (+vintage printables)
    Thank You all so much for your wonderful comments about the papers I've been obsessed with. Your kind words make me grin so big that I g...
  • New Popcorn Box template set (pretty stamp room storage) :o)
    Are you in the mood for a template or two? I was going to wait until I had really good photos and a full pictorial, but then I would take fo...
  • "Honey, I shrunk the stationery!" (Hero Arts typewriter notebook)
    Still trying to make more of my cards into little gifts. This Hero Arts typewriter card is another take on the card turned refillable notebo...
  • Making Your Own Colour Shimmer Sprays--Links & Info
    Info & Links Links for how to Mak e yo ur o w n Sh im mery s prays: (These are for you sweet Beth! oxo) ( more info on these colours in...
  • over 100 free pattern overlays ... at a glance
    Would you believe that the free overlay total is at 139 overlays and counting? (I might have a wee little addiction) ;-) Since overlays can ...
  • Felt-based cards (Rock-a-Bye Baby tutorial)
    New idea, Old projects.... I've been debating whether or not to post some older projects/tutorials since the big bad insecurity beast...
  • Circle Overlays (to revamp your papers!)
    Can you ever have too many ways to use your stash? No card today, just popping in with a cheap trick for revamping your "old" pat...
  • Everything I've Ever Made (at a glance)
    This post is a visual overview of my blog history-- with thumbnails that are linked to tutorials & templates for pretty much everything ...
  • 3 Clean And Simple cards (with SRM stickers)
    You guys may know that I was tragically born without the gene that let's you achieve a C lean A nd S imple card. ;-) Not sure why I find...

Categories

  • 'Mouse'-the-cat (10)
  • *TEMPLATEs (98)
  • 3D-projects (144)
  • A-Day-For-Daisies (7)
  • Amber Ink (9)
  • Angel's-Landing (2)
  • BASICS (47)
  • Blogging-tips (7)
  • Caardvarks (48)
  • Cat's-Pajamas (2)
  • cheap-tricks (224)
  • Christmas (33)
  • Claire-Keay (2)
  • Cricut (3)
  • cut-file (2)
  • Cuttlebug (45)
  • decor (6)
  • Digital-Images (131)
  • Distress-Inks-etc (14)
  • DIYstamps (1)
  • Eat-Cake-Graphics (11)
  • Faves (207)
  • Fred-She-Said (5)
  • Freebies (77)
  • GESSO (9)
  • Halloween (10)
  • Heather Ellis (3)
  • Hero-Arts (14)
  • ISC (7)
  • Jessica-Sprague (2)
  • Just-Rite (2)
  • LPS (63)
  • Mo's-Digital-Pencil (16)
  • My-Favorite-Things (33)
  • organizing (7)
  • Other-People's-Tutorials (36)
  • Paper-Garden-Projects (54)
  • Paper-Temptress (39)
  • Punches (21)
  • Purple-Onion-Designs (23)
  • S.U. (1)
  • SCOR-PAL (4)
  • silhouette (4)
  • Skipping-Stones-Design (7)
  • Squigglefly (6)
  • SRM-Stickers (8)
  • techniques (191)
  • templates (26)
  • Tiffany-Doodles (4)
  • Tutorials (252)

Blog Archive

  • ▼  2013 (16)
    • ▼  July (4)
      • A Triple-stamped Fancy-cut Flower card
      • Flying by to say ... 'hello'
      • a Silhouette Challenge project
      • Silhouette Cameo - Sketch pen Camera card
    • ►  June (4)
    • ►  May (3)
    • ►  April (1)
    • ►  March (1)
    • ►  February (3)
  • ►  2012 (53)
    • ►  December (2)
    • ►  November (2)
    • ►  October (1)
    • ►  August (3)
    • ►  July (2)
    • ►  June (5)
    • ►  May (7)
    • ►  April (8)
    • ►  March (9)
    • ►  February (13)
    • ►  January (1)
  • ►  2011 (74)
    • ►  December (1)
    • ►  November (5)
    • ►  October (10)
    • ►  September (9)
    • ►  August (12)
    • ►  July (5)
    • ►  June (9)
    • ►  May (2)
    • ►  April (6)
    • ►  March (7)
    • ►  February (4)
    • ►  January (4)
  • ►  2010 (84)
    • ►  December (7)
    • ►  October (1)
    • ►  September (6)
    • ►  August (1)
    • ►  June (1)
    • ►  May (7)
    • ►  April (21)
    • ►  March (3)
    • ►  February (17)
    • ►  January (20)
  • ►  2009 (234)
    • ►  December (16)
    • ►  November (21)
    • ►  October (11)
    • ►  September (23)
    • ►  August (29)
    • ►  July (26)
    • ►  June (10)
    • ►  May (16)
    • ►  April (26)
    • ►  March (22)
    • ►  February (27)
    • ►  January (7)
  • ►  2008 (39)
    • ►  December (14)
    • ►  November (25)
Powered by Blogger.

About Me

Unknown
View my complete profile