StampznewBright

  • Subscribe to our RSS feed.
  • Twitter
  • StumbleUpon
  • Reddit
  • Facebook
  • Digg
Showing posts with label Cricut. Show all posts

Monday, 31 January 2011

Have a Heart: E.C.G. Valentines (+ Cricut ideas)

Posted on 15:00 by Unknown
okay, so not "ECG" as in electrocardiogram...
(though being Valentine's Day cards there are
a couple of hearts around here)

(heeheehee) ...but rather E.C.G.
as in
Eat Cake Graphics

some teensy weensy stamped
eat cake graphics images on a couple
of Valentine's cards:


One is a standard A2 card (4 1/4" x 5 1/2")...

(with a tiny wind-up mousie)
I've been trying to make more standard-sized cards for
mailability. Which kinds of cards do you prefer: standard,
or square, or round, or strange folds, or fill-in-the-blank?

The other card I made is a littler guy (3"x 3")...
(one of my favourite sizes)
(with a wee bee!)

both cards have scallops and hearts
(which I shall soon ramble incessantly about
in hopes that it might be interesting to somebody) heehee


1...the stamp images & card details
2...digital paper (kitty text) freebie
3...tool talk: Cricut chatter
4...free templates for hand cutting options

-1-


Some big pics of the wee stamped
Eat Cake Graphics images:


The Wind up Mouse stamp can be found here.
(This little fellow measures in at: 1 inch by 0.5 inches)

The heart was cut on the cricut (details below); it's layered with vellum over it, pierced and stitched with black thread.

The sentiment is printed from a word document onto Paris Bleedproof cardstock (which lets you heat emboss out of the inkjet printer, if you are fairly quick. Instructions on digital heat embossing on Paris Bleedproof in my post here.)

The cloud patterned paper is some older stuff from the Prima Marketing Animal Bash Collection called "Eager"
-2-


The black & white kitty text paper is a digital one I made by scanning an old book about cats (I love the look of using real book pages, but printed ones are acid free AND I can share the files with You!) :o)

Here is the kitty text paper freebie,
if you'd like to download it it:


(Click on the image above it will open full size then you can save it
or click here to visit Acrobat.com to Download it)


The Buzzle Bee stamp can be found here
(it looks enormous here, but it's only
a wee 0.8 inch x 0.7 inch)

The sentiment is printed on Vellum
(which also lets you heat emboss out of an ink jet printer)

The patterned papers are: GCD Party it Up collection (dotted paper)
BasicGrey Urban Prairie 6x6 paper-Wild Flowers (honeycomb flower paper)

-3-

Trendy things to make using the
Cricut (and the Plantin Schoolbook cartridge
that comes with it).

Have no cricut? No worries. I've linked up scallop and heart templates as well (for those who enjoy cutting by hand and free stuff.)

Confession time!!! I am ashamed to say that my Cricut Expression cutting machine has been sitting in a drawer unused for a VERY long time (almost 2 years, GASP!) It felt like such a waste to let something like that sit idle when so many people long to own one of their own, but I'd not been feeling well enough for all of the experimenting. I had even received SCAL as a gift but have still never cut a thing with it (I can't figure it out, WEEP!) That's one of my more materialistic New Year's resolutions.

I do have 2 cartridges (the plantin schoolbook that came with it and a farm animals one which was a gift from a lovely reader who is far too generous.) So..... yesterday I vowed to get it out & make it work.

Turns out that there are a couple of "trendy" things that the "old school" Plantin Schoolbook cartridge has on it--that (if you're a little like me) you might not have realized:

1) Scallops (for layers of beautiful lovely fat or wee scallop edges!)

2) Hearts (I've always wanted a heart punch. Who knew?) The hearts above were cut on the cricut, but I wasn't pleased with the way the different Cricut-cut sizes nested, for some reason, so I cut the mat layers underneath them free-hand with scissors.

These little scallops were cut from light-weight white paper:


They were made this way...

1) Cut ten scallops at 3/4" size (if memory serves) I believe that is the measurement of the scallop, but I could be wrong. ;o)
2) Make 3x3 note card (cut some white cardstock to measure 3" x 6" & score in the center
3) Adhere the ten scallops to the note card
4) Trim off the edges with scissors
5) Distress the edges of all the scallops (I used my fingernail) though I did get one wee paper-cut. And I'm guessing distressing with blood instead of ink is not likely to be the new trend. CREEPY! ;o)

Scallop and Heart


If you rather cut things by hand:

my free BIG scallop template is a PDF on SplitCoastStampers here
&
heart template Google image search here

Thanks so much for popping by!


P.S. I'm not affiliated with Eat Cake Graphics. I bought these wee stamps 4 years ago & just had to use 'em on Valentines this year. :o)

P.P.S. Thinking of buying a Cricut? Before you do, might I play devil's advocate and suggest reading this article? I've never used a Silhouette, but long-time meticulous crafter Kristina Werner has me wishing I'd tried one out! (I have no affiliation with Silhouette at all, sadly LOL) ;O)

P.P.P.S. If you wanted, you could use the hearts to make this...

...gorgeous 3D heart banner
Photo & tutorial from How about Orange
(You could use either machine-cut hearts or hand-cut ones, of course)

P.P.P.P.S. Oops, I think I have the chatties, sorry!
Read More
Posted in Cricut, Digital-Images, Eat-Cake-Graphics, Freebies, Other-People's-Tutorials, techniques, templates | No comments

Sunday, 13 September 2009

{Jena Witch} Over the Moon box (an LPS peek)

Posted on 08:15 by Unknown
Thank You again so much for understanding again when I have to pull a disappearing act. As though you really had a choice, right? ;-) Sorry, I wish it wasn't necessary to miss days & You know me, I feel ultra guilty and broken-record-y. I would much rather hang with You all, but life--and Monsieur Migraine (aka the-evil-head-torturer) is still getting in the way daily, dang it all!

Anywho, without further ado, meet {Jena Witch}!
the newest set from Little Paper Shop

She's sittin' pretty over the city. :o)


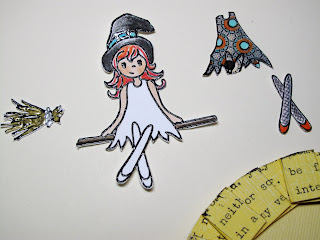
1...preview peek of the new Little Paper Shop Set {Jena Witch}
2...pictorial for how to make a moon treat box
3...the round box template


(new LPS Set {Jena Witch})

This lil' witch is flyin in on Tuesday
(her release day at LPS)


Nothing like a cute new stamp to fire up your mojo, hey? I'm so stoked about today's sneak preview {Jena Witch}. I flip for Halloween. I've dressed up as a witch a few time (and a vampire, princess Leia, an alien, a bunny wabbit, a crow... you get the idea...I lurve Halloween madly!)
Want to win her?
Simply comment on the LPS blog here!
easy or what? ;o)


-2-

...make a moon treat box


  • {Jena Witch} stamp set (Coming soon to the Little Paper Shop!)
  • Round box template (linked below)
  • Core'dinations cardstock (Roy G Biv Super Assortments-2 yellows)
  • Sandpaper
  • Printer & text file (details below)
  • Strong adhesive (I used Scor-tape & Tombow)
  • Scissors & paper cutter
  • Scor-pal (or another scoring tool)
  • Paper piercer, black thread, & needle
  • Black ink, clear embossing powder, & heat gun
  • Prismacolour pencils, Copic markers, & Sakura Souffle pens
  • BasicGrey Ambrosia paper (6x6 pack)
  • Copic Spica (clear) & Silver Zigpainty pen


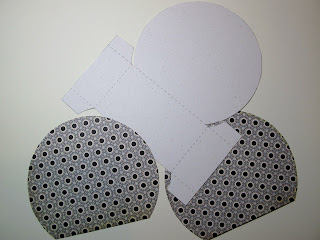
Step 1} Trace, cut, & score the round box template.


Step 2} Sand Core'dinations cardstock to distess it & remove the dust.


Step 3}
Make the ruffled edge. This is a trick I learned from the Brilliant Nathalia; her fantastic tutorial is here. These are made this way...

A) Print Halloween text onto the sanded Core'dinations cardstock
B) Let the printer ink dry for a couple seconds
C) Cut it into strips
D) Score it & fold it (I scored it every half an inch)
E) Adhere the folds to themselves--curving it to fit the circular box.

(This text is Edgar Allen Poe's The Black Cat typed in MSword in Underwood Champion a free font from dafont


Step 4}
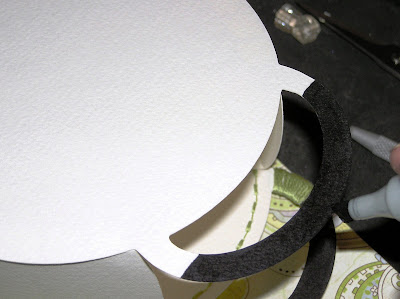
Adhere the folded text strips around the circle & trim them (using the box circle edge as a cutting guide)


Step 5}
Pierce & stitch through the folded strips.


Step 6} Cut a city (this was cut with the Cricut Expression & the cartridge that comes with it Plantin Schoolbook) (For more details on how this city was made please see this post.)


Step 7} Stamp {Jena Witch} in Black ink & emboss her with clear embossing powder. She's coloured with a mix of Prismacolour pencils, Copic markers, & Sakura pens. I paper pieced her dress using BasicGrey Ambrosia paper.

Her fishnet stockings are my favourite part (she's sassy! heehee) A pencil crayon seemed the easiest way to get a thin, soft line on them.


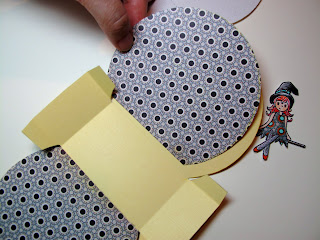
Step 8} Trace & cut two semi circles to line the box with. This is more of that BasicGrey Ambrosia.


Step 9} Adhere the liner pieces inside the box. (Dear Tombow, I loves ya too much!)


Step 10} Glue the paper pieces onto {Jena Witch} & stick her to the top of the moon box.

-3-

(round box template at 80%)

For now it's just a traceable template...


I tried to make a new whole template with 2 round ends, but my technical skill is rather limited, so I couldn't get it to work & had to give up, for now. (I need tech support! LOL)

Used at this percentage, this makes a 4.5 inch diameter box.
For the original 5.5 inch box template, please see this post.


Thanks for flyin' by!

(click to visit the blog from an email or reader)
...to subscribe: Feedburner or Feedblitz
Read More
Posted in *TEMPLATEs, 3D-projects, Cricut, LPS, Tutorials | No comments

Tuesday, 14 April 2009

I got a Cricut Expression! Squeal!!!! (+Round Skyline Purse Box)

Posted on 05:10 by Unknown
Edited to add: The sky line is from the Plantin Schoolbook cartridge (same one that I used to make the bag.) It makes a city/rural houses/trees/grass/mountains & flowers.) The directions for the are on the video that comes with the Expression, but if anyone needs to know how: it is the set on Tall Ball. I used 'fit to page' on a 12x12 piece of watercolour paper.

Sorry no post yesterday. I needed a sick day to sleep a LOT.


today the ol' blog should be called: I'm not Worthy!!! ;o)


I made this with my new Cricut Expression (!!!!!), but this post also has a couple of links to a substitute template, for those of you who don't have one (and hopefully some Cuttlebug and-or embellishment ideas you might make use of too.) :O)


1. Squished Cuttlebug embossing (to de-emphasize the embossing some)
2. Making a round purse bag (Cricut or no Cricut)
3. No sew embroidery details on a 3D project
4. Adding feet to 3D projects


I got a Cricut Expression for my birthday! I have wanted one of these bad boys for a long time & I got the spoiling of a lifetime for my birthday. It still makes me all teary eyed how lucky I am. (I'm more than lucky in so many non-materialistic ways everyday, of course. This just ROCKs to the "me-likey...me-wanta...me-needa" side of me.) ;O) I'm just starting to figure the mechanics of it out, but it is such a thrill!

;o)

I hope to make a lot of projects with the Expression in future. They should be easy to duplicate if you have one, since I won't be buying a lot of cartridges (maybe One eventually: the Storybook one that Cynde mentioned...thanks Cynde!) Mostly, I plan on learning to make .cut files to share with you.

Don't plan on getting an Expression? No worries, I'll make the templates for regular cutting & for machine cutting. For now, since i don't have a clue how to use the software...(but just hafta play with the thinger)... I'll try to post links to alternative templates so that you can make similar projects without a Cricut, if you like. :O)

-1-

...make squished Cuttlebug embossing...


The black buildings have squished embossing. Seems weird hey? We're always trying to get deeper embossing, right? But a couple of times lately I've found that I wanted a design to include less prominent embossing, so I thought I'd share the really really easy way to get that:


Cuttlebug & Cuttlebug embossing folders
Paper (a die cut, a mat, or any ol' shape)

This uses this sandwich (after regular embossing):

--A plate
--B plate
--embossed paper piece
--Cuttlebug folder (on top of paper)
--B plate


A) Cut any shape & emboss it as you normally would


Flatten it:

B) Place your embossed paper piece on top of the A pad & a B plate


C)
Place the Cuttlebug folder on top of your embossed paper piece (so the flat side is against it) & add the second B plate over that and then...Roll through...

One thing to note:
any cut marks in your B plates will show on your embossing.

-2-

...make a round purse bag...


Whether you use a Cricut or no Cricut, this is one funky kind of shape, no?


Cardstock: Watercolour paper & Black
Patterned papers: (Basic Grey-Lily Kate Wisteria) Retired SU Christmas paper.
Schtuff: Black seed beads, green embroidery thread, clear rectangular beads (feet.)
Tools: making memories Paper piercer, needle, Cricut Expression, Cuttlebug & embossing folder (Perfectly Paisley)
Adhesive: Tombow Monomulti

Purse Box Cutting:
If you have an Expression & want to make the bag... it uses the Plantan School cartridge & the instructions for cutting it are on the DVD that comes with it.

No Expression? Please see the section below. :O)


Step 1) Build the round purse box using template or Cricut (I sewed a beaded circle on the front before assembing it.)


Step 2) Add a piece of beaded Scor-Pal grid (tutorial for the beading HERE)


Step 3) Dry fit city skyline to box & trim to fit


Step 4)
Make the moon: Cut circle for moon and emboss it. Pierce it if you'd like to add stitching.


Step 5) Sew the moon :O)


Step 6) Stick it together...Adhere city skyline to the moon & stick the whole thing to the box


Step 7) Adhere a second layer of skyline with dimensional tape. (You can use black foam tape. Or you can use a Copic marker to colour it to camouflage it with any colour.)


(watercolour paper)

This bag was cut from watercolour paper (Farbiano, 90lb) from a local art store. Watercolour paper comes in large sizes & in sturdy enough heft for 3D projects. It's great for any project in my book. It may be an especially nifty option for you Cricut enthusiasts who want to take advantage of the 24 inch high cutting abilities.


Don't have an Expression, but you'd like to make a version of this purse? Try attaching circles & handles to an octagon-shaped box...


Octagon-shaped box: Here are two templates that look fantastic (a bottom with a lid): Octagon Box 1 & Octagon Box 2 from TrimCraft<--(see the example there for Sue Burrows tutotial) (Sorry TrimCraft, I tried to direct link to your site, but it wouldn't work.)

I'd try it this way:
  1. Build the box & measure for circles
  2. Use a circle cutter (or bowl/plate...) to Cut two circles (these circles are 5 2/8 inches in diameter)
  3. Dry fit them to the box
  4. Trim the bottom off of them, so they'll sit flat
  5. Cut & Attach a handle to the back of each circle
  6. Adhere the circle to the rectangular box
However, you may want to tweak all that; I've not tried that template out... Looks great though.


-3-


...add a no-sew embroidery
embelishment to 3D projects...


I can't stop winding emroidery floss around stuff. LOL. Adds some softness to 3D projects with neither the tempermentality of ribbon nor the bulk. ;o) Here's how the bottoms of those black handles were done...


Embroidery thread
Adhesives: Tombow Monomulti & Oh So sticky tape


Step 1)
Colour the handle with a marker if you like it to be a different colour (Copic markers won't bleed) :O)


Step 2) Add adhesive to handle where you want your thread embellishment (nice & sticky is important.) I like Oh So sticky tape


Step 3) Wind embroidery thread around.

I did just the base of the handle, but if you've the patience of a Saint you could wind the whole thing. ;O) It might be much easier if you are trying it on a template where the handle is not attached yet...)


Step 4) Trim the thread & adhere the end.


-4-
...add feet to 3D projects


This couldn't be an easier way to add cool factor to a 3D project: beads for feet. :O) I added clear rectangular beads (I like round ones too though.) Three work nicely & are sturdy like a little tripod...or four or more...


Any kind of beads (feet)
Tombow Monomulti (adhesive)


Glue feet on. :O)

A little trick that might help if you decide to add feet to an irregular shaped project like this (as an afterthought): put the project over something upside down so gravity will hold your feet on (i used a bottle since this has a small opening.)

and that's that...


(Tombow Monomulti)

--I'm always on about Tombow Monomulti. I like to use it for fiddly bits like the end of all those embroidery threads. Never tried it? It goes on like white glue (but with a fine applicator tip & it dries way quicker with more hold.) It is made of latex, so anyone with latex allergies shouldn't use it on your fingers, but it has no fumes and it is super handy.
--Tombow has a lot of holding power, even on glass. I used it to adhere those bead feet on here, and have in the past on other things & they never budge!


Hope your crafting is superkalifantastalistic,


P.S. Does the new formatting work for you?
Any changes you'd like to see?


Read More
Posted in *TEMPLATEs, 3D-projects, cheap-tricks, Cricut, Faves, Paper-Garden-Projects, techniques, Tutorials | No comments
Older Posts Home
Subscribe to: Posts (Atom)

Popular Posts

  • free Butterfly Silhouette .studio cut files (in 3 styles)
    Hi, All! Here are those butterfly Silhouette .studio cut files. They are for only for the Silhouette machine... But I do hope to share other...
  • Graphics Fairy Inspiration (+vintage printables)
    Thank You all so much for your wonderful comments about the papers I've been obsessed with. Your kind words make me grin so big that I g...
  • New Popcorn Box template set (pretty stamp room storage) :o)
    Are you in the mood for a template or two? I was going to wait until I had really good photos and a full pictorial, but then I would take fo...
  • "Honey, I shrunk the stationery!" (Hero Arts typewriter notebook)
    Still trying to make more of my cards into little gifts. This Hero Arts typewriter card is another take on the card turned refillable notebo...
  • Making Your Own Colour Shimmer Sprays--Links & Info
    Info & Links Links for how to Mak e yo ur o w n Sh im mery s prays: (These are for you sweet Beth! oxo) ( more info on these colours in...
  • over 100 free pattern overlays ... at a glance
    Would you believe that the free overlay total is at 139 overlays and counting? (I might have a wee little addiction) ;-) Since overlays can ...
  • Felt-based cards (Rock-a-Bye Baby tutorial)
    New idea, Old projects.... I've been debating whether or not to post some older projects/tutorials since the big bad insecurity beast...
  • Circle Overlays (to revamp your papers!)
    Can you ever have too many ways to use your stash? No card today, just popping in with a cheap trick for revamping your "old" pat...
  • Everything I've Ever Made (at a glance)
    This post is a visual overview of my blog history-- with thumbnails that are linked to tutorials & templates for pretty much everything ...
  • 3 Clean And Simple cards (with SRM stickers)
    You guys may know that I was tragically born without the gene that let's you achieve a C lean A nd S imple card. ;-) Not sure why I find...

Categories

  • 'Mouse'-the-cat (10)
  • *TEMPLATEs (98)
  • 3D-projects (144)
  • A-Day-For-Daisies (7)
  • Amber Ink (9)
  • Angel's-Landing (2)
  • BASICS (47)
  • Blogging-tips (7)
  • Caardvarks (48)
  • Cat's-Pajamas (2)
  • cheap-tricks (224)
  • Christmas (33)
  • Claire-Keay (2)
  • Cricut (3)
  • cut-file (2)
  • Cuttlebug (45)
  • decor (6)
  • Digital-Images (131)
  • Distress-Inks-etc (14)
  • DIYstamps (1)
  • Eat-Cake-Graphics (11)
  • Faves (207)
  • Fred-She-Said (5)
  • Freebies (77)
  • GESSO (9)
  • Halloween (10)
  • Heather Ellis (3)
  • Hero-Arts (14)
  • ISC (7)
  • Jessica-Sprague (2)
  • Just-Rite (2)
  • LPS (63)
  • Mo's-Digital-Pencil (16)
  • My-Favorite-Things (33)
  • organizing (7)
  • Other-People's-Tutorials (36)
  • Paper-Garden-Projects (54)
  • Paper-Temptress (39)
  • Punches (21)
  • Purple-Onion-Designs (23)
  • S.U. (1)
  • SCOR-PAL (4)
  • silhouette (4)
  • Skipping-Stones-Design (7)
  • Squigglefly (6)
  • SRM-Stickers (8)
  • techniques (191)
  • templates (26)
  • Tiffany-Doodles (4)
  • Tutorials (252)

Blog Archive

  • ▼  2013 (16)
    • ▼  July (4)
      • A Triple-stamped Fancy-cut Flower card
      • Flying by to say ... 'hello'
      • a Silhouette Challenge project
      • Silhouette Cameo - Sketch pen Camera card
    • ►  June (4)
    • ►  May (3)
    • ►  April (1)
    • ►  March (1)
    • ►  February (3)
  • ►  2012 (53)
    • ►  December (2)
    • ►  November (2)
    • ►  October (1)
    • ►  August (3)
    • ►  July (2)
    • ►  June (5)
    • ►  May (7)
    • ►  April (8)
    • ►  March (9)
    • ►  February (13)
    • ►  January (1)
  • ►  2011 (74)
    • ►  December (1)
    • ►  November (5)
    • ►  October (10)
    • ►  September (9)
    • ►  August (12)
    • ►  July (5)
    • ►  June (9)
    • ►  May (2)
    • ►  April (6)
    • ►  March (7)
    • ►  February (4)
    • ►  January (4)
  • ►  2010 (84)
    • ►  December (7)
    • ►  October (1)
    • ►  September (6)
    • ►  August (1)
    • ►  June (1)
    • ►  May (7)
    • ►  April (21)
    • ►  March (3)
    • ►  February (17)
    • ►  January (20)
  • ►  2009 (234)
    • ►  December (16)
    • ►  November (21)
    • ►  October (11)
    • ►  September (23)
    • ►  August (29)
    • ►  July (26)
    • ►  June (10)
    • ►  May (16)
    • ►  April (26)
    • ►  March (22)
    • ►  February (27)
    • ►  January (7)
  • ►  2008 (39)
    • ►  December (14)
    • ►  November (25)
Powered by Blogger.

About Me

Unknown
View my complete profile