StampznewBright

  • Subscribe to our RSS feed.
  • Twitter
  • StumbleUpon
  • Reddit
  • Facebook
  • Digg

Thursday, 30 June 2011

How to make Custom patterns in Photoshop & use them to fill Line Art etc.

Posted on 20:30 by Unknown

This one's for You, Malin!


...make a custom pattern in Photoshop
& use it to fill line art or digital images


I uploaded a Powerpoint of this tutorial here,
since these Blogger pictures can be hard to see.
(If you like the powerpoint idea, please let me know for
future technical tutorials)

Click the image to go to the powerpoint pictorial:

(Acrobat takes quite a while to generate the preview,
but you can download the powerpoint right away, if you like)


And here's how the custom pattern & image filling is done:

(my way, anyhow)


Step 1) Open the image that you'd like to turn into a pattern. Select the Edit tab, then choose "Define Pattern"

(Sizing: You can use some pretty large images for patterns. I used this one which was 2500 pixels, since that prints at about 8.5" square (and fits on a standard sheet of cardstock). 2500 px is the maximum size for Photoshop brushes in PS so I made some coloured damask patterns that size. I think I may do a little tutorial on brushes at some point, if anyone is curious about them).
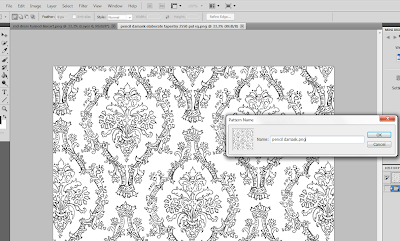


Step 2) A window will pop up for you to name your pattern.

A little thought on naming patterns: If you are using someone else's image, it helps to add that info in the name, so you know who to credit when you use it, and you can refer to their terms of use or copyright policies.


Step 3) Close the image you used to make the pattern, and open the line art image (or digital stamp image or template) or whatever you want to fill with pattern....


Step 4) Once you open the image to be filled:

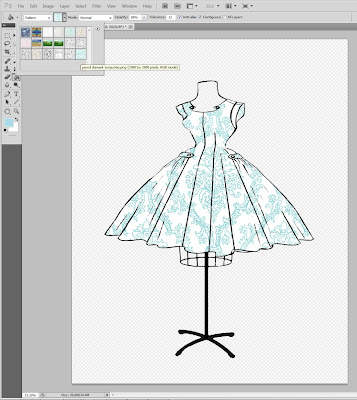
A) select the paint bucket tool.

B) Pull down the tab that says foreground in the toolbar above & select "Pattern" (instead of foreground which gives you solid colour).


Step 5) Pull down again (by the pattern square thumbnail image) to choose your pattern.


Step 6) Set the opacity for your pattern fill. You can make it more or less opaque (solid) or you can make it more transparent (sheer).


Step 7) Position the paint bucket over the line image & click to fill.


Step 8) Repeat with the paint bucket to fill the rest of the image with pattern.


Step 9) Use the zoom tool to get close for easier pattern filling on small areas.


If you like you can fill with colour before adding pattern
by using the "Foreground" paint bucket fill setting first:


(Repeat to fill all areas)


Then, switch to the "Pattern" setting
again, set the opacity, and fill over the colour with pattern.

or....

To get a coloured pattern, change the colour of the image,
then set it as a pattern:


(There's a tutorial on how
to change black &
white images to colour ones

in an older post here).

Then you can fill the image with your new coloured pattern:


Trouble-shooting:

If the whole page fills with pattern, it probably means...
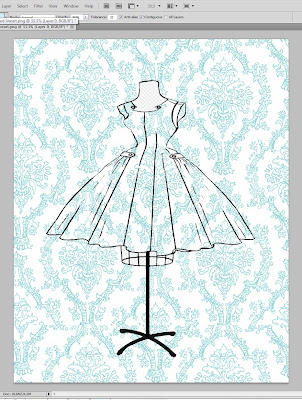


...that there's a hole in the line art somewhere:
(unless you are on another layer that isn't the image layer)


(or in otherwords, there's a break in the line that is
letting that pattern get out of line! ;)


Repair the hole in the line art with the brush tool.


You can use this method to fill templates
(or parts of templates for added detail)


(This template set is available here on Flickr)

It's handy for making custom patterned envelope templates:

(or just making patterned envelope liners)

You can scan anything and turn it into a pattern
(book pages, fabrics, kid's art...)

Even fill things with scanned photographs:


This was done with a vintage photo postcard of
Stanley Park, Vancouver BC Canada.
(I have a collection that I've been meaning to scan & share with you)


Credit for the dress judy image goes to... The image used here is an adaptation of an image created by Monica Gaffney. I turned her Red Dress image into an outline image for a blog buddy, Malin. Monica's fun & funky digitals can be found in her etsy store, AssortedSundries, here.


Coming soon to a blog near you:


If you have any pointers for how to do Photoshop things in a better
way, I'd love to hear them. I just make things up as I go,
:o)


P.S. That sweet T.V. image at the top is available as line art
here at Tiffany Doodles for only $1.o0!
Read More
Posted in cheap-tricks, Digital-Images, techniques, Tiffany-Doodles, Tutorials | No comments

Tuesday, 28 June 2011

Cut out pressure embossing tutorial

Posted on 10:50 by Unknown
heat embossed thicker stamping on cut out pressure emboss

Don't you love when a frustrating mistake turns into a fun thing to try out?

I was embossing a piece of cardstock and it got several tears in it (and I had
done some fancy heat embossing on it and everything!):


To save it, I ended up cutting the more obvious torn bits out,
and it was fun,
so I thought I'd share this schtuff...


1... a pictorial for how to do 'cut out pressure embossing'
2... general tips for better embossing

-1-

do 'Cut Out pressure Embossing':


  • Pressure embossing machine: Cuttlebug, Big Shot, Wizard
  • Embossing folder (this one is S.U.'s Elegant Lines embossing folder
  • Cardstock (8olb or more is nice)
  • Exacto blade or hobby knife
  • Patterned or coloured paper
  • Scissors & Adhesive (I used double-sided tape)


Step 1) Pressure emboss a piece of cardstock & cut out select areas with a hobby knife. (If you are more comfortable with scissors you could stab them into the center of the area & cut in towards the outline instead, but the hobby blade fits little spots nicely).


Step 2) Snip bits of paper to add to the back of your embossed piece of cardstock where the cut outs are.


I used sprayed paper left over from colouring a doily using DIY shimmer spray

doily sprayed with DIY glimmer mists mel stampz&.
(doily spraying post here.......&...... how to make the sprays here)


Step 3) Lay it all out behind cut outs before adhering to be sure you like it


Step 4) Adhere bits to the back of cut out embossing...


Step 5) Trim, if necessary.


Step 6) Finally, mount your embossed piece onto a card the same size (this one is a standard A2: 5 1/2" x 4 1/4" card with a top fold):


.................................(clickable blogger pics)

Little Tip: Use a thin enough paper underneath. The spritzed paper
is a delight colour-wise & it has a really nice sparkle to it
from the shimmer mist...

sparkle of diy spritz

...but next time I'd use thinner paper (the 140lb watercolour paper made bumps under the embossed piece that look less than perfect in person. Thankfully, through the magic of photography you can't really see that here! sneaksneak)


There's another version of
cut out pressure embossing here

(and a men's suiting pattern freebie)

-2-

for better pressure embossing:


If you'd like a deeper embossing impression, you can...

1) You can shim your embossing stack: add a piece of cardstock (or 2 or 3) to your plate stack/sandwich.
2) Use thicker cardstock - I've had great results with Strathmore 100lb Bristol Vellum paper
3) Or spritz your cardstock with water or alcohol & emboss it while damp.

If your embossing is tearing, you can...

1) Emboss two pieces of cardstock at once to prevent rips. Sometimes one will still tear but you'll have a good piece to use.
2) Spritz the cardstock with water & alcohol to make it less brittle.

Hope you're having a day
that fits like it was 'cut-out' for you!


P.S. Fancy photo bits thanks to: Pugly Pixel tape (recoloured) from here & the Ambrosia Creative Polaroid Frame from here

P.P.S. Next time, using thickers (foam alphabet sticker) as an ultra affordable background stamp to get heat emboss alphabet on embossed cardstock:


Read More
Posted in cheap-tricks, Cuttlebug, techniques, Tutorials | No comments
Newer Posts Older Posts Home
Subscribe to: Posts (Atom)

Popular Posts

  • free Butterfly Silhouette .studio cut files (in 3 styles)
    Hi, All! Here are those butterfly Silhouette .studio cut files. They are for only for the Silhouette machine... But I do hope to share other...
  • Graphics Fairy Inspiration (+vintage printables)
    Thank You all so much for your wonderful comments about the papers I've been obsessed with. Your kind words make me grin so big that I g...
  • New Popcorn Box template set (pretty stamp room storage) :o)
    Are you in the mood for a template or two? I was going to wait until I had really good photos and a full pictorial, but then I would take fo...
  • "Honey, I shrunk the stationery!" (Hero Arts typewriter notebook)
    Still trying to make more of my cards into little gifts. This Hero Arts typewriter card is another take on the card turned refillable notebo...
  • Making Your Own Colour Shimmer Sprays--Links & Info
    Info & Links Links for how to Mak e yo ur o w n Sh im mery s prays: (These are for you sweet Beth! oxo) ( more info on these colours in...
  • over 100 free pattern overlays ... at a glance
    Would you believe that the free overlay total is at 139 overlays and counting? (I might have a wee little addiction) ;-) Since overlays can ...
  • Felt-based cards (Rock-a-Bye Baby tutorial)
    New idea, Old projects.... I've been debating whether or not to post some older projects/tutorials since the big bad insecurity beast...
  • Circle Overlays (to revamp your papers!)
    Can you ever have too many ways to use your stash? No card today, just popping in with a cheap trick for revamping your "old" pat...
  • Everything I've Ever Made (at a glance)
    This post is a visual overview of my blog history-- with thumbnails that are linked to tutorials & templates for pretty much everything ...
  • 3 Clean And Simple cards (with SRM stickers)
    You guys may know that I was tragically born without the gene that let's you achieve a C lean A nd S imple card. ;-) Not sure why I find...

Categories

  • 'Mouse'-the-cat (10)
  • *TEMPLATEs (98)
  • 3D-projects (144)
  • A-Day-For-Daisies (7)
  • Amber Ink (9)
  • Angel's-Landing (2)
  • BASICS (47)
  • Blogging-tips (7)
  • Caardvarks (48)
  • Cat's-Pajamas (2)
  • cheap-tricks (224)
  • Christmas (33)
  • Claire-Keay (2)
  • Cricut (3)
  • cut-file (2)
  • Cuttlebug (45)
  • decor (6)
  • Digital-Images (131)
  • Distress-Inks-etc (14)
  • DIYstamps (1)
  • Eat-Cake-Graphics (11)
  • Faves (207)
  • Fred-She-Said (5)
  • Freebies (77)
  • GESSO (9)
  • Halloween (10)
  • Heather Ellis (3)
  • Hero-Arts (14)
  • ISC (7)
  • Jessica-Sprague (2)
  • Just-Rite (2)
  • LPS (63)
  • Mo's-Digital-Pencil (16)
  • My-Favorite-Things (33)
  • organizing (7)
  • Other-People's-Tutorials (36)
  • Paper-Garden-Projects (54)
  • Paper-Temptress (39)
  • Punches (21)
  • Purple-Onion-Designs (23)
  • S.U. (1)
  • SCOR-PAL (4)
  • silhouette (4)
  • Skipping-Stones-Design (7)
  • Squigglefly (6)
  • SRM-Stickers (8)
  • techniques (191)
  • templates (26)
  • Tiffany-Doodles (4)
  • Tutorials (252)

Blog Archive

  • ►  2013 (16)
    • ►  July (4)
    • ►  June (4)
    • ►  May (3)
    • ►  April (1)
    • ►  March (1)
    • ►  February (3)
  • ►  2012 (53)
    • ►  December (2)
    • ►  November (2)
    • ►  October (1)
    • ►  August (3)
    • ►  July (2)
    • ►  June (5)
    • ►  May (7)
    • ►  April (8)
    • ►  March (9)
    • ►  February (13)
    • ►  January (1)
  • ▼  2011 (74)
    • ►  December (1)
    • ►  November (5)
    • ►  October (10)
    • ►  September (9)
    • ►  August (12)
    • ►  July (5)
    • ▼  June (9)
      • How to make Custom patterns in Photoshop & use the...
      • Cut out pressure embossing tutorial
      • Cut Out pressure embossing technique & Men's Suiti...
      • missing for a little bit...
      • Emboss & Colour Fabric (one fish, two fish, old fi...
      • Blog layout changes & Pinteresting style
      • Orange you tired of turquoise?
      • Felt-based cards (Rock-a-Bye Baby tutorial)
      • new template set: Cake/Gift-stack boxes (and garde...
    • ►  May (2)
    • ►  April (6)
    • ►  March (7)
    • ►  February (4)
    • ►  January (4)
  • ►  2010 (84)
    • ►  December (7)
    • ►  October (1)
    • ►  September (6)
    • ►  August (1)
    • ►  June (1)
    • ►  May (7)
    • ►  April (21)
    • ►  March (3)
    • ►  February (17)
    • ►  January (20)
  • ►  2009 (234)
    • ►  December (16)
    • ►  November (21)
    • ►  October (11)
    • ►  September (23)
    • ►  August (29)
    • ►  July (26)
    • ►  June (10)
    • ►  May (16)
    • ►  April (26)
    • ►  March (22)
    • ►  February (27)
    • ►  January (7)
  • ►  2008 (39)
    • ►  December (14)
    • ►  November (25)
Powered by Blogger.

About Me

Unknown
View my complete profile