okay, so not "ECG" as in electrocardiogram...
 (though being Valentine's Day cards there are
a couple of hearts around here)
(heeheehee) ...but rather E.C.G.
as in
Eat Cake Graphics
some teensy weensy stamped
eat cake graphics images on a couple
of Valentine's cards:
One is a standard A2 card (4 1/4" x 5 1/2")...

a couple of hearts around here)
(heeheehee) ...but rather E.C.G.
as in
Eat Cake Graphics
some teensy weensy stamped
eat cake graphics images on a couple
of Valentine's cards:
One is a standard A2 card (4 1/4" x 5 1/2")...

(with a tiny wind-up mousie)
I've been trying to make more standard-sized cards for
mailability. Which kinds of cards do you prefer: standard,
or square, or round, or strange folds, or fill-in-the-blank?
I've been trying to make more standard-sized cards for
mailability. Which kinds of cards do you prefer: standard,
or square, or round, or strange folds, or fill-in-the-blank?
The other card I made is a littler guy (3"x 3")...
(one of my favourite sizes)
(one of my favourite sizes)

(with a wee bee!)
both cards have scallops and hearts
(which I shall soon ramble incessantly about
in hopes that it might be interesting to somebody) heehee
(which I shall soon ramble incessantly about
in hopes that it might be interesting to somebody) heehee

1...the stamp images & card details
2...digital paper (kitty text) freebie
3...tool talk: Cricut chatter
4...free templates for hand cutting options
-1-

Some big pics of the wee stamped
Eat Cake Graphics images:
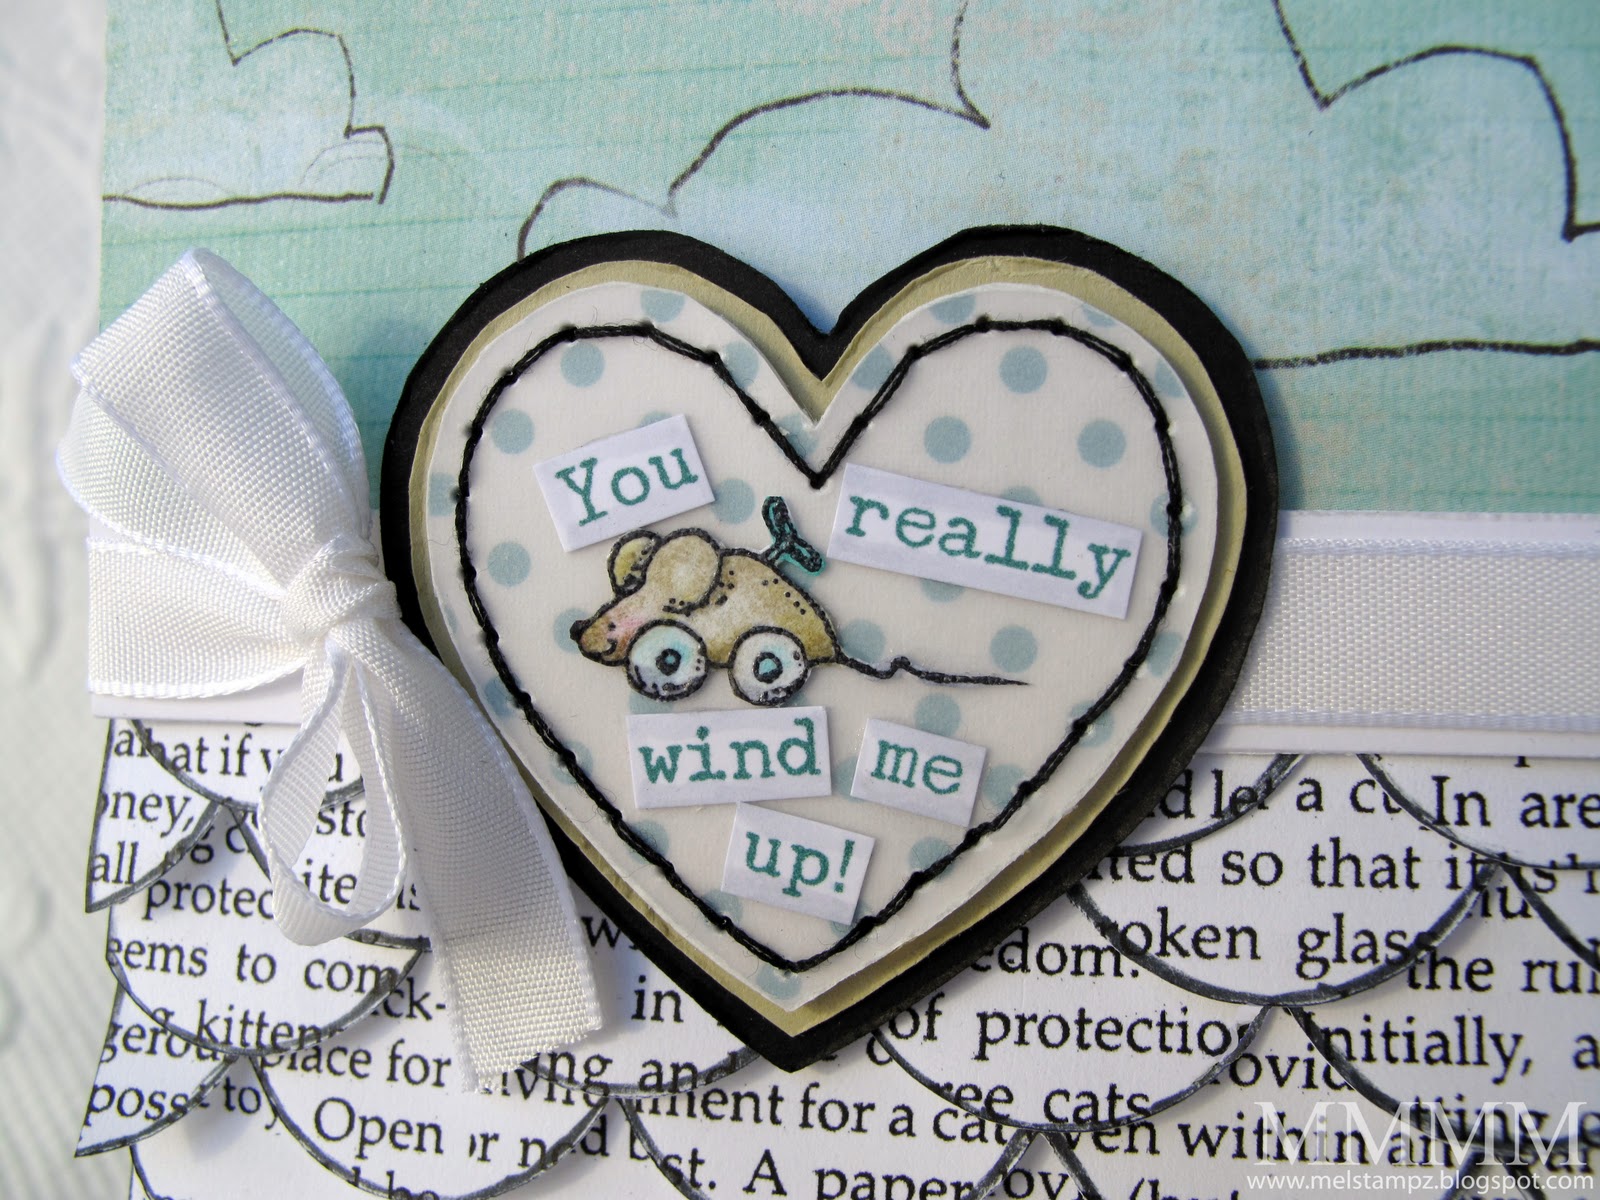
The Wind up Mouse stamp can be found here.
(This little fellow measures in at: 1 inch by 0.5 inches)
The heart was cut on the cricut (details below); it's layered with vellum over it, pierced and stitched with black thread.
The sentiment is printed from a word document onto Paris Bleedproof cardstock (which lets you heat emboss out of the inkjet printer, if you are fairly quick. Instructions on digital heat embossing on Paris Bleedproof in my post here.)
The cloud patterned paper is some older stuff from the Prima Marketing Animal Bash Collection called "Eager"
The black & white kitty text paper is a digital one I made by scanning an old book about cats (I love the look of using real book pages, but printed ones are acid free AND I can share the files with You!) :o)
The sentiment is printed from a word document onto Paris Bleedproof cardstock (which lets you heat emboss out of the inkjet printer, if you are fairly quick. Instructions on digital heat embossing on Paris Bleedproof in my post here.)
The cloud patterned paper is some older stuff from the Prima Marketing Animal Bash Collection called "Eager"
-2-

The black & white kitty text paper is a digital one I made by scanning an old book about cats (I love the look of using real book pages, but printed ones are acid free AND I can share the files with You!) :o)
Here is the kitty text paper freebie,
if you'd like to download it it:

(Click on the image above it will open full size then you can save it
or click here to visit Acrobat.com to Download it)
if you'd like to download it it:

(Click on the image above it will open full size then you can save it
or click here to visit Acrobat.com to Download it)

The Buzzle Bee stamp can be found here
(it looks enormous here, but it's only
a wee 0.8 inch x 0.7 inch)
The sentiment is printed on Vellum
(which also lets you heat emboss out of an ink jet printer)
The patterned papers are: GCD Party it Up collection (dotted paper)
BasicGrey Urban Prairie 6x6 paper-Wild Flowers (honeycomb flower paper)
-3-

Trendy things to make using the
Cricut (and the Plantin Schoolbook cartridge
that comes with it).
Have no cricut? No worries. I've linked up scallop and heart templates as well (for those who enjoy cutting by hand and free stuff.)
Confession time!!! I am ashamed to say that my Cricut Expression cutting machine has been sitting in a drawer unused for a VERY long time (almost 2 years, GASP!) It felt like such a waste to let something like that sit idle when so many people long to own one of their own, but I'd not been feeling well enough for all of the experimenting. I had even received SCAL as a gift but have still never cut a thing with it (I can't figure it out, WEEP!) That's one of my more materialistic New Year's resolutions.
I do have 2 cartridges (the plantin schoolbook that came with it and a farm animals one which was a gift from a lovely reader who is far too generous.) So..... yesterday I vowed to get it out & make it work.
Turns out that there are a couple of "trendy" things that the "old school" Plantin Schoolbook cartridge has on it--that (if you're a little like me) you might not have realized:
1) Scallops (for layers of beautiful lovely fat or wee scallop edges!)
2) Hearts (I've always wanted a heart punch. Who knew?) The hearts above were cut on the cricut, but I wasn't pleased with the way the different Cricut-cut sizes nested, for some reason, so I cut the mat layers underneath them free-hand with scissors.
These little scallops were cut from light-weight white paper:

They were made this way...
1) Cut ten scallops at 3/4" size (if memory serves) I believe that is the measurement of the scallop, but I could be wrong. ;o)
2) Make 3x3 note card (cut some white cardstock to measure 3" x 6" & score in the center
3) Adhere the ten scallops to the note card
4) Trim off the edges with scissors
5) Distress the edges of all the scallops (I used my fingernail) though I did get one wee paper-cut. And I'm guessing distressing with blood instead of ink is not likely to be the new trend. CREEPY! ;o)
Scallop and Heart

If you rather cut things by hand:
my free BIG scallop template is a PDF on SplitCoastStampers here
&
heart template Google image search here

If you rather cut things by hand:
my free BIG scallop template is a PDF on SplitCoastStampers here
&
heart template Google image search here
Thanks so much for popping by!

P.S. I'm not affiliated with Eat Cake Graphics. I bought these wee stamps 4 years ago & just had to use 'em on Valentines this year. :o)
P.P.S. Thinking of buying a Cricut? Before you do, might I play devil's advocate and suggest reading this article? I've never used a Silhouette, but long-time meticulous crafter Kristina Werner has me wishing I'd tried one out! (I have no affiliation with Silhouette at all, sadly LOL) ;O)
P.P.P.S. If you wanted, you could use the hearts to make this...

...gorgeous 3D heart banner
Photo & tutorial from How about Orange
(You could use either machine-cut hearts or hand-cut ones, of course)
P.P.P.P.S. Oops, I think I have the chatties, sorry!
P.P.P.S. If you wanted, you could use the hearts to make this...
...gorgeous 3D heart banner
Photo & tutorial from How about Orange
(You could use either machine-cut hearts or hand-cut ones, of course)
P.P.P.P.S. Oops, I think I have the chatties, sorry!


+Mouse+can+often+be+found+with+her+nose+in+a+book.JPG)
+Mouse%27s+favourite+author+is+Haruki+Murakami.JPG)
+She+is+often+amazed+and+inthralled+by+Murakami%27s+use+of+magical+realism.JPG)
+Mouse+gets+very+angry+if+you+disrupt+her+reading+--+especially+the+last+pages+of+a+chapter+or+the+end+of+the+novel.JPG)
+She+does+not+enjoy+it+when+you+ask+her+stupid+questions+about+the+narrative.JPG)
+She+will+read+until+she+is+so+sleepy+tha+she+can%27t+keep+her+eyes+open+a+second+longer.JPG)