StampznewBright

  • Subscribe to our RSS feed.
  • Twitter
  • StumbleUpon
  • Reddit
  • Facebook
  • Digg

Wednesday, 12 May 2010

caardvarks Challenge cards (& some etsy digi shoppin')

Posted on 13:30 by Unknown
A quick post, sorry. Charles & I have big bad colds.
"UGH" about sums it up. LOL ;o)

Today, a couple of colourful Caardvarks Core-dinations cards with
cute characters & SRM sentiment stickers.

(Say that five times fast.) hehehe

Caardvarks Core-dinations SRM stickers kimprints tada paper kitty thank you card

These critter kids are digital images that I purchased from
two different artists on etsy...

The Kitty Cats Digital image above is by Kimprints (her store is here on etsy)
I embossed her on white cardstock painted with Matte Medium.
The kitty was coloured to match Mouse:


(She's getting so big! Must be the super kitty vitamins we gave her to
try & counteract any deficiency from the worms...) :-)


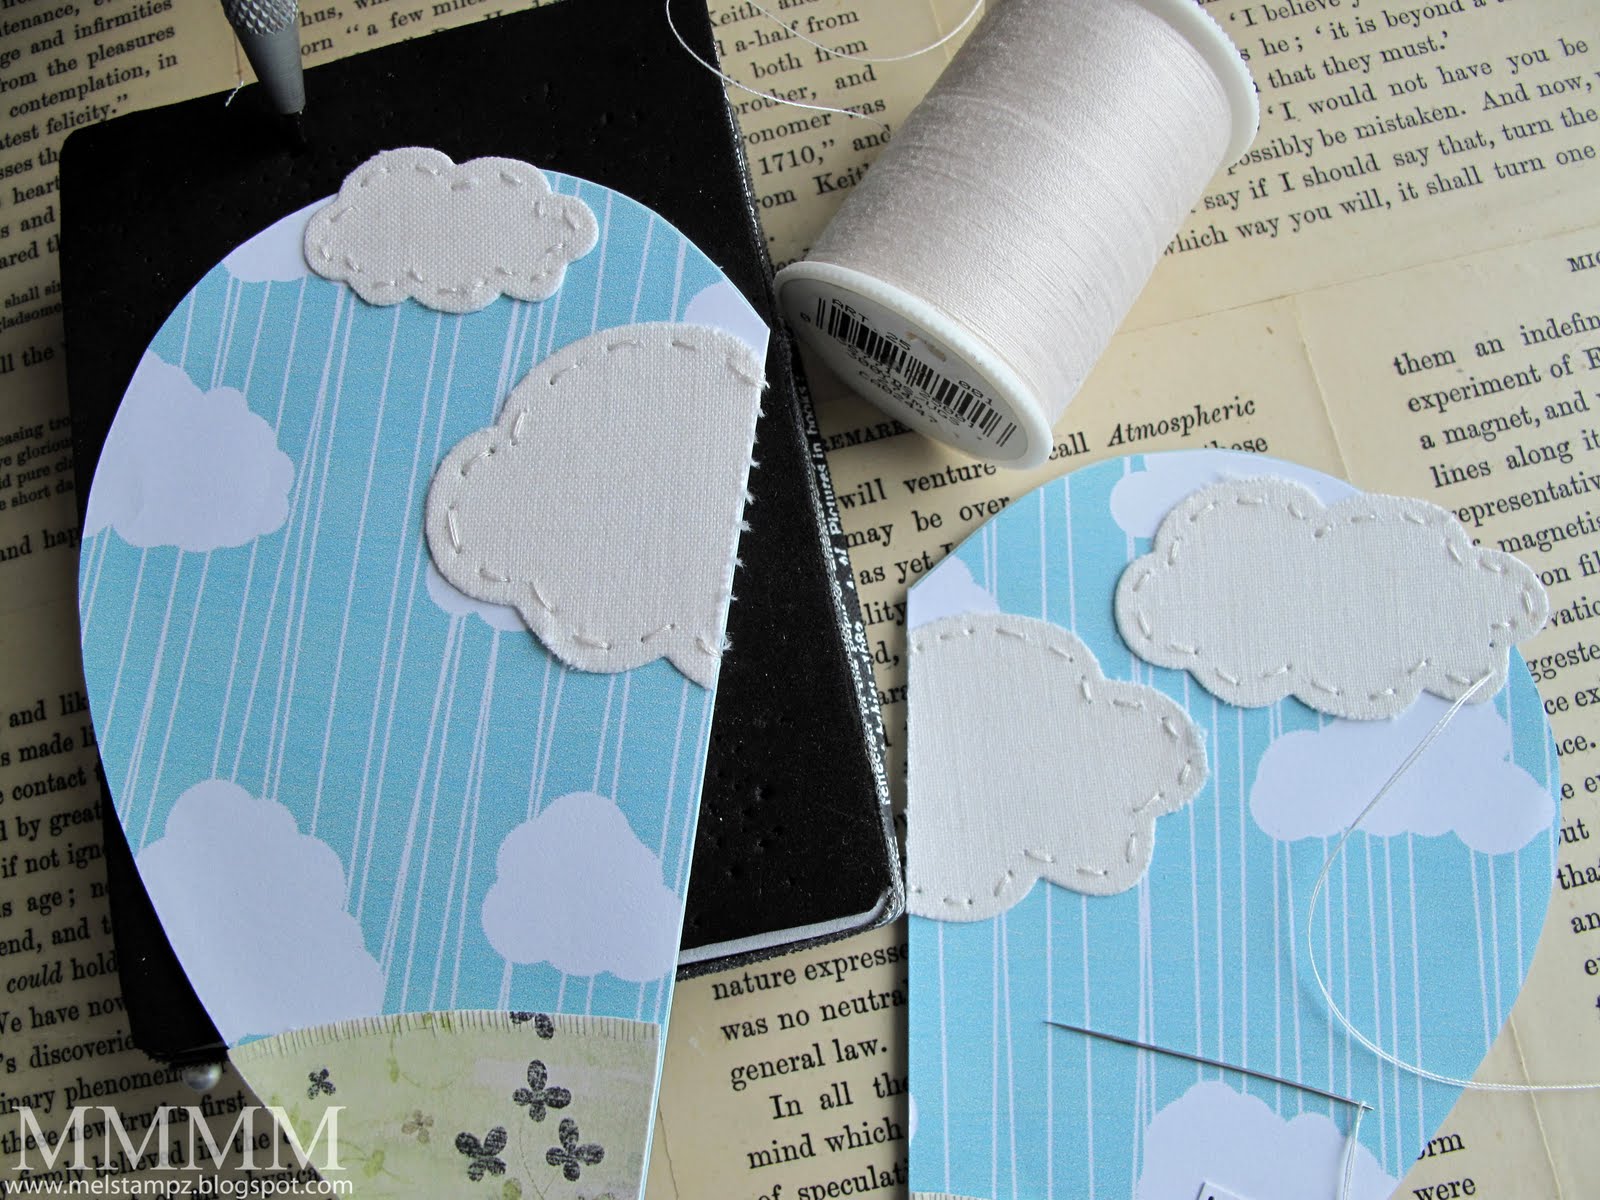
Fur texture on the cartoon "Mouse" cat
was made by scratching the paper with a paper piercing tool.

To jazz up her kitty costume, I doodled on flowers & coloured her in Copic markers...
pierced holes around the face & hem & stitched it with gray embroidery thread.


The patterned paper is digital as well, from TADA (on etsy here.)

For textured-distressed digital paper,

I covered the printed paper in Mod Podge tissue paper:
  1. Print the digital paper pattern & Heat set with a heat gun
  2. Brayer the Mod Podge on (to minimize colour bleed.)
  3. Then add white tissue paper over the wet Mod Podge.
(I also cut one of the flowers & some leaves out of the digital paper.)

Caardvarks Core-dinations SRM stickers HYCJ tada paper Monkey Kid   bday card mel stampz

Monkey Kid is drawn by HYCJ on etsy (the store is here.)

& this is more patterned digital paper from TADA (TracyAnnDigitalArt)

The card bases are made with Core-dinations cardstock
from their Ebony & Ivory collection pack.


The SRM sticker sentiments can be found here.


Hope your day is a colourful one!

Read More
Posted in | No comments

Saturday, 8 May 2010

Our Mothers ROCK! Happy Mother's Day Orchid Card

Posted on 15:07 by Unknown
Happy Mother's Day! :-)


An Orchid digital image is something I've wanted ever since I first knew what digis were. This one by Ruth is perfection. Just like the two outrageously amazing Moms that Charles & I are blessed to have in our life! (I'm not telling which one this card is for though! Nanananabooboo, Moms! We love Youse, madly!) :oP

Mother's Day Orchid Digi from A Passion for Stamps & Vinnie  Pearce Paper

This has all kinds of odds 'n' ends: layers & stitching & lacy bits & even rocks....

CROP Mother's Day Orchid Digi from A Passion for Stamps &  Vinnie Pearce Paper

...but layout-wise, I tried to keep it simple for the SplitCoastStampers'
CAS65 Clean And Simple Mother's Day/May Flowers Challenge here.
(I find simplicity so difficult!)

Here's the inside of the 5 and 1/2 inch card...


1... New & Nifty: Orchid digi image by Ruth
2... how to make this card
-1-


This Orchid used to be a sold-out clear stamp & is now a digi!
It's available here on Ruth's blog A Passion For Stamps in this post

Info on where to email her with any orders is here:

& you can see all of her blog entries & images as well.

-2-

...make this Orchid card


  • Orchid digital image from A Passion for Stamps
  • Illuminate text stamp from Above the Mark in Antique Linen Distress Ink
  • Copic markers
  • Vinnie Pearce Old Things Papers Paper #10 (digital from Two Peas)
  • Little pierces of rock & Beacon's 3 in 1 Advanced Craft Glue
  • Paper piercer, needle, embroidery floss & ivory thread
  • SRM Sticker sentiment from the Love sheet # 51004 here
  • French-English dictionary pages
  • "Generations adhesive vellum" made by Cardinal Brands
Some chit chat about Blogger Viewing options:

All the photos below can be enlarged by clicking on them (to view in Blogger)
In Mozilla Firefox you can right click & choose open link in a new tab (to save your place in the tutorial) or click the back button in your browser toolbar...

...and You can hold the Control button while scrolling the wheel on your mouse forward or backward to enlarge or decrease the photo size... :o)


Step 1) Print the Orchid image & pieces to layer:
  • Stamp the Illuminate text stamp in Antique Linen Distress ink.
  • Heat set the ink to dry well before printing.
  • Run it through the printer to print the Orchid, an extra flower, extra leaves, & a second pot--for layering.


Step 2) Colour it, adhere the layers, & add embellishments

This is coloured with there Copic markers: Flower & stem: B00 Frost Blue; BG10 Cool Shadow; YG91 Putty, E44 Clay. Leaves: YG23 New Leaf; YG67 Moss; G85 Verdigris; Pot: Photoshop brush text "Mother" brush (in beige) shaded with YG91 Putty, E44 Clay.

I glued on some bits of rock at the top of the pot, giggle giggle:


(and some distressed hand sewing around the edge of the image)


Step 3) Decorate the bottom of the image. This has dictionary text, paper ruffles, & crochet trim (Using: a French-English dictionary; adhered to 3 layers of cardstock cut in free hand wavy lines & distressed; & a crochet edge cut from a stained doily.)


Step 4) Make a curved mat & stitch it. This mat was made by:
  • Printing the Vinnie Pearce Old Things paper (digital from Two Peas)
  • Cutting it to measure 4.5" wide by 5.25" high
  • Tracing a plastic lid to get a curve at the bottom & cutting it out
  • Trimming off the bottom of the curve to make it flat
  • Piercing holes around the edge & stitching with embroidery thread
  • Adhering it to a piece of white cardstock, trimming around, & distressing


(Sometimes I trace any old round things at hand, because it's faster than getting out the circle cutter. LOL)


Step 5) Add a sentiment. (I'm so excited that there's another reason to obsess over SRM stickers: you can use them to do tape transfer sentiments!

Here's how this "[lots of love]" SRM sticker got its makeover (a collage layer under it & a softer look):
  • Cut the sentiment sticker to the size I wanted & peeled it off the backing
  • Adhered it over a page out of the French-English dictionary (cheap paper works wonders for this)
  • Rubbed to stick it well int he areas where I wanted words & paper to stick
  • Peeled it off of the book page
  • Adhered it to a piece of white cardstock & trimmed it
  • ....and to soften the contrast so that the image would remain the focal point (and to add a little texture) I stuck some self-adhesive vellum over the SRM sticker:


This sticky-backed vellum is called "Generations adhesive vellum" made by Cardinal Brands (I got it at staples office supply a couple of years ago.) If you like this look, but don't have any adhesive vellum, you could adhere any vellum, onion skin paper, tracing, or tissue paper...

Put it all together...

...and you have a card for Mom:


Thank You for visiting & may your Mother's Day be ultra lovely,
whether you are a Mom or were just made by one!
ynuk ynuk


P.S. Oops! Sorry for the weird post that went out to Feedburner subscribers that said "Happy Mother" I started typing this & hit some wonky button & you get the posts the second they go live, so there's no 'undo-the-OOPs' button! ;o) LOL


(Please click if you'd like to visit the blog
from an email or reader)
Read More
Posted in Digital-Images, Faves, Tutorials | No comments

Wednesday, 5 May 2010

Rinse Lather & Repeat-MFT Hop & Shop!

Posted on 19:00 by Unknown


Welcome to the MFT Hop & Shop!
:-)

Today, a speedy project for a change. I had a blast with the new Pure Innocence image ($9) and I tried to make this a quick project tutorial for those who have less time on their hands. :O)

Rinse Lather Repeat...


MFT Rinse Lather Repeat bead bubbles 4.5 inch box

(Inside the box it says "Baby Yourself" heehee)

The bead bubbles are so fast, but they look real enough to give ya the giggles:

MFT Rinse Lather Repeat bead bubbles DETAIL

(They seem to look more bubbly in real life) :o)


1...Hop & Shop (My Favorite Things new releases)
2...How to make this QUICK Pure Innocence 4.5" box

-1-


If you haven't started yet & would like to hop
The hopping starts here on Kim's blog!

Next up is marvelous Megan!

-2-

make this 4.5" box


  • 4.5" square box template
  • New MFT clear stamp set: Rinse, Lather, Repeat (available here tonight)
  • ...stamped on Perfect paper panels
  • ...with Black Brilliance ink, clear embossing powder & a heat gun
  • Copic markers
  • Sweet tooth heavy weight cardstock
  • TADA digital paper (flowers) from etsy & scrap of BasicGrey Origins
  • Green & light turquoise cardstock
  • Paper piercing tool, needle & thread,
  • Beacon's 3 in 1 advanced craft glue & lots of clear seed beads
  • Black Multiliner/permanent marker
  • White cotton ribbon (from DressSew in Vancouver)


Step 1)
Print the 4.5 inch square box bottom:

Print the MFT template for the 4.5 inch box bottom on green cardstock
Score it (where the tick marks show), cut it, & crease the folds.

(I used the version of the template that has no score lines on it, so it would be tidy inside.)


Step 2)
Print & embellish the box lid:
  • Print the template for the lid (this is printed on digital patterned paper)
  • Score it, cut it, & crease the folds.
  • Scallop the edges & trim the 4 flaps to fit behind the scallops.


Step 3)
Add faux stitches with a black marker (speedy for a change!) ;O)


Step 4) Assemble the lid...


(tabs on the inside)


Step 5) Assemble the box bottom (tabs on the inside again) :o)


Step 6) Cut patterned paper to decorate the inside of the box bottom--4 1-4 inches square.


Step 7) Stamp & colour top of the tub with the Pure Innocence gal (from the Rinse Lather Repeat set.)


Step 8) Stamp & cut just the bottom for the tub (to layer under it) Colour the bathtub feet with metallic pen.


Step 9) Cheap trick: Stamp extra images to use a paper spacers (cut roughly.) Lately, I find this not only more affordable, but also more tidy than foam tape. (I guess I'm a bit cheap & a touch neurotic.) ynuk ynuk.


Step 10) Bubble the bath up with seed beads:
  • Add clear glue to the bubble bath part of the image.
  • Sprinkle lots of little clear seed beads on the wet glue.
  • Add a second layer of glue & beads if you want it really bubbly.
  • Fill in with single beads in spots that got missed.
(I used Beacon's 3 in 1 because it holds so well & dries SO quickly. It has a little give so it doesn' seem to crack when dry. I did the gluing outside, for lots of ventilation & used a plastic lid to catch extra beads.)


Neat thingy: Clear beads will pick up whatever colour you made the bubble bath on the image underneath. :o) I wanna do a rainbow coloured bath next time... and inchies with that ducky. (He is off the hook cute at about a half an inch square.)

and that's it....


Next on the hop
is Megan!

Thanks for visiting & hope you have a great Hop!


P.S. For anyone who can't wait a moment longer,
You can find all the Brand Spankin New set here.


(please click if you'd like to visit the blog
from an email or reader)
Read More
Posted in 3D-projects, Faves, My-Favorite-Things, Tutorials | No comments

Tuesday, 4 May 2010

"Hi Sweet Cheeks!" (Meet Emma & Wyatt)

Posted on 01:04 by Unknown
MFT Meet Emma & Wyatt gatefold mel stampz

Ahhhh, don't you just love LOVE?
This pair of smitten sweeties gives me the giggles.

They're two of MFT's newest characters Emma & Wyatt

...and another giggle-worthy thing:
my Die-namics arrived! Yeaaaah for Happy Mail!

MFT die-namics clouds

Cloud dies! If I could have invented a die of my dreams,
these would be it. Fo' sho'!
(Brilliant idea, Jody!)

...and please don't pass out on me, but I did the inside of the card...

MFT Meet Emma & Wyatt gatefold INSIDE mel stampz

(kind of had to, since it's a gatefold.) ;o)


1... New & Nifty: Meet Emma & Wyatt (and Die-Namics!?!)
2... How to make this gatefold card

-1-

New Characters...

Okay, I think I might owe your wallet an apology...
this month's sets are too cute. Sorry!
heehee

Here are today's new My Favorite Things sets:
  • Meet Emma & Wyatt (used here)
  • Jolinne--Heart on a string
  • Clearly sentimental about Fathers
You'll find all of today's projects linked up here on Kim's Blog
--at 11:00 AM E.S.T. today.

The sets will all be available here on May 5th.


CloudsSMALL


Die-namics Clouds $14.95

Small – 1.25” wide and .70” tall
Medium – 1.89” wide and 1.06” tall
Large – 2.51” wide and 1.41” tall


(You guys know how I loves me some clouds!) :O)

-2-

...make this gatefold card:


  • New MFT clear stamp set: Meet Emma & Wyatt
  • ...stamped on Perfect paper panels
  • ...with Black Brilliance ink, clear embossing powder & a heat gun
  • Copic markers
  • Sno Cone heavy weight 100lb cardstock
  • MFT digital cloud paper--Sheltering Tree collection.
  • Scrap of fabric (I used an old pillowcase that had torn); Mod Podge
  • Cuttlebug machine; Die-namics Clouds
  • Vinnie Pearce Old Things Papers (two peas)
  • Paper piercing tool, needle & thread, seed beads
  • Paint brush; black Multiliner/permanent marker


Step 1) Stamp, Colour, & cut out Emma & Wyatt (They're embossed, as usual: heat embossed in black brilliance ink on Perfect Paper panels, with clear embossing powder and a heat gun.) ;O)

Step 2) Paper piece Emma's dress & Wyatt's shirt (Vinnie Pearce digital paper shaded with Copic marker Champagne E71 & a colourless blender)

I added an embroidery thread knot to make the center of the flower in Emma's hair:


heeheehee Love that little expression!


Step 3) Make a plain 5 and 1/2 inch square gatefold card:
  • Cut a standard piece of Sno Cone cardstock to measure 11 x 5 and 1/2 inches
  • Score it at 2 and 3/4 inches
  • Rotate the cardstock & Score at 2 and 3/4 inches on the other side


Step 4) Add some patterned paper Cut 2 rectangles to measure 2 and 5/8" x 5 and 3/8" Adhere them to the square gatefold card. (I used Vinnie Pearce digi paper)


Step 5) Make a heart to go on the gatefold card.

5A) Print & Trace a heart template onto MFT digital cloud paper
, from the Sheltering Tree collection. I used this heart template from Kiddyhouse.com. Printing it at 115% & cutting the large heart out to get one that's 5.5" wide.

5B) Make & add a hill:
  • Trace the heart again (the bottom) to make a hill (more Vinnie Pearce paper)
  • Distress the hill (I used a wet paint brush to smudge the inkjet printer ink
  • Adhere it to the heart sky
5C) Cut the heart in half


Step 6) Make some Die-namics clouds:


Do It Yourself Mod Podge fabric/canvas (on cardstock)
(It's surprisingly quick to make, easy to use, and superbly cheap) ;o)

6A) Tear or cut a piece of fabric. (This is a piece from an old pillowcase)
6B) Pour some Mod Podge onto heavy weight cardstock
6C) Spread the wet Mod Podge evenly (I use a scrap piece of cardstock)
6D) Put the fabric on the wet Mod Podge, rub it gently & Let dry


6E)Cut the fabric cardstock in your pressure machine...
this is the Cuttlebug sandwich (or stack) for Die-namics:

Machine: Cuttlebug
Material: Fabric Fabric glued to heavy weight 100lb card stock

Stack (from top to bottom)

C plate ("Thin die adapter")
Die-namics Clouds Die (face down)
Fabric glued to heavy weight 100lb card stock
B plate ("Cutting pad")
A plate ("Spacer")


Step 7) Adhere the clouds to the 2 heart halves (cutting the big cloud in half)

Step 8) Adhere the sentiment from Emma & Wyatt "Hi" and add black elispses "..." with a black Multiliner (or other permanent marker)


Step 9) Pierce & stitch the clouds Punch holes with a paper piercing tool, & stitch with ivory thread.

Step 10) Finish it up:

10A) Stitch the heart (I pierced holes around the edge & stitched in black thread) and...

10B)...add some button closures:


They're sewn on & then wrapped with embroidery thread (to keep the gatefold closed so the cuties hold hands.) :-D


10C) Add some butterflies; these are cut from the Vinnie Pearce digi paper. They're doodled on with silver pen (for their bodies) & pencil (for their antennae.)


10D) Cut panels for the inside [These panels are made with the same digi paper--lightened by increasing the lightness in the saturation setting in Photoshop. The middle section is cut to measure 5 3/8", the two side panels are 2 and 5/8 x 5 and 3/8") I pierced & added faux stitches inside with a Multiliner (black fine marker.)]

10E) Cut one of the small heart templates for the inside, trace it on the MFT cloud digi paper, pierce, stitch it with black thread, and add the rest of the sentiment: ...Sweet Cheeks.

And that's it!


Thanks for bein' You!


P.S. For those of you who are wonderful enough to wonder/worry about my madness my schedule... ;o) I'm just going a little overboard right now since it's teaser time for MFT, and I don't wanna miss the excitement of it all. I promise to chill out soon (mostly). heehee. oxo


(Please click if you'd like to visit the blog
from an email or reader)
Read More
Posted in cheap-tricks, Faves, My-Favorite-Things, templates, Tutorials | No comments
Newer Posts Older Posts Home
Subscribe to: Posts (Atom)

Popular Posts

  • free Butterfly Silhouette .studio cut files (in 3 styles)
    Hi, All! Here are those butterfly Silhouette .studio cut files. They are for only for the Silhouette machine... But I do hope to share other...
  • Graphics Fairy Inspiration (+vintage printables)
    Thank You all so much for your wonderful comments about the papers I've been obsessed with. Your kind words make me grin so big that I g...
  • New Popcorn Box template set (pretty stamp room storage) :o)
    Are you in the mood for a template or two? I was going to wait until I had really good photos and a full pictorial, but then I would take fo...
  • "Honey, I shrunk the stationery!" (Hero Arts typewriter notebook)
    Still trying to make more of my cards into little gifts. This Hero Arts typewriter card is another take on the card turned refillable notebo...
  • Everything I've Ever Made (at a glance)
    This post is a visual overview of my blog history-- with thumbnails that are linked to tutorials & templates for pretty much everything ...
  • Making Your Own Colour Shimmer Sprays--Links & Info
    Info & Links Links for how to Mak e yo ur o w n Sh im mery s prays: (These are for you sweet Beth! oxo) ( more info on these colours in...
  • Felt-based cards (Rock-a-Bye Baby tutorial)
    New idea, Old projects.... I've been debating whether or not to post some older projects/tutorials since the big bad insecurity beast...
  • Circle Overlays (to revamp your papers!)
    Can you ever have too many ways to use your stash? No card today, just popping in with a cheap trick for revamping your "old" pat...
  • over 100 free pattern overlays ... at a glance
    Would you believe that the free overlay total is at 139 overlays and counting? (I might have a wee little addiction) ;-) Since overlays can ...
  • new technique? Silver Leaf & Sticky Back Canvas (step by step)
    Today's post is all about texture & a little sparkle: texture from canvas and sparkle from silver leaf. It's a LONG one! I got ...

Categories

  • 'Mouse'-the-cat (10)
  • *TEMPLATEs (98)
  • 3D-projects (144)
  • A-Day-For-Daisies (7)
  • Amber Ink (9)
  • Angel's-Landing (2)
  • BASICS (47)
  • Blogging-tips (7)
  • Caardvarks (48)
  • Cat's-Pajamas (2)
  • cheap-tricks (224)
  • Christmas (33)
  • Claire-Keay (2)
  • Cricut (3)
  • cut-file (2)
  • Cuttlebug (45)
  • decor (6)
  • Digital-Images (131)
  • Distress-Inks-etc (14)
  • DIYstamps (1)
  • Eat-Cake-Graphics (11)
  • Faves (207)
  • Fred-She-Said (5)
  • Freebies (77)
  • GESSO (9)
  • Halloween (10)
  • Heather Ellis (3)
  • Hero-Arts (14)
  • ISC (7)
  • Jessica-Sprague (2)
  • Just-Rite (2)
  • LPS (63)
  • Mo's-Digital-Pencil (16)
  • My-Favorite-Things (33)
  • organizing (7)
  • Other-People's-Tutorials (36)
  • Paper-Garden-Projects (54)
  • Paper-Temptress (39)
  • Punches (21)
  • Purple-Onion-Designs (23)
  • S.U. (1)
  • SCOR-PAL (4)
  • silhouette (4)
  • Skipping-Stones-Design (7)
  • Squigglefly (6)
  • SRM-Stickers (8)
  • techniques (191)
  • templates (26)
  • Tiffany-Doodles (4)
  • Tutorials (252)

Blog Archive

  • ►  2013 (16)
    • ►  July (4)
    • ►  June (4)
    • ►  May (3)
    • ►  April (1)
    • ►  March (1)
    • ►  February (3)
  • ►  2012 (53)
    • ►  December (2)
    • ►  November (2)
    • ►  October (1)
    • ►  August (3)
    • ►  July (2)
    • ►  June (5)
    • ►  May (7)
    • ►  April (8)
    • ►  March (9)
    • ►  February (13)
    • ►  January (1)
  • ►  2011 (74)
    • ►  December (1)
    • ►  November (5)
    • ►  October (10)
    • ►  September (9)
    • ►  August (12)
    • ►  July (5)
    • ►  June (9)
    • ►  May (2)
    • ►  April (6)
    • ►  March (7)
    • ►  February (4)
    • ►  January (4)
  • ▼  2010 (84)
    • ►  December (7)
    • ►  October (1)
    • ►  September (6)
    • ►  August (1)
    • ►  June (1)
    • ▼  May (7)
      • caardvarks Challenge cards (& some etsy digi shopp...
      • Our Mothers ROCK! Happy Mother's Day Orchid Card
      • Rinse Lather & Repeat-MFT Hop & Shop!
      • "Hi Sweet Cheeks!" (Meet Emma & Wyatt)
      • Pure Innocence 'Beach Bum' Towel Topper
      • From bad to WORSE: LONG Loveosaurus diorama tutori...
      • Meet the Loveosaurus (diorama & MFTeasers!)
    • ►  April (21)
    • ►  March (3)
    • ►  February (17)
    • ►  January (20)
  • ►  2009 (234)
    • ►  December (16)
    • ►  November (21)
    • ►  October (11)
    • ►  September (23)
    • ►  August (29)
    • ►  July (26)
    • ►  June (10)
    • ►  May (16)
    • ►  April (26)
    • ►  March (22)
    • ►  February (27)
    • ►  January (7)
  • ►  2008 (39)
    • ►  December (14)
    • ►  November (25)
Powered by Blogger.

About Me

Unknown
View my complete profile