StampznewBright

  • Subscribe to our RSS feed.
  • Twitter
  • StumbleUpon
  • Reddit
  • Facebook
  • Digg

Sunday, 7 December 2008

Note Top Purse Templates

Posted on 13:03 by Unknown
Okay, my posts have been kind of sucky lately & I am sadly MIA in blogland. Sorry, it breaks my heart, but I've been so awfully burnt out. Hopefully this big fat purse tutorial & template will make up for it a little. :O)


This is a flat topped version of this ol' purse template. I tried to improve on the old one, so that it prints better & is easier to score (and hopefully this Tut. will make it easier for anyone who wanted to try it but wasn't sure how it went together.

There are two sizes (Medium & Small), so that the label templates (square & rectangle) can be used as purse flaps. The fun part about the flap is that it lets you dress it up a little more. These ones are embossed and stitched and lined and stuff...


I love the funkiness of the Basic Grey Urban Prairie against white.


See that stripey texture? Well, I'm bursting with excitement about that amazing paper company--aptly named Paper Temptress. The paper I used for this project is called Classic Columns. It's got the texture of fancy smooth watercolour paper but with these columns of stripes. The weight of it made it the nicest paper I've ever built a box with, sighhhh.

Templates are all linked here:

Small purse & stuff
Medium purse, Score Guide & stuff


The Small Purse Templates


The Medium Purse Templates


Supplies:

Cardstock: White Classic Columns cardstock
Patterned Paper: Basic Grey Urban Prairie
Cuttlebug Folders:
Swiss Dots, Floral Fantasy, Textile
Miscellaneous:
Embroidery thread (turquoise, Hot Pink, Apple Green); Basic Grey Urban Prairie Brads, Filigree embellishments from SU
Tools/Basics:
Scor-Pal, Paper piercer, Needle & thread, Oh So Sticky tape

Puttin' it together:
  • Building the Box


Step 1) Print template directly onto the column cardstock (speeeedy Baby!)


Step 2) One way to make scoring this really easy is to cut strategically:
A) cut roughly (leaving the score marks at the top of the purse (marked in blue below)
B) Then cut right to the template line in the Vs of the purse marked in red bellow


Step 3) After cutting strategically, you can line up the top line & the V on your Scor-Pal, or use whatever scoring method you like.


Step 4) Score the box where the dotted lines on the Score Guide indicate & crease the folds.


Step 5) Assemble the box. Line up the top of the flaps for tidiness.

Here's where I like to put the adhesive:


...looks a lot like a diaper, heehee. But it is a purse. :O) Having the two side flaps on the outside make a nice triangle. Alternatively, you could have the rounded flap (small middle one) on the outside. [For an example of the flap on the outside, please see this post.]


  • Makin' a Lined, Embossed & Stitched Purse Flap:


Step 1 ) Trace the label template onto the back of patterned paper


Step 2) Stick the patterned paper down to the white column cardstock


Step 3) Use the patterned paper as a guide to cut the white cardstock away


Step 4) Pierce around the edges of the label shape

Step 5 ) Cuttlebug both the layers


Step 6) Adhere the thread end where it'll be hidden (on the patterned side at one of the pointier points) :O) The Cuttlebug embossing hides the stitches a little which gives a nice look, but you can still sew 'em.


Step 7) Stitch around the label shape

  • Adding the Purse Flap:


Step 1) Score from point to point (the smaller points) and fold it
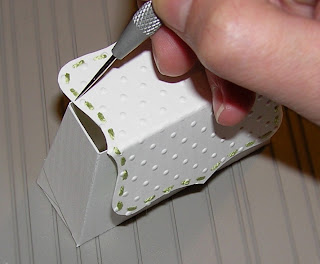


Step 2) Place the flap onto the box & mark where the back is (being sure to leave enough room for the middle section will make the fit nice) :O)


Step 3) Use those markings to score the second line (blue dotted line markings above) and fold it


Step 4) Pierce three holes in the back small section for brads
(makes it much stronger)


Step 5) Mark the holes onto the box with a pencil


Step 6) Pierce three holes. [Depending on your comfort level with piercing you may wanna do this with a hole punch, or you can use a needle to create a pilot hole for piercing (less chance of buckling)]


Step 7) Add brads


To make the lined handle, I did this schtuff...
  1. Cut a piece of Classic Columns cardstock (1 inch by 8 inches)
  2. Cut a piece of Urban Prairie paper (also 1 inch by 8 inches)
  3. Pierce holes along both sides of the handle.
  4. To get tidy stitching on both sides of the handle, thread a needle & put it through the handle piercing so that the thread end is adhered where it will be hidden when you attach the handle to the purse.
  5. Stitch it up with thread
  6. Use Oh So Sticky tape to stick the handle on.
And that's it..


Happy Craftin' You Crafty Peoples You!


P.S. If you have loved ones on your list who'd like purse boxes, but you wanna switch it up a little & make a variety, there are 151 purses templates & tuts here.
Email ThisBlogThis!Share to XShare to FacebookShare to Pinterest
Posted in *TEMPLATEs, 3D-projects, Paper-Temptress, techniques, Tutorials | No comments
Newer Post Older Post Home

0 comments:

Post a Comment

Subscribe to: Post Comments (Atom)

Popular Posts

  • free Butterfly Silhouette .studio cut files (in 3 styles)
    Hi, All! Here are those butterfly Silhouette .studio cut files. They are for only for the Silhouette machine... But I do hope to share other...
  • DIY digital paper (some freebies)
    The lull in posts (over the last couple of days) was for me to finish up this looooong post I've been wanting to share with you for eons...
  • New Popcorn Box template set (pretty stamp room storage) :o)
    Are you in the mood for a template or two? I was going to wait until I had really good photos and a full pictorial, but then I would take fo...
  • Missing with a migraine, Craft room BEFORE pics, & LINKs for Organizing the craft room
    Edited to add: Sorry guys. I feel like I was hit by a truck. Migraine's lasted so long... but I will be back with a post by tomorrow eve...
  • Graphics Fairy Inspiration (+vintage printables)
    Thank You all so much for your wonderful comments about the papers I've been obsessed with. Your kind words make me grin so big that I g...
  • "Honey, I shrunk the stationery!" (Hero Arts typewriter notebook)
    Still trying to make more of my cards into little gifts. This Hero Arts typewriter card is another take on the card turned refillable notebo...
  • 3 Clean And Simple cards (with SRM stickers)
    You guys may know that I was tragically born without the gene that let's you achieve a C lean A nd S imple card. ;-) Not sure why I find...
  • Making Your Own Colour Shimmer Sprays--Links & Info
    Info & Links Links for how to Mak e yo ur o w n Sh im mery s prays: (These are for you sweet Beth! oxo) ( more info on these colours in...
  • over 100 free pattern overlays ... at a glance
    Would you believe that the free overlay total is at 139 overlays and counting? (I might have a wee little addiction) ;-) Since overlays can ...
  • Felt-based cards (Rock-a-Bye Baby tutorial)
    New idea, Old projects.... I've been debating whether or not to post some older projects/tutorials since the big bad insecurity beast...

Categories

  • 'Mouse'-the-cat (10)
  • *TEMPLATEs (98)
  • 3D-projects (144)
  • A-Day-For-Daisies (7)
  • Amber Ink (9)
  • Angel's-Landing (2)
  • BASICS (47)
  • Blogging-tips (7)
  • Caardvarks (48)
  • Cat's-Pajamas (2)
  • cheap-tricks (224)
  • Christmas (33)
  • Claire-Keay (2)
  • Cricut (3)
  • cut-file (2)
  • Cuttlebug (45)
  • decor (6)
  • Digital-Images (131)
  • Distress-Inks-etc (14)
  • DIYstamps (1)
  • Eat-Cake-Graphics (11)
  • Faves (207)
  • Fred-She-Said (5)
  • Freebies (77)
  • GESSO (9)
  • Halloween (10)
  • Heather Ellis (3)
  • Hero-Arts (14)
  • ISC (7)
  • Jessica-Sprague (2)
  • Just-Rite (2)
  • LPS (63)
  • Mo's-Digital-Pencil (16)
  • My-Favorite-Things (33)
  • organizing (7)
  • Other-People's-Tutorials (36)
  • Paper-Garden-Projects (54)
  • Paper-Temptress (39)
  • Punches (21)
  • Purple-Onion-Designs (23)
  • S.U. (1)
  • SCOR-PAL (4)
  • silhouette (4)
  • Skipping-Stones-Design (7)
  • Squigglefly (6)
  • SRM-Stickers (8)
  • techniques (191)
  • templates (26)
  • Tiffany-Doodles (4)
  • Tutorials (252)

Blog Archive

  • ►  2013 (16)
    • ►  July (4)
    • ►  June (4)
    • ►  May (3)
    • ►  April (1)
    • ►  March (1)
    • ►  February (3)
  • ►  2012 (53)
    • ►  December (2)
    • ►  November (2)
    • ►  October (1)
    • ►  August (3)
    • ►  July (2)
    • ►  June (5)
    • ►  May (7)
    • ►  April (8)
    • ►  March (9)
    • ►  February (13)
    • ►  January (1)
  • ►  2011 (74)
    • ►  December (1)
    • ►  November (5)
    • ►  October (10)
    • ►  September (9)
    • ►  August (12)
    • ►  July (5)
    • ►  June (9)
    • ►  May (2)
    • ►  April (6)
    • ►  March (7)
    • ►  February (4)
    • ►  January (4)
  • ►  2010 (84)
    • ►  December (7)
    • ►  October (1)
    • ►  September (6)
    • ►  August (1)
    • ►  June (1)
    • ►  May (7)
    • ►  April (21)
    • ►  March (3)
    • ►  February (17)
    • ►  January (20)
  • ►  2009 (234)
    • ►  December (16)
    • ►  November (21)
    • ►  October (11)
    • ►  September (23)
    • ►  August (29)
    • ►  July (26)
    • ►  June (10)
    • ►  May (16)
    • ►  April (26)
    • ►  March (22)
    • ►  February (27)
    • ►  January (7)
  • ▼  2008 (39)
    • ▼  December (14)
      • Happy New Year! and a project recap :o)
      • Over 50 links for Stitching paper (tutotials & exa...
      • I'm getting a stamp room!!!! (& Over 100 ways to u...
      • Thanks for the Love & no need to worry :O) OXO
      • Sorry no posts for a few days
      • Props to da Pencil & Vellum resist 'A Year of Flow...
      • M is for Monogram Templates & Tuts
      • LPS Penguin Box with stitched acetate (template & ...
      • Cardstock Blog Candy from Paper Temptress!
      • Note Top Purse Templates
      • Sleighful Scene, Dark Rectangular Labels, & Ideas ...
      • Square Label or Note shape Templates (& some cards)
      • "Have a Cookie" Box for Ruzzer (gift idea)
      • Have You been Naughty or Nice? ;O) (& a virtual pe...
    • ►  November (25)
Powered by Blogger.

About Me

Unknown
View my complete profile