StampznewBright

  • Subscribe to our RSS feed.
  • Twitter
  • StumbleUpon
  • Reddit
  • Facebook
  • Digg

Saturday, 20 June 2009

Caarvarks Window Challenge- You're the Top Pops!

Posted on 01:11 by Unknown
POD top hat  faux window melstampz

In honour of my Dad (who loves to dress sharply--a vintage jacket with tails is a fave in his wardrobe)...a little glam for Father's day. With a stitched bow tie & lots of emboss resist & stitching. This is for the newest Caardvarks challenge: Window cards! For some reason I never make windows on my cards (must be sheer laziness?!? hehehe) I love how the Caardvarkians always make me try something different. :O)


1...new Caarvarks challenge (Windows!)
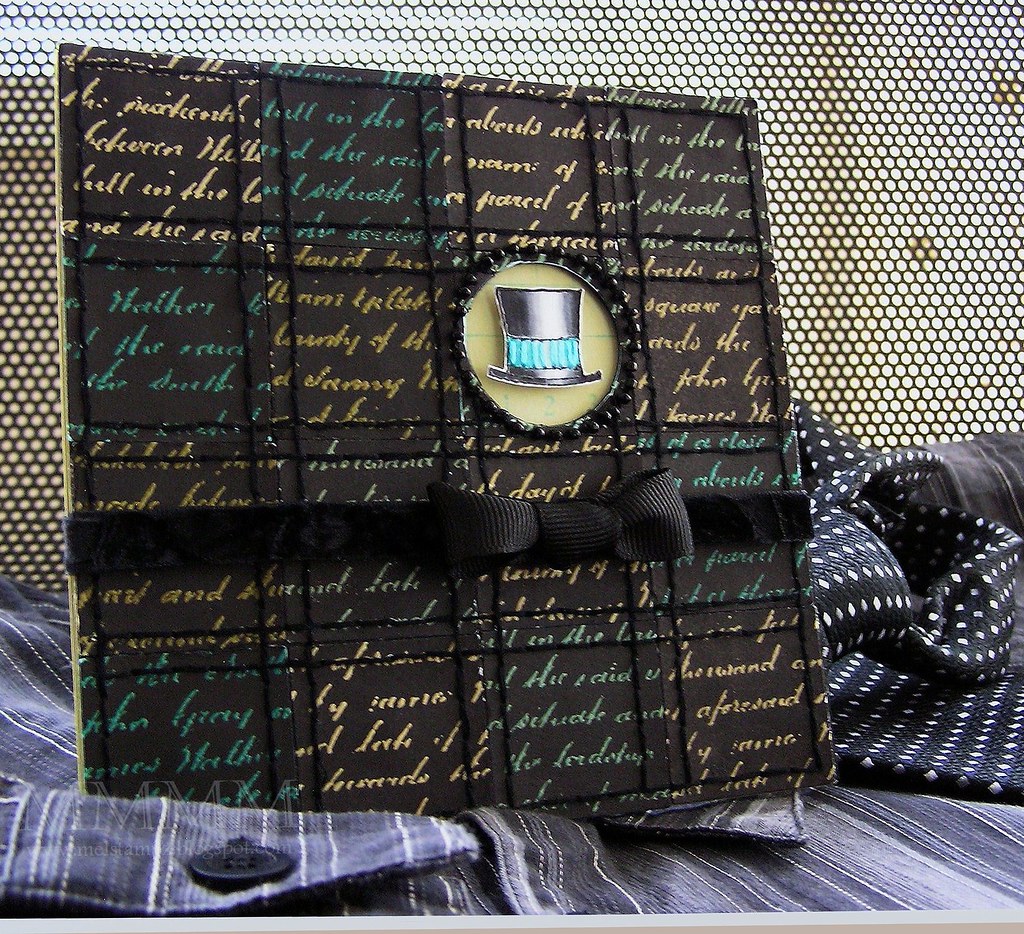
2...create coordinating emboss resist papers & quilt 'em
(plus the window how-to)
3...dress a top hat image & stitch a bow tie
-1-


You can play along with the challenge here:

(or just check out the amazing cards that the wicked 'Varks
crew & the ultra talented POD guests have made. WOWed me!)


The sponsor for this challenge is

(don't tell your 'significant other' that I sent you a-shoppin',
but man oh man are there some sweet stamps there!) ;O)

PRIZE: Prize is a $50 shopping spree at Purple Onion Designs!!!

PROMOTION: POD will also be offering 25% off to Caardvarks' readers for the length of the challenge. Enter code "Caardvarks" at checkout.

DEADLINE: To have a shot at the shopping spree, you'll need to have your entries linked to Caardvarks via Mr. Linky by July 3rd at Midnight, PST.

-2-

...create coordinating emboss resist papers & quilt them


  • Various coloured cardstocks
  • Background Stamp (POD Late 1800's Script)
  • The inside of the card is stamped with Antique Ledger Background
  • Clear embossing powder & heat gun
  • Black ink (test for colour base--some are purpley. I like the brownish ones)
  • Sponge dauber/other ink applicator
  • Paper towel & wax paper (for easy clean up)
  • Double-sided tape
  • Black embroidery thread, paper piercer & needle
  • 1 and 3/8 inch square punch (SU/Paper Shapers)
  • 1 and 1/4 inch circle punch (SU/Paper Shapers)
  • Tim Holtz ruler


Step 1) Punch squares of paper (these are 1 3-8” squares) The paper is emboss resist made by:
  1. Stamping the gorgeous script stamp in Versamark & heat embossing with clear embossing powder {The fun part was using a variety of coloured cardstocks (Cool Caribbean, Soft Sky, River Rock, Tempting Turquoise, Naturals White, Whisper White}
  2. Spreading out wax paper to keep the mess down
  3. Using a sponge dauber and black ink to saturate the stamped cardstocks
  4. Wiping off the excess ink & allowing it to dry before punching squares
  5. Let dry & punch squares. I used a 1 3/8" square punch (SU/Paper Shapers)


Step 2) Adhere squares to the card. On a 5 and 1-2 inch square card 16 fit perfectly. Avoid putting adhesive where you plan to stitch.


Step 3) Pierce along all the edges of the squares. Long lines of stitches make it speedy. I love Tim Holtz ruler with pins stuck in a fun foam mat.


Step 4) make a well-centered window by punching a circle from a scrap of thin paper, then adhering it to one of your squares


Step 5) Use the scrap circle as a guide to punch perfectly in center

That will leave you with a delicate circular frame:


Of course you could use any shape you like (with punch or die cutter)


Step 6) Adhere the circle frame to your card (pierce it too)


Step 7) Use the circle frame as a guide to cut through with an exacto blade.

That will leave you with a shaped window:


Step 8) Then just stitch it up :O)...

-3-


...dress a top hat image
& stitch a slide off bow tie

That cute little top hat is part of Purple Onion Designs set "Celebitties" set. Schtuff I've done with it here:
  • Embossed it (black ink & clear embossing powder)
  • Coloured with Copic markers
  • Covered the turquoise band with Crystal Lacquer (and dried that well)
  • Pierced and stitched the band with embroidery thread for texture
  • Mounted it on the card with foam tape so it stuck up through the window
  • Ribbon (I used black 3/4 inch poly-blend grosgrain)
  • Ribbon (this is 3/8 inch crushed velvet)
  • Tombow monomulti
  • Thread & needle
  • Really sharp scissors


Stitch a Bow Tie:
  • 1) Use ribbon with decent length measurement (to tie & work it)
  • 2) Tie a knot in the middle
  • 3) Choose which side of the knot you like best (front or back)
  • 4) Bring one end to the back to measure & cut
  • 5) Sear end of the ribbon with a lighter (if the ribbon takes that)
  • 6) Stitch it on (checking in between stitching to be sure it’s shaping up how you like)
  • 7) Repeat for the other side
  • 8) Measure some thinner ribbon (to fit snugly around your card but not so that it buckles you card. You want it to slide off.) :O)
  • 9) Stitch the ends of the ribbon to each other to make a round of ribbon
  • 10) Stitch your bow tie on

Thank you so much for hanging in there with my
sporadic posts while I'm ill. You're THE very best!


(today the ol' blog should be called: Puttin' on the Ritz)


P.S. There are a whack of Father's Day links HERE

Email ThisBlogThis!Share to XShare to FacebookShare to Pinterest
Posted in Caardvarks, cheap-tricks, Faves, Punches, Purple-Onion-Designs, Tutorials | No comments
Newer Post Older Post Home

0 comments:

Post a Comment

Subscribe to: Post Comments (Atom)

Popular Posts

  • free Butterfly Silhouette .studio cut files (in 3 styles)
    Hi, All! Here are those butterfly Silhouette .studio cut files. They are for only for the Silhouette machine... But I do hope to share other...
  • DIY digital paper (some freebies)
    The lull in posts (over the last couple of days) was for me to finish up this looooong post I've been wanting to share with you for eons...
  • New Popcorn Box template set (pretty stamp room storage) :o)
    Are you in the mood for a template or two? I was going to wait until I had really good photos and a full pictorial, but then I would take fo...
  • Missing with a migraine, Craft room BEFORE pics, & LINKs for Organizing the craft room
    Edited to add: Sorry guys. I feel like I was hit by a truck. Migraine's lasted so long... but I will be back with a post by tomorrow eve...
  • Graphics Fairy Inspiration (+vintage printables)
    Thank You all so much for your wonderful comments about the papers I've been obsessed with. Your kind words make me grin so big that I g...
  • "Honey, I shrunk the stationery!" (Hero Arts typewriter notebook)
    Still trying to make more of my cards into little gifts. This Hero Arts typewriter card is another take on the card turned refillable notebo...
  • 3 Clean And Simple cards (with SRM stickers)
    You guys may know that I was tragically born without the gene that let's you achieve a C lean A nd S imple card. ;-) Not sure why I find...
  • Making Your Own Colour Shimmer Sprays--Links & Info
    Info & Links Links for how to Mak e yo ur o w n Sh im mery s prays: (These are for you sweet Beth! oxo) ( more info on these colours in...
  • over 100 free pattern overlays ... at a glance
    Would you believe that the free overlay total is at 139 overlays and counting? (I might have a wee little addiction) ;-) Since overlays can ...
  • Felt-based cards (Rock-a-Bye Baby tutorial)
    New idea, Old projects.... I've been debating whether or not to post some older projects/tutorials since the big bad insecurity beast...

Categories

  • 'Mouse'-the-cat (10)
  • *TEMPLATEs (98)
  • 3D-projects (144)
  • A-Day-For-Daisies (7)
  • Amber Ink (9)
  • Angel's-Landing (2)
  • BASICS (47)
  • Blogging-tips (7)
  • Caardvarks (48)
  • Cat's-Pajamas (2)
  • cheap-tricks (224)
  • Christmas (33)
  • Claire-Keay (2)
  • Cricut (3)
  • cut-file (2)
  • Cuttlebug (45)
  • decor (6)
  • Digital-Images (131)
  • Distress-Inks-etc (14)
  • DIYstamps (1)
  • Eat-Cake-Graphics (11)
  • Faves (207)
  • Fred-She-Said (5)
  • Freebies (77)
  • GESSO (9)
  • Halloween (10)
  • Heather Ellis (3)
  • Hero-Arts (14)
  • ISC (7)
  • Jessica-Sprague (2)
  • Just-Rite (2)
  • LPS (63)
  • Mo's-Digital-Pencil (16)
  • My-Favorite-Things (33)
  • organizing (7)
  • Other-People's-Tutorials (36)
  • Paper-Garden-Projects (54)
  • Paper-Temptress (39)
  • Punches (21)
  • Purple-Onion-Designs (23)
  • S.U. (1)
  • SCOR-PAL (4)
  • silhouette (4)
  • Skipping-Stones-Design (7)
  • Squigglefly (6)
  • SRM-Stickers (8)
  • techniques (191)
  • templates (26)
  • Tiffany-Doodles (4)
  • Tutorials (252)

Blog Archive

  • ►  2013 (16)
    • ►  July (4)
    • ►  June (4)
    • ►  May (3)
    • ►  April (1)
    • ►  March (1)
    • ►  February (3)
  • ►  2012 (53)
    • ►  December (2)
    • ►  November (2)
    • ►  October (1)
    • ►  August (3)
    • ►  July (2)
    • ►  June (5)
    • ►  May (7)
    • ►  April (8)
    • ►  March (9)
    • ►  February (13)
    • ►  January (1)
  • ►  2011 (74)
    • ►  December (1)
    • ►  November (5)
    • ►  October (10)
    • ►  September (9)
    • ►  August (12)
    • ►  July (5)
    • ►  June (9)
    • ►  May (2)
    • ►  April (6)
    • ►  March (7)
    • ►  February (4)
    • ►  January (4)
  • ►  2010 (84)
    • ►  December (7)
    • ►  October (1)
    • ►  September (6)
    • ►  August (1)
    • ►  June (1)
    • ►  May (7)
    • ►  April (21)
    • ►  March (3)
    • ►  February (17)
    • ►  January (20)
  • ▼  2009 (234)
    • ►  December (16)
    • ►  November (21)
    • ►  October (11)
    • ►  September (23)
    • ►  August (29)
    • ►  July (26)
    • ▼  June (10)
      • Teapot Box (from a Tiny Take out template)
      • Katie Cupcake Recipe Card (a.k.a. self-standing po...
      • I was kidnapped! (heeheehee)
      • Coffee Tea or Templates? (Over 75) +ideas with Pho...
      • Felt Box with Katie Cupcake
      • Caarvarks Window Challenge- You're the Top Pops!
      • Impressabilities resist card (+pins & buttons)
      • LPS Sneak Peek! {Garden Gate} box (with template)
      • {Katie Cupcake} LPS sneak peek (pocket recipe card)
      • Caardvarks 3D challenge: Club Scrap 5x7 File Box
    • ►  May (16)
    • ►  April (26)
    • ►  March (22)
    • ►  February (27)
    • ►  January (7)
  • ►  2008 (39)
    • ►  December (14)
    • ►  November (25)
Powered by Blogger.

About Me

Unknown
View my complete profile