StampznewBright

  • Subscribe to our RSS feed.
  • Twitter
  • StumbleUpon
  • Reddit
  • Facebook
  • Digg

Saturday, 22 June 2013

a Rainbow Colour-Blocked card - A Day for Daisies magazine article. :)

Posted on 13:30 by Unknown
When the lovely Tammy, of A Day for Daisies fame, asked me to 
make a card that would be included in her feature article for  
Complete Cardmaking Magazine I jumped  for joy! Then I made this...

A Day For Daisies 'i love my two girls' card by mel stampz


Here's a little peek at the article:

Complete Cardmaking magazine article - A Day for Daisies

It was such a thrill to hold a real magazine in my hands, for a change! :)

The cards that the team at A Day for Daisies made for the article are so gorgeous!

-1-


The image is called "I Love my Two Girls"
I printed it at 70% for this card:

A Day For Daisies 'i love my two girls'

This sweet little portrait digi reminded me of my best friend Kim & her twins girls. (They're a bunch of gorgeous, angelic people just like these gals).

The image was heat embossed by printing on Paris Bleedproof paper for Pens (Borden & Riley) and then quickly covering with fine/detail clear embossing powder & melting it with a heat gun. You can read more about heat-embossing digital images, here.

I scratched lines for the hair into the cardstock in with a paper piercer (to add texture).

It's coloured with these copic markers... skin: shaded with E00 Skin white &  C1 cool gray no.1. blush on cheeks: E50 pinkish white hair: W1 Warm Gray No.1; W3 Warm Gray No.3; touches of Y02 Canary Yellow (on a clear blender pen); YG91 Putty; W7 Warm Gray No.7; E44 Clay; E49 Dark Bark; 100 Black background: BG10 Cool Shadow.


-2-


The embossed background was made using white cardstock embossed with Sizzix Tropical Paisley folder that was slathered in Gesso. Here's how:

 apply a little gesso or paint to a piece of card (or an old plastic gift card)

Step 1) Pressure emboss a piece of cardstock in an embossing folder.

Step 2) Apply gesso or paint to an old plastic gift card.

swipe embossed cardstock with gesso or paint

Step 3) Swipe the paint on the cardstock, over the raised areas of the embossing.

use the weight of a die cutting machine to flatten buckled painted paper

Step 4) Allow it to dry to the touch (don't worry about buckling). Tip: You can speed up drying time with a blow dryer (the kind you use for your hair) but heat guns may cause paint to bubble. :-)


Step 5) You can straighten it out easily: Once it's dry to the touch, set your painted embossed piece under something flat & heavy (like a stack of books).

I like to use my embossing machine. With a plate under it. It has just the right weight and is always within reach.

You can also ink your piece & sand it for more texture, if you like:
(Here's a tutorial from a few years ago)

-3-

Here's a close-up photo of the textured paper:

Tiny punched flower paper

 It was made by punching out tiny flowers from Fiskar's 'Scalloped Daisy' 
border punch then  piercing a hole in the middle of each:

 tiny paper orange blossoms made with punch outs from fiskars flower scallop punch

And gluing them on paper...

You could do this with any punched shape, really.  It's a bit time consuming, but it's quite easy and in the end you have something that's a little out of the ordinary. And I'm probably stating the obvious here, but you can save time by only adding flowers to the areas that show on your card.


-4-

You can download all of the rainbow digital elements for this card, here (or individually below)


The 3D flowers were paper pieced by filling with digital paper colours and fussy cutting. The flower stamens were made by stitching on white thread & silver seed beads:

3D flowers & silver beads for stamens

Tammy gave her permission for me to share the rainbow-filled flowers as a free image 
in case anyone would like to do their own paper piecing: 
i love my two girls - a day for daisies - paper piecing flowers
-5-

To make two-layered flowers, you could try this in Photoshop:

1) Open the "I love my two girls" image.
2) Open the rainbow flowers & copy them.
3) Paste the flowers & arrange them over the image.
4) Print the image & an extra set of flowers to layer.

Don't have Photoshop? 

You could simply print & cut them and stick them on the image.

Need a quick card?
You could just lay the rainbow flowers over the image & print
if you need a quick card & don't want to be fussy cutting.


-6-

Here's the rainbow frame, in case you'd like to use it:
RAINBOW - A2 card MAT example
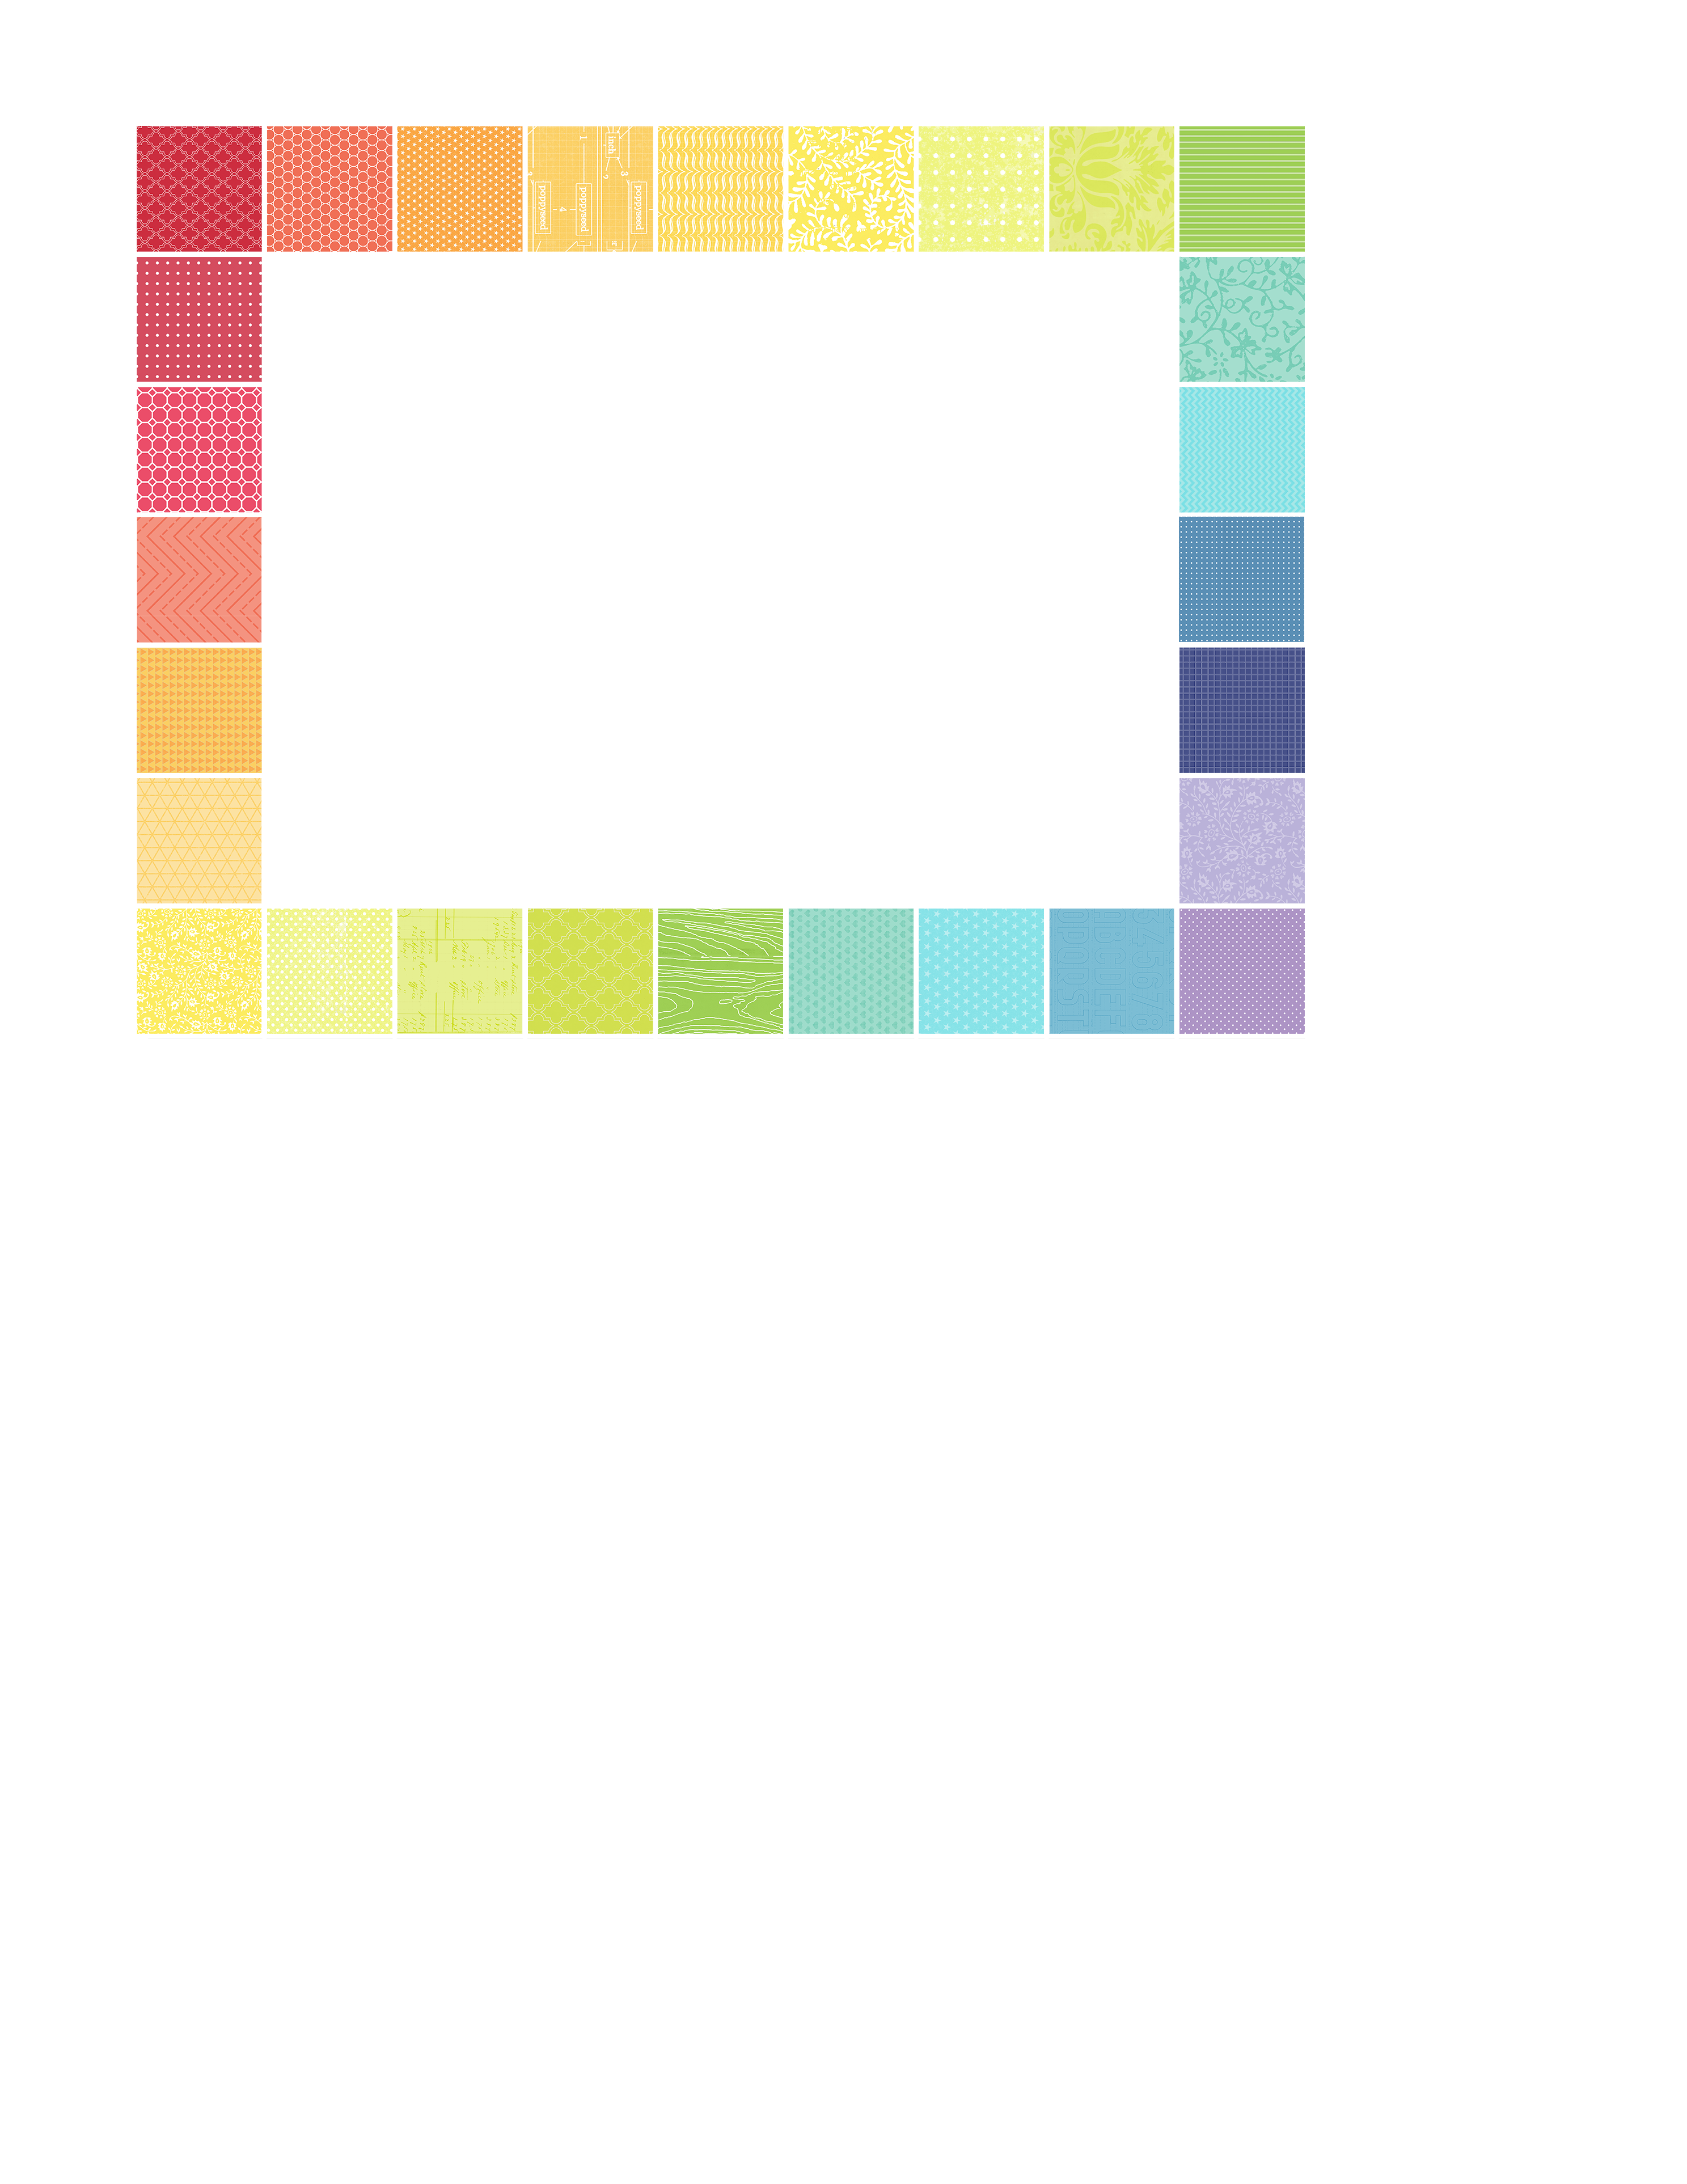
To make the frame, I just made a grid in Photoshop & then filled
 each square with some of my patterned papers (at a really small scale):
rainbow frame PNG in PHOTOSHOP 2
And here is the blank Overlay version, in case you'd like to 
make your own custom frame or square quilt paper:

Overlay - square grid A2 size 5.5 x 4.25 inch - free digital element SAMPLE ONLY

or you can find the blank overlay here on flickr.

New to making papers?

You might want to check out this tutorial for filling with pattern in Photoshop
or this one using Gimp (which is a free program).


And here's the inside of the card:

Inside - A Day For Daisies 'i love my two girls' card by mel stampz

Just some tiny graph paper in light turquoise,
with a simple little strip of rainbow and a row of more punched flowers.

Here's the strip, in case you might like to use it:

inside card rainbow strip

. 

 
How to save these single papers directly from my blog:

PC users in Firefox/Chrome: right click on the image & choose "save link as"
PC users in Explorer: right click on the image & choose "save target as".
Mac users: Visit flickr, here, click on the paper you want, then right click and 
select 'all sizes' & click on "download the original size of this photo" 


If something isn't working for you, or you would
like some tips on printing, please just let me know
  melstampz@gmail.com


-7-
 

The design team at A Day for Daisies share some stunning work on the Blog. 
And they have challenges often - with free images. Here's a look at the latest release:
 It's a set of interactive paper doll images that dance & move!


Hope you're enjoying your day, ox


P.S. You might like to know that all of the images in the 'I Love...' collection come on a free CD with the magazine. It's such a great bargain. (You can also find them individually here and as a collection here.)
Email ThisBlogThis!Share to XShare to FacebookShare to Pinterest
Posted in | No comments
Newer Post Older Post Home

0 comments:

Post a Comment

Subscribe to: Post Comments (Atom)

Popular Posts

  • free Butterfly Silhouette .studio cut files (in 3 styles)
    Hi, All! Here are those butterfly Silhouette .studio cut files. They are for only for the Silhouette machine... But I do hope to share other...
  • DIY digital paper (some freebies)
    The lull in posts (over the last couple of days) was for me to finish up this looooong post I've been wanting to share with you for eons...
  • New Popcorn Box template set (pretty stamp room storage) :o)
    Are you in the mood for a template or two? I was going to wait until I had really good photos and a full pictorial, but then I would take fo...
  • Missing with a migraine, Craft room BEFORE pics, & LINKs for Organizing the craft room
    Edited to add: Sorry guys. I feel like I was hit by a truck. Migraine's lasted so long... but I will be back with a post by tomorrow eve...
  • Graphics Fairy Inspiration (+vintage printables)
    Thank You all so much for your wonderful comments about the papers I've been obsessed with. Your kind words make me grin so big that I g...
  • "Honey, I shrunk the stationery!" (Hero Arts typewriter notebook)
    Still trying to make more of my cards into little gifts. This Hero Arts typewriter card is another take on the card turned refillable notebo...
  • 3 Clean And Simple cards (with SRM stickers)
    You guys may know that I was tragically born without the gene that let's you achieve a C lean A nd S imple card. ;-) Not sure why I find...
  • Making Your Own Colour Shimmer Sprays--Links & Info
    Info & Links Links for how to Mak e yo ur o w n Sh im mery s prays: (These are for you sweet Beth! oxo) ( more info on these colours in...
  • over 100 free pattern overlays ... at a glance
    Would you believe that the free overlay total is at 139 overlays and counting? (I might have a wee little addiction) ;-) Since overlays can ...
  • Felt-based cards (Rock-a-Bye Baby tutorial)
    New idea, Old projects.... I've been debating whether or not to post some older projects/tutorials since the big bad insecurity beast...

Categories

  • 'Mouse'-the-cat (10)
  • *TEMPLATEs (98)
  • 3D-projects (144)
  • A-Day-For-Daisies (7)
  • Amber Ink (9)
  • Angel's-Landing (2)
  • BASICS (47)
  • Blogging-tips (7)
  • Caardvarks (48)
  • Cat's-Pajamas (2)
  • cheap-tricks (224)
  • Christmas (33)
  • Claire-Keay (2)
  • Cricut (3)
  • cut-file (2)
  • Cuttlebug (45)
  • decor (6)
  • Digital-Images (131)
  • Distress-Inks-etc (14)
  • DIYstamps (1)
  • Eat-Cake-Graphics (11)
  • Faves (207)
  • Fred-She-Said (5)
  • Freebies (77)
  • GESSO (9)
  • Halloween (10)
  • Heather Ellis (3)
  • Hero-Arts (14)
  • ISC (7)
  • Jessica-Sprague (2)
  • Just-Rite (2)
  • LPS (63)
  • Mo's-Digital-Pencil (16)
  • My-Favorite-Things (33)
  • organizing (7)
  • Other-People's-Tutorials (36)
  • Paper-Garden-Projects (54)
  • Paper-Temptress (39)
  • Punches (21)
  • Purple-Onion-Designs (23)
  • S.U. (1)
  • SCOR-PAL (4)
  • silhouette (4)
  • Skipping-Stones-Design (7)
  • Squigglefly (6)
  • SRM-Stickers (8)
  • techniques (191)
  • templates (26)
  • Tiffany-Doodles (4)
  • Tutorials (252)

Blog Archive

  • ▼  2013 (16)
    • ►  July (4)
    • ▼  June (4)
      • Bye Bye Google Reader! a quick way to save your fe...
      • a Rainbow Colour-Blocked card - A Day for Daisies ...
      • Mustache paper & overlay set (free)
      • a coloured traced doodling card (& my first video)...
    • ►  May (3)
    • ►  April (1)
    • ►  March (1)
    • ►  February (3)
  • ►  2012 (53)
    • ►  December (2)
    • ►  November (2)
    • ►  October (1)
    • ►  August (3)
    • ►  July (2)
    • ►  June (5)
    • ►  May (7)
    • ►  April (8)
    • ►  March (9)
    • ►  February (13)
    • ►  January (1)
  • ►  2011 (74)
    • ►  December (1)
    • ►  November (5)
    • ►  October (10)
    • ►  September (9)
    • ►  August (12)
    • ►  July (5)
    • ►  June (9)
    • ►  May (2)
    • ►  April (6)
    • ►  March (7)
    • ►  February (4)
    • ►  January (4)
  • ►  2010 (84)
    • ►  December (7)
    • ►  October (1)
    • ►  September (6)
    • ►  August (1)
    • ►  June (1)
    • ►  May (7)
    • ►  April (21)
    • ►  March (3)
    • ►  February (17)
    • ►  January (20)
  • ►  2009 (234)
    • ►  December (16)
    • ►  November (21)
    • ►  October (11)
    • ►  September (23)
    • ►  August (29)
    • ►  July (26)
    • ►  June (10)
    • ►  May (16)
    • ►  April (26)
    • ►  March (22)
    • ►  February (27)
    • ►  January (7)
  • ►  2008 (39)
    • ►  December (14)
    • ►  November (25)
Powered by Blogger.

About Me

Unknown
View my complete profile