StampznewBright

  • Subscribe to our RSS feed.
  • Twitter
  • StumbleUpon
  • Reddit
  • Facebook
  • Digg

Monday, 11 June 2012

"One, Two, Three... Get Loose, Now!"

Posted on 14:00 by Unknown
Do you like that loose relaxed style that seems to be all the rage, now?

I love it! But I find it totally im-possum-ible, so I'm trying
to get a little more chilled out in my card layouts...

purple onion designs hometown Bakery card

Not sure if this little card qualifies as relaxed, but it felt that way
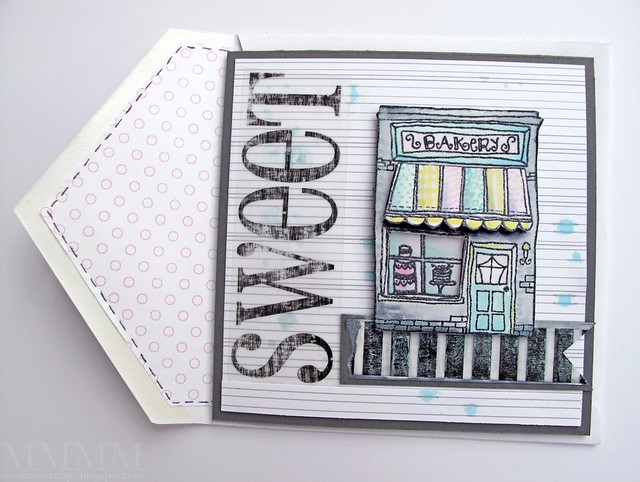
when I was making it. ;-) (It's a 4-1/4 inch square card).


- a splatter using the inner mechanism of a spray bottle

Step 1) Print subtle graph paper & add some splatters. This is some Distress Ink spray that I made: tumbled glass & distilled water, but instead of spraying, I flicked the inky water on using the mechanism-thingy from the inside of the spray bottle.

1 Put the SRM sticker on your project and sand off some of the text

Step 2) Stick an SRM sticker on the paper and sand off some of the black ink.

It will take away some of the sticker ink leaving a funky distressed texture and softer look:

2 It will take away some of the sticker ink leaving a funky distressed texture and softer look

You could sand the sticker before you add it to your project to reduce the chance of smudges but I just stuck a piece of low tack painters tape on...

3 You could sand the sticker before you add it to your project to reduce the chance of smudges but I just stuck a piece of low tack painters tape on and

... and when you lift the tape, the black dust from sanding lifts right off:

4 when you lift the tape the black dust from sanding lifts right off and doesn't smudge onto your paper

It gives you a nice clean look and the black dust won't smudge onto your paper.

Another trick with tape that surprised me:

Distress Stain on washi tape

If you put picket fence Distress Stain on washi tape it will stay put
and it gives you a lovely texture:

washi tape painted with Picket Fence Distress Stain

Step 3) Stick the tape onto cardstock & make a little tag shape.

a purple onion designs hometown bakery  stamped and layered with acetate window

Step 4) Stamp the Bakery hometown stamp. (I heat embossed it with black pigment ink & clear embossing powder. One of the nicest things about the hometown building stamps is that they are not too small. (This little Bakery is just under 2.5" tall.) Makes it easy to colour!

I stamped it 2 times.

Once to cut the window out of to add a bit of acetate & layer it up:

c acetate window purple onion designs hometown Bakery

I also stamped the Bakery image a second time to cut the awning out:

b purple onion designs hometown Bakery awning dimension built up out of grey cardstock layers

(The handy thing is that I could use the same image I cut the awning from to also cut out the yummy contents of the window to pop in behind). The layers in behind the whole thing are all grey cardstock. I like that better than foam dots since it's sturdier and looks like a shadow.

To layer it, I did this schtuff:

A) Stamped the image & cut the window out with a hobby blade.
B) Glued 3 pieces of white cardstock together (a bit smaller than the size as the image to fit in behind it).
C) Temporarily adhered the 3 layers of cardstock in behind the stamped image with the window cut out of it.
D) Cut the window out of the layers that are in behind -- using the first window cutting as a guide.
E) Cut a little piece of acetate & glue it in behind the stamped image. Permanently adhere the layers for dimension.
F) Add the awning (coloured & cut) with layers of grey cardstock in behind.
G) Add the bakery window contents in behind the little acetate window.

Step 5) Stick it all together:

purple onion designs hometown Bakery card

Step 6) Add a little paper to the inside of the card
and line an envelope to match:

inside card and lined envelope

It's just simple printed digi paper, with faux stitches drawn in pen.
(I'll add the three digi papers I used for this card in the next day or two).

The tutorial for lining an envelope in a big old hurry, is here.


a purple onion designs hometown bakery  stamped and layered with acetate window

As soon as I saw this hometown collection,
I knew I just had to have it:

Purple Onion Designs stamps - hometown collection by Stephanie Ackerman

It's from Purple Onion Designs,
and it's drawn by Stephanie Ackerman.


  • Bakery stamp from Purple Onion Designs hometown collection.
  • White cardstock (80lb) white copy paper (thin to line envelope).
  • Ranger Archival jet black ink, clear embossing powder, heat gun
  • Dark grey cardstock, A2 sized white envelope, double-sided tape.
  • Piano monochrome Sweet Bella tape & picket fence Distress Stain.
  • SRM Sticker set: "SWEET" We've Got Your Sticker.
  • Copic markers: RV-02, V000, c-7,c-3, c-1, BG-10, B-00, YG-00.

Hope your day is a sweet one!


P.S. On an extra personal note: Sorry the posts around here continue to be random. I've been working on managing my energy levels and diet (anemia and the no gluten or dairy or egg etc...) It's has been a bit of a struggle. I'm a regular zombie, I tell ya (and oh man my house is a big old MESS!) :-) But Charles is more patient than a saint, and we've been enjoying days here and there spent in the community garden and spent with our amazing family. I am starting to have some non-zombie days and my migraines are fewer! Yay!!! I hope you and yours are feeling oh so well, and are as lucky as we are.

P.P.S. "One, Two, Three... Get loose now!" Got that song stuck in your head? Here's "It Takes Two make a Think go Right" (for my fellow the Rob Base & D.J. Easy Rock fans). :-D And of course, "Joy & Pain" too!
Email ThisBlogThis!Share to XShare to FacebookShare to Pinterest
Posted in Distress-Inks-etc, Purple-Onion-Designs, techniques, Tutorials | No comments
Newer Post Older Post Home

0 comments:

Post a Comment

Subscribe to: Post Comments (Atom)

Popular Posts

  • free Butterfly Silhouette .studio cut files (in 3 styles)
    Hi, All! Here are those butterfly Silhouette .studio cut files. They are for only for the Silhouette machine... But I do hope to share other...
  • DIY digital paper (some freebies)
    The lull in posts (over the last couple of days) was for me to finish up this looooong post I've been wanting to share with you for eons...
  • New Popcorn Box template set (pretty stamp room storage) :o)
    Are you in the mood for a template or two? I was going to wait until I had really good photos and a full pictorial, but then I would take fo...
  • Missing with a migraine, Craft room BEFORE pics, & LINKs for Organizing the craft room
    Edited to add: Sorry guys. I feel like I was hit by a truck. Migraine's lasted so long... but I will be back with a post by tomorrow eve...
  • Graphics Fairy Inspiration (+vintage printables)
    Thank You all so much for your wonderful comments about the papers I've been obsessed with. Your kind words make me grin so big that I g...
  • "Honey, I shrunk the stationery!" (Hero Arts typewriter notebook)
    Still trying to make more of my cards into little gifts. This Hero Arts typewriter card is another take on the card turned refillable notebo...
  • 3 Clean And Simple cards (with SRM stickers)
    You guys may know that I was tragically born without the gene that let's you achieve a C lean A nd S imple card. ;-) Not sure why I find...
  • Making Your Own Colour Shimmer Sprays--Links & Info
    Info & Links Links for how to Mak e yo ur o w n Sh im mery s prays: (These are for you sweet Beth! oxo) ( more info on these colours in...
  • over 100 free pattern overlays ... at a glance
    Would you believe that the free overlay total is at 139 overlays and counting? (I might have a wee little addiction) ;-) Since overlays can ...
  • Felt-based cards (Rock-a-Bye Baby tutorial)
    New idea, Old projects.... I've been debating whether or not to post some older projects/tutorials since the big bad insecurity beast...

Categories

  • 'Mouse'-the-cat (10)
  • *TEMPLATEs (98)
  • 3D-projects (144)
  • A-Day-For-Daisies (7)
  • Amber Ink (9)
  • Angel's-Landing (2)
  • BASICS (47)
  • Blogging-tips (7)
  • Caardvarks (48)
  • Cat's-Pajamas (2)
  • cheap-tricks (224)
  • Christmas (33)
  • Claire-Keay (2)
  • Cricut (3)
  • cut-file (2)
  • Cuttlebug (45)
  • decor (6)
  • Digital-Images (131)
  • Distress-Inks-etc (14)
  • DIYstamps (1)
  • Eat-Cake-Graphics (11)
  • Faves (207)
  • Fred-She-Said (5)
  • Freebies (77)
  • GESSO (9)
  • Halloween (10)
  • Heather Ellis (3)
  • Hero-Arts (14)
  • ISC (7)
  • Jessica-Sprague (2)
  • Just-Rite (2)
  • LPS (63)
  • Mo's-Digital-Pencil (16)
  • My-Favorite-Things (33)
  • organizing (7)
  • Other-People's-Tutorials (36)
  • Paper-Garden-Projects (54)
  • Paper-Temptress (39)
  • Punches (21)
  • Purple-Onion-Designs (23)
  • S.U. (1)
  • SCOR-PAL (4)
  • silhouette (4)
  • Skipping-Stones-Design (7)
  • Squigglefly (6)
  • SRM-Stickers (8)
  • techniques (191)
  • templates (26)
  • Tiffany-Doodles (4)
  • Tutorials (252)

Blog Archive

  • ►  2013 (16)
    • ►  July (4)
    • ►  June (4)
    • ►  May (3)
    • ►  April (1)
    • ►  March (1)
    • ►  February (3)
  • ▼  2012 (53)
    • ►  December (2)
    • ►  November (2)
    • ►  October (1)
    • ►  August (3)
    • ►  July (2)
    • ▼  June (5)
      • 3 New free Paper Sets (subtle stripe, tiny graph, ...
      • "One, Two, Three... Get Loose, Now!"
      • Wrinkle-free Distress Ink technique
      • over 100 free pattern overlays ... at a glance
      • how to make your own custom coloured papers with g...
    • ►  May (7)
    • ►  April (8)
    • ►  March (9)
    • ►  February (13)
    • ►  January (1)
  • ►  2011 (74)
    • ►  December (1)
    • ►  November (5)
    • ►  October (10)
    • ►  September (9)
    • ►  August (12)
    • ►  July (5)
    • ►  June (9)
    • ►  May (2)
    • ►  April (6)
    • ►  March (7)
    • ►  February (4)
    • ►  January (4)
  • ►  2010 (84)
    • ►  December (7)
    • ►  October (1)
    • ►  September (6)
    • ►  August (1)
    • ►  June (1)
    • ►  May (7)
    • ►  April (21)
    • ►  March (3)
    • ►  February (17)
    • ►  January (20)
  • ►  2009 (234)
    • ►  December (16)
    • ►  November (21)
    • ►  October (11)
    • ►  September (23)
    • ►  August (29)
    • ►  July (26)
    • ►  June (10)
    • ►  May (16)
    • ►  April (26)
    • ►  March (22)
    • ►  February (27)
    • ►  January (7)
  • ►  2008 (39)
    • ►  December (14)
    • ►  November (25)
Powered by Blogger.

About Me

Unknown
View my complete profile