Working on any crafty Christmas presents, yet?

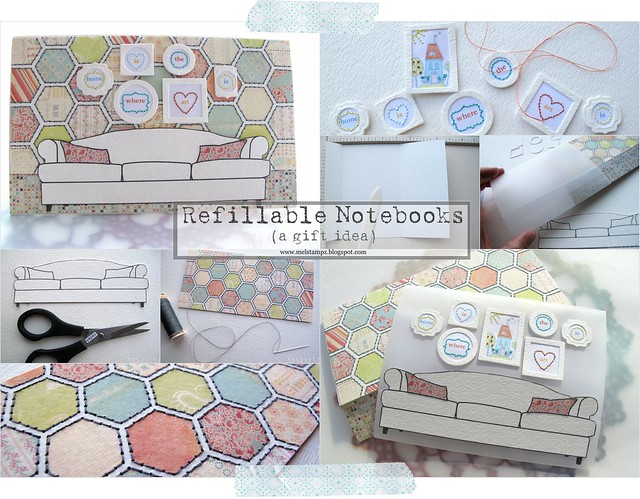
Everyone on my list is getting a refillable notebook,
(for a start). The handy thing is that you can even take cards
you've already made & turn them into notebook gifts in a flash.
:-D

Furniture images are nifty, no?
This Couch digi from Tiffany Doodles is my fave.
I've been wanting to make something with it for ages.

So, it ended up as a notebook, twice:
Notebook #1

The 1st version has a removable vellum
belly-band cover that slides off:

...and a matchbook style fold.
Here's the inside:

Very basic inside, but it has refillable pages (the pages are attached
with tied ribbon instead of being stitched in or glued into the cover).
The refillable page part thrills me, since you can make easy little
'refill packs' so that the recipient can just re-tie them in
with the ribbon to keep using the notepad over and over again.
Notebook #2
The 2nd version has the same elements in
a plain top-fold style,
but inside:

It has a little bit of embellishment fun
(with a teeny painting made using another digital fave
Seasonal House on a Hill digi from Squigglefly).
The patterned paper is Cosmo Cricket "Lucy" from Clementine
---
Both notebook styles measure 6-3/4 inches by 4 inches.

...make a matchbook style notebook
with a vellum belly-band cover
& refillable pages.


Step 4) Cut a rug! ;o) Cut a piece of patterned paper the size of the bottom fold piece. This is a patterned paper called "Squares" from Cosmo Cricket's Honey Pie digital paper pack.
Notebook #1

The 1st version has a removable vellum
belly-band cover that slides off:

...and a matchbook style fold.
Here's the inside:

Very basic inside, but it has refillable pages (the pages are attached
with tied ribbon instead of being stitched in or glued into the cover).
The refillable page part thrills me, since you can make easy little
'refill packs' so that the recipient can just re-tie them in
with the ribbon to keep using the notepad over and over again.
Notebook #2

The 2nd version has the same elements in
a plain top-fold style,
but inside:

It has a little bit of embellishment fun
(with a teeny painting made using another digital fave
Seasonal House on a Hill digi from Squigglefly).
The patterned paper is Cosmo Cricket "Lucy" from Clementine
---
Both notebook styles measure 6-3/4 inches by 4 inches.

...make a matchbook style notebook
with a vellum belly-band cover
& refillable pages.
- Couch digital image from Tiffany Doodles
- Watercolour paper 140lb, scissors,
- Seasonal House on a Hill digi from Squigglefly
- Borden & Riley Paris Bleedproof paper for pens
- Ink Jet printer, clear embossing powder & heat gun
- White Cardstock 80lb or more (used here: Naturals White)
- Vellum cardstock, double-sided tape, scoring board
- Punches: 1" circle, 1/2" circle, 1" square, 3/4" square, 3/4" circle
- Nestabilities label 9 die (the very smallest one)
- Note pages: Copy paper or thin printer paper (acid-free)
- Small rectangular punch, White satin Ribbon 1/8"
- Copic markers, various colours of thread, paper piercer, a needle.

Step 1) Print Tiffany Doodles Couch digital image at 90% on watercolour paper & cut it out.

Step 2) Make a matchbook-fold style cover for the notebook:
2A) Cut cardstock to measure 8-1/2 inches x 6-3/4 inches.
2B)Score it at 1-1/8" and 5- 1/4" marks.

Step 3) For a fancy wallpaper look: Print or use some patterned paper.
Pierce with a paper piercing tool, and stitch it, if you like.
Print:
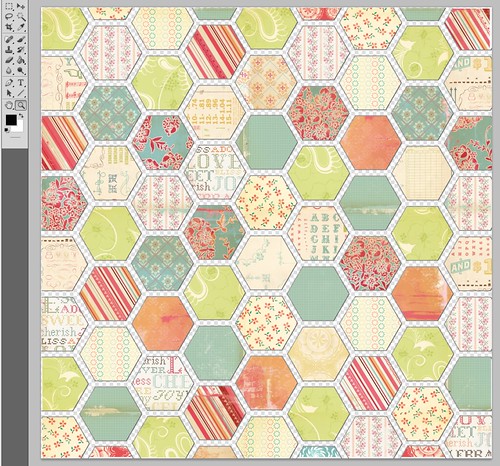
I made this custom hexagon paper using
various Cosmo Cricket digital papers:

Details on how to make the paper (with a link to
the free hexagon template) are in this post.
Stitch:
It takes quite a while to hand stitch in this kind of detail, of course...

...but I have a very special recipient in mind for this, who loves to sew.
(And secretly, stitching paper is my most ultimate favourite thing of all!)

Step 2) Make a matchbook-fold style cover for the notebook:
2A) Cut cardstock to measure 8-1/2 inches x 6-3/4 inches.
2B)Score it at 1-1/8" and 5- 1/4" marks.

Step 3) For a fancy wallpaper look: Print or use some patterned paper.
Pierce with a paper piercing tool, and stitch it, if you like.
Print:
I made this custom hexagon paper using
various Cosmo Cricket digital papers:

Details on how to make the paper (with a link to
the free hexagon template) are in this post.
Stitch:
It takes quite a while to hand stitch in this kind of detail, of course...

...but I have a very special recipient in mind for this, who loves to sew.
(And secretly, stitching paper is my most ultimate favourite thing of all!)

Step 4) Cut a rug! ;o) Cut a piece of patterned paper the size of the bottom fold piece. This is a patterned paper called "Squares" from Cosmo Cricket's Honey Pie digital paper pack.
Step 5) Finish the matchbook-style notebook:

5A) Adhere the background piece & the rug piece.

5B) Add refillable pages to the notebook: Cut pages to measure 6 and 1-2 x 8 inches. Fold each page in half. Punch holes in the tops of the pages. Then punch more holes, in the back page of the notebook cover (to align with the page holes). Tie the pages into the cover with a bit of ribbon.

Step 6) Make a vellum sleeve that will slide on & off. Here's how I made mine:

Step 7) To make the sleeve: Cut vellum cardstock to measure 9 inches x 5-1/2 inches. Score at both the 1-1/4 inch and the 5-1/2 inch mark.

Step 8) Press folds into the vellum cardstock where you've scored.

Step 9) Add adhesive to the sleeve: Wrap vellum around card, check fit, and add adhesive. (I like to use double-sided tape where it will be hidden by an image or embellishment.)

Step 10) Seal the sleeve up: Press the front matchbook vellum flap onto adhesive & press the sleeve closed.

Step 11) Adhere the couch to the sleeve (hides that seam).

Step 12) Add mini frames to the wall above the couch: Punch shapes for frames & matching solid-shape backs (The solid shape behind gives more dimension & makes things easy to assemble.)
I used different sized circle & square punches to make frames. Tip: start with the smallest size shape (like a 3/4" circle) and punch it first; then punch the larger shape (like a 1" circle) around it.

Step 13) Adhere the solid shapes to the vellum band. To make the curvy frames (to the left and right in the photo below) I used a Nestabilities label 9 die (the very smallest one):

Step 14) Add cushions to the Couch These ones are digitally paper pieced to get pattern (using a small section of Cosmo Cricket digital paper "Sweet Nothings" snipped from their Hey Sugar set & turned into a custom pattern in Photoshop so that it would fill just the flowery part of that digi paper.)

Step 15) Make your own custom art: You could use photos or anything you like. Here's what I did:
Print Squigglefly Seasonal House on a Hill image at 15 percent. I erased the border from the image & recoloured it to make it blue. The word art is text that I typed into a word document in 11 & 12 pt font, and changed the colour of. All of it is printed onto Borden & Riley Paris Bleedproof paper and heat embossed in clear.
To get the frames cut nicely: simply stick them to the printed images & words & repunch around each frame.

5A) Adhere the background piece & the rug piece.

5B) Add refillable pages to the notebook: Cut pages to measure 6 and 1-2 x 8 inches. Fold each page in half. Punch holes in the tops of the pages. Then punch more holes, in the back page of the notebook cover (to align with the page holes). Tie the pages into the cover with a bit of ribbon.

Step 6) Make a vellum sleeve that will slide on & off. Here's how I made mine:

Step 7) To make the sleeve: Cut vellum cardstock to measure 9 inches x 5-1/2 inches. Score at both the 1-1/4 inch and the 5-1/2 inch mark.

Step 8) Press folds into the vellum cardstock where you've scored.

Step 9) Add adhesive to the sleeve: Wrap vellum around card, check fit, and add adhesive. (I like to use double-sided tape where it will be hidden by an image or embellishment.)

Step 10) Seal the sleeve up: Press the front matchbook vellum flap onto adhesive & press the sleeve closed.

Step 11) Adhere the couch to the sleeve (hides that seam).

Step 12) Add mini frames to the wall above the couch: Punch shapes for frames & matching solid-shape backs (The solid shape behind gives more dimension & makes things easy to assemble.)
I used different sized circle & square punches to make frames. Tip: start with the smallest size shape (like a 3/4" circle) and punch it first; then punch the larger shape (like a 1" circle) around it.

Step 13) Adhere the solid shapes to the vellum band. To make the curvy frames (to the left and right in the photo below) I used a Nestabilities label 9 die (the very smallest one):

Step 14) Add cushions to the Couch These ones are digitally paper pieced to get pattern (using a small section of Cosmo Cricket digital paper "Sweet Nothings" snipped from their Hey Sugar set & turned into a custom pattern in Photoshop so that it would fill just the flowery part of that digi paper.)

Step 15) Make your own custom art: You could use photos or anything you like. Here's what I did:
Print Squigglefly Seasonal House on a Hill image at 15 percent. I erased the border from the image & recoloured it to make it blue. The word art is text that I typed into a word document in 11 & 12 pt font, and changed the colour of. All of it is printed onto Borden & Riley Paris Bleedproof paper and heat embossed in clear.
To get the frames cut nicely: simply stick them to the printed images & words & repunch around each frame.
Step 18) Slide the cover onto the notebook & that's it!


0 comments:
Post a Comment