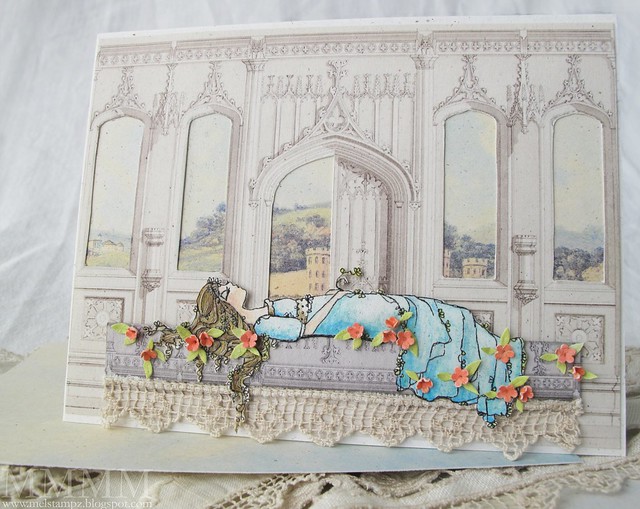
I've been working on some digital graphics for a hybrid sleeping beauty
card for a while now, but couldn't get the finishing touches right.
The Lily Pad Cards colour challenge was the perfect inspiration for
teeny coral flowers & wee green leaves!
And it's sponsored by my favourite artist,
Tammy of A Day for Daisies.
Here are Kathy's gorgeous colours for the challenge:

The Lily Pad Cards colour challenge was the perfect inspiration for
teeny coral flowers & wee green leaves!
And it's sponsored by my favourite artist,
Tammy of A Day for Daisies.
Here are Kathy's gorgeous colours for the challenge:


The Sleeping Beauty image is one I bought
a while back from A Day For Daisies

It's called Loves First Kiss

And Sleeping Beauty has a new Fairy Godmother:
(she's hip & hybrid)
The Graphics Fairy!
The Gothic Arches background is a free image shared
here by the generous Graphics Fairy, Karen.
[If you haven't seen her incredible blog, and you love clip art,
then you are in for a treat!]
here by the generous Graphics Fairy, Karen.
[If you haven't seen her incredible blog, and you love clip art,
then you are in for a treat!]
Click the image, if you'd like to go to Karen's post & download it:
Alterations to the images:
1) I reduced the size of both graphics fairy images (since they were nice & big--which makes for great quality when you print them smaller).
2) For the Gothic Arches image, I also reduced the saturation in Photoshop (making the image a little more "black-and-white-ish"... since my printer seemed to make it a little orange). I really wanted it to match kraft coloured cardstock & to be softer. :o)
2) For the Gothic Arches image, I also reduced the saturation in Photoshop (making the image a little more "black-and-white-ish"... since my printer seemed to make it a little orange). I really wanted it to match kraft coloured cardstock & to be softer. :o)

Make a castle card with cut windows:
(or you could just print out the
combined digital image below)

- Inkjet Printer, Matte medium & clear embossing powder
- Speckled ivory cardstock
- Copic markers & Prismacolour pencils
- Edge punch, paper piercer, watercolour pencil to make flowers
This method is the cut out the windows and layer the scene in behind method, but I've also combined them digitally and uploaded that in two sizes for you to download if you'd like to save time (linked below).

Step 1) Print, colour, & cut out the sleeping beauty image.
I heat-embossed the ADFD Loves First Kiss digital image by painting matte medium onto speckled cardstock, but you could use Paris Bleedproof cardstock if you want a heat embossed digital image. More about the Paris Bleedproof paper for digi embossing in this post.
...and I did that textured hair thing again (scored curving lines into
her hair with a paper piercing tool to give it texture):
her hair with a paper piercing tool to give it texture):
The scored lines seem to make it easier to colour hair.

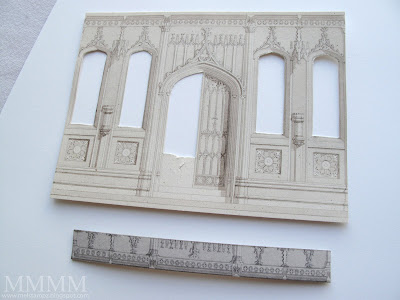
Step 2) Print Gothic image --at 50%)--on a light cardstock (alter the colour first, if you like). Cut out the windows & half of the door. (I used an exacto blade and as you can see, I didn't worry about making the hidden bits tidy) ;O)

Step 3) Print a small section of the Gothic Arches image & cut it to make the bier for sleeping beauty to lay upon. I made the image darker, before clipping a piece of it in Photoshop & printing it.

Step 4) Print the Landscape image at 33% (You can crop it first to save ink). Place the landscape image behind the Gothic arch windows and trim it to fit. (I overlapped it to get the little hill to show in the left-hand window--the mess will be invisible later muhahaha).

Step 5) Cut out the bier & adhere it to the card. Adhere sleeping beauty on top of it. (add flowers and leaves and glue on a scrap of crochet, if you like.)
(The teensy wee flowers were made with the left overs from an edge punch, coloured with watercolour pencil crayon. The leaves are just cut from some paper coloured with a copic marker)
Step 6) Adhere everything to a folded A2 card (5 1/2" x 4 1/4")...
...and th-th-th-that's all, folks:
I also made a purse template filled with pattern to match,
but had no time to finish it if I wanted to get a card in
for that ADFD Lily Pad challenge.

 &
& 
If you don't want to do all the fiddly cutting that I did above:
you can simply print the combined backgrounds, cut out the bier,
add sleeping beauty, and 'garnish' with flowers. ;o)
PDF, PNG and JPEG formats:
Click the images to visit Flickr if you'd
like to download JPEGs.
Click the links for PDFs, or find the PNGs below:
Download PDF for background here

Download PDF for the castle purse here

Download PDF for LARGE background here


JPEG format files:
How to save these PNGs:
1) Click on the small images below
(it should open the full image in your browser)
2) Then right click with your mouse
3) chose the option "save image as PNG"


More on how to Download files
types & terms of use here
but had no time to finish it if I wanted to get a card in
for that ADFD Lily Pad challenge.

 &
& 
If you don't want to do all the fiddly cutting that I did above:
you can simply print the combined backgrounds, cut out the bier,
add sleeping beauty, and 'garnish' with flowers. ;o)
PDF, PNG and JPEG formats:
Click the images to visit Flickr if you'd
like to download JPEGs.
Click the links for PDFs, or find the PNGs below:
Download PDF for background here

Download PDF for the castle purse here

Download PDF for LARGE background here


JPEG format files:
How to save these PNGs:
1) Click on the small images below
(it should open the full image in your browser)
2) Then right click with your mouse
3) chose the option "save image as PNG"


More on how to Download files
types & terms of use here
I would've simply asked you to visit The Graphics Fairy for these, and not have taken the liberty of sharing the combined images, but it took ages in Photoshop, so I thought I'd save you the work. If you use any of these, be sure to credit Karen & link her, pretty please. :o)
Thanks so much for having a look,


0 comments:
Post a Comment