


Woohoo! I'm on fire & I'm running.
(This is as close as I'll ever get to an olympic sport teehee)
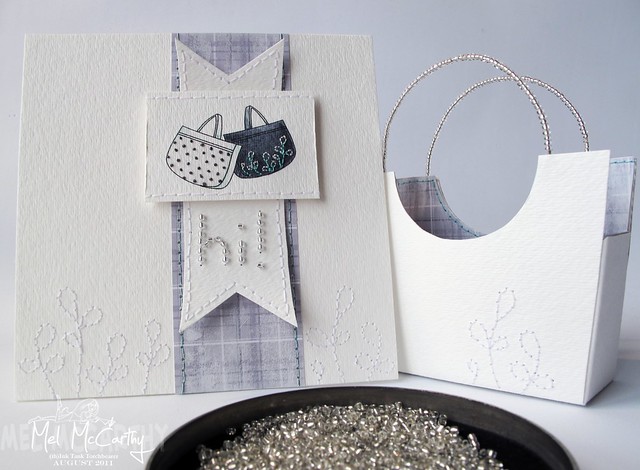
I've been passed the torch, so today my Amber Ink project is
a simple little purse-themed set,with a whole whack of hand sewing
(and even more explanation.) ;-)
You can read all about the new torchbearers here.
(What a fun read. Man, these Amber Ink gals can write!)
& you can see what all the gals are up to in today's Amber ink post.
a simple little purse-themed set,with a whole whack of hand sewing
(and even more explanation.) ;-)
You can read all about the new torchbearers here.
(What a fun read. Man, these Amber Ink gals can write!)
& you can see what all the gals are up to in today's Amber ink post.

1... Amber Ink digital images & ipapers
2... details that went into making the purse card & box
3... Cheap tricks: DIY tinted thread & beaded purse handles
(tomorrow, the templates) :O)
-1-

First, a mini-review-slash-rave:
The quality of Amber Ink's digital images is thoroughly impressive.
I found that you could even scale the TIFF images larger in Photoshop
and still get stunning printing- me likey!

(I printed these purses at 130%)
so... they have the sweetest "Oh What A Doll"
digital image collection. One of the paper doll gals sets
is this one, Wave Hello:
digital image collection. One of the paper doll gals sets
is this one, Wave Hello:

Cute, hey?
... but I used the beach bag from its matching
Day At The Beach Clothes set
as a purse for today's project:
Day At The Beach Clothes set
as a purse for today's project:

[I dream of making an entire paper doll set
for my BFF's gals]

I also used this patterned digital
ipaper Schoolgirl Plaid

(Goldenrod Tiny)
...but printed in black & white

for grey plaid
-2-

...on how this set was made:
the card:
To get two purse images...

I copied & pasted the original beach bag image in Photoshop:

I opened the image & did this stuff to get two purses:
- Rotated the original image a little & then copied it.
- Flipped the canvas horizontal & pasted purse #2 on
- Moved the layer with purse #2 so that it was on top
- Moved it down slightly, and that was it!

Printing: I printed the purses & heat embossed the purses by...
A) Cutting a piece of 140lb watercolour paper (8.5 inches by 4 inches)
B) printing in my Canon MP 24o inkjet printer
C) heat embossing by quickly sprinkling clear detail embossing powder on the wet printer ink and melting the embossing powder with a heat gun.
(If you work quickly, you can heat emboss small digital images on many different types of paper. Results may vary with different inkjet printers & humidity etc).

(colouring using Copic markers: Cool grey tones for one purse & the other with just a hint of B-00).

...I doodled a teeny leaf pattern on the grey purse with white pencil & pierced holes in the watercolour paper (using a paper piercing tool) so that I could sew a teeny pattern of white stitching. Then I coloured some of the white stitching in with a Coral Sea BG23 Copic marker for a two toned pattern.)
A) Cutting a piece of 140lb watercolour paper (8.5 inches by 4 inches)
B) printing in my Canon MP 24o inkjet printer
C) heat embossing by quickly sprinkling clear detail embossing powder on the wet printer ink and melting the embossing powder with a heat gun.
(If you work quickly, you can heat emboss small digital images on many different types of paper. Results may vary with different inkjet printers & humidity etc).
The purses were coloured & then stitched with wee patterns:
(colouring using Copic markers: Cool grey tones for one purse & the other with just a hint of B-00).
The grey dots are teeny knots of thread and then I went a little
nutso with needle & thread:
nutso with needle & thread:
...I doodled a teeny leaf pattern on the grey purse with white pencil & pierced holes in the watercolour paper (using a paper piercing tool) so that I could sew a teeny pattern of white stitching. Then I coloured some of the white stitching in with a Coral Sea BG23 Copic marker for a two toned pattern.)
There's a strip of the plaid ipaper on the card (dry brushed with white paint & hand stitched with turquoise thread). I also added a white on white leaf pattern:

I made a little doodle pattern piercing guide to get the stitched leaf pattern by...
A) Doodling on vellum & piercing holes in it
B) Then laying the vellum guide over the bottom of the card
C) and Piercing the pattern & stitching it by hand with needle & thread.
A) Doodling on vellum & piercing holes in it
B) Then laying the vellum guide over the bottom of the card
C) and Piercing the pattern & stitching it by hand with needle & thread.
To get the pattern reversed, I just flipped the
doodle pattern piercing guide over & pierced some more.
doodle pattern piercing guide over & pierced some more.

The "hi !" sentiment is made up of stitched on seed beads:

and that's it for the card...

the purse gift box:
The matching stitching on the bottom of the purse box template
was made using the same doodled piercing guide:
was made using the same doodled piercing guide:

(I love hand-stitching on watercolour paper, especially 140lb. It holds up so nicely)
More of that cute plaid ipaper made a liner for the purse box:
More of that cute plaid ipaper made a liner for the purse box:

(I printed the digital ipaper first then printed the liner template
on the back of it & cut it out, dry-brushed it with white paint & stitched it.)
-3-on the back of it & cut it out, dry-brushed it with white paint & stitched it.)

(tinting thread & beaded purse handles)
DIY tinted thread:

If you don't have a huge selection in colours of thread, you can use Copic
markers--or any other markers--to custom dye white thread.
(It makes the perfect match to your colouring that way!)
Beaded wire handles:

To make unique handles for a little purse box,
just slide seed beads onto wire:
A) Choose wire in a gauge that will fit inside your beads.
B) Cut it to length (longer than your handle, leaving room for loops a the ends).
C) Make a loop at one end to keep the beads from escaping while you slide them on
D) Slide seed beads onto the wire.
E) When you have enough make another loop to finish.
F) Adhere to the inside of the box (or wire loops into eyelets or something)
(If you adhere using strong double-sided tape the way I did here, you can cover over the loops with a paper liner or bits of cardstock.)
...and that's it for the purse box:

(I'm going to put a gift card tucked in some tissue paper in it,
as a pick-me-up for a friend.)

- Purse image from Amber Ink digital set Day At The Beach Clothes
- ipaper from Amber Ink Schoolgirl Plaid -Goldenrod Tiny (printed in black & white)
- Strathmore 300 series Watercolour paper (coldpress 140lb--It even let me heat emboss the image using ink jet printer ink & clear embossing powder!)
- Copic markers (different greys & turquoises)
- Stitching stuff: Paper piercing tool, needle & thread (white & grey)
- Purse template (free below), scissors, scoring tool & double-sided tape.
- Wire, beads & pliers.
Thanks for letting me ramble!

P.S. Don't miss those new flames! :-) And for anyone who still uses printed templates, tomorrow night, I'll load the new purse templates for ya.


0 comments:
Post a Comment