


From one extreme to the other, hey?
[from rainbows to white on white on
white--(with a little silver)]
This post is just a little photo collection of some
textural elements that I've been experimenting with
(this stuff)...
them in case they might inspire you a little...

 (First, a "Technical" tip for your viewing pleasure: if these photos, or any page on the web, looks too big or small to you, you can re-size: simply hold control button on your keyboard, and simultaneously scroll with your mouse up or down to re-size larger or smaller).

Martha book page flowers
using Mod Podge & paint

but I used it as a shape for a PhotoShop brush to re-size it
many times to make this one sheet to print with many different sizes:

I printed the flower template, glued book pages on the back of
it with Mod Podge, painted & stamped in the paint, and
then cut the flowers out then layered them onto white floral wire:

(I did find that I wanted to cut one side of the Martha flower differently
than the template to get it more symmetrical as a paper flower.)
(There's a step-by-step pictorial for the
book page process here):
+Cut+into+separate+flowers,+but+leave+some+of+the+rough+outline+intact+%28in+other+words,+don%27t+trim+perfectly+yet%29+Use+hole+punches+to+punch+out+the+divots+at+the+petal+ends.JPG)
+Cut+the+flowers+out.+Using+the+fred+She+Said+cherry+center+lines+as+a+guide+is+handy+for+making+deeper+petals+than+the+original+%28to+shape+nicely%29.JPG)

The Martha template was lovely to work with, as always,
but it left me with a craving for a more symetrical rose-like flower
so I doodled a template of my own for this...
Emboss resist cardstock rose:
I've been wanting to make the paper roses you see everywhere now,
so I tried some rolling (Let's just say that I'm very bad
at the rolled rose thing. Need to practice, a whole whack!).
So, this rose is made of cut & shaped layers of cardstock instead of rolling.
It's just one shape made into a template that I printed & cut out (below)
heat embossed stick back canvas with vintage graph paper transfer:
This was a fun experiment in layers...

Canvas with heat embossing & paper transfer:
[from rainbows to white on white on
white--(with a little silver)]
This post is just a little photo collection of some
textural elements that I've been experimenting with
(this stuff)...
- Mod Podge & book pages with paint and embossing
- Free flower templates (2: one by Martha et al & one by me)
- Chipboard letters & Gesso
- Sticky back canvas (by Claudine Hellmuth)
- Silver Leaf
- White Paint
- Stamps from Skipping Stones Designs & Hero Arts
- White colorbox ink & embossing powders
- Transfer Gel Medium
them in case they might inspire you a little...
 (First, a "Technical" tip for your viewing pleasure: if these photos, or any page on the web, looks too big or small to you, you can re-size: simply hold control button on your keyboard, and simultaneously scroll with your mouse up or down to re-size larger or smaller).
Martha book page flowers
using Mod Podge & paint
Some flowers I made using Mod Podge & Book pages
and a Martha Stewart flower template:

I used this Martha flower from a lovely project here:
and a Martha Stewart flower template:
I used this Martha flower from a lovely project here:

but I used it as a shape for a PhotoShop brush to re-size it
many times to make this one sheet to print with many different sizes:

I printed the flower template, glued book pages on the back of
it with Mod Podge, painted & stamped in the paint, and
then cut the flowers out then layered them onto white floral wire:
(I did find that I wanted to cut one side of the Martha flower differently
than the template to get it more symmetrical as a paper flower.)
(There's a step-by-step pictorial for the
book page process here):


+Apply+some+white+paint.+I+used+white+acrylic+paint+mixed+with+mod+podge+and+applied+with+a+rag+%28still+no+dirty+brush+to+clean%29.JPG)
+After+the+page+is+dry,+flip+it+over+%26+roughly+cut+to+trim+around+a+section+of+flowers.JPG)
The Martha template was lovely to work with, as always,
but it left me with a craving for a more symetrical rose-like flower
so I doodled a template of my own for this...

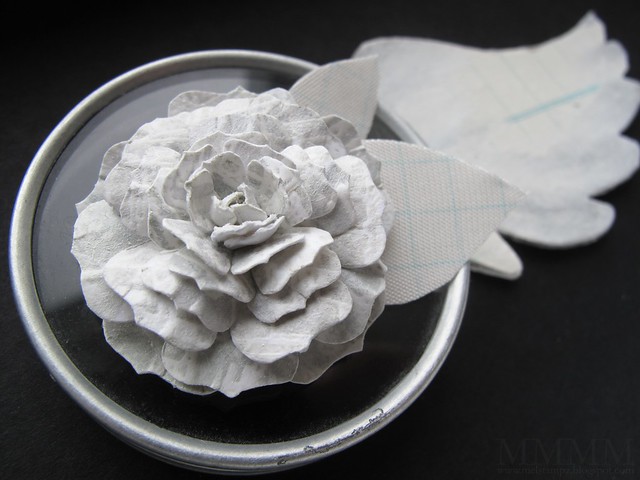
Emboss resist cardstock rose:
I've been wanting to make the paper roses you see everywhere now,
so I tried some rolling (Let's just say that I'm very bad
at the rolled rose thing. Need to practice, a whole whack!).
So, this rose is made of cut & shaped layers of cardstock instead of rolling.
It's just one shape made into a template that I printed & cut out (below)
1) Print flower template on white cardstock.
2) Flip printed flower template over (so the flowers are on the back & you can work on the blank side).
3) Stamp on blank side of the cardstock with a background stamp & heat emboss in versamark ink and white embossing powder.
4) Brush on some ink with water for colour (i used SU river rock ink).
5) Let dry the flowers dry for easier cutting.
6) Cut flower shapes out (following lines on template roughly).
7) To shape (one flower at a time works nicely): Mist flowers with a fine spray of water to make them pliable. Lay flowers on some fun foam (to cushion shaping) Use a stylus to shape each of the petals. Press once in the middle down firmly to give more of a bowl shape to the whole flower.
8) To put it together on a stem or as a brooch with leaves: pierce a hole in the center of each flower; take a long piece of wire (or floral wire with the thread on it) and twist the end so it will hold the flower, slide each flower onto the wire (glue to secure petals the way you like. I like them to be alternated so they aren't all lined up unnaturally); twist the wire at the back to keep them in place. Fold excess wire to make loops as a base to stick the leaves on.
9) To make the leaves: stick silk tape (the kind for first aid is cheap and lovely) onto graph paper. Cut shape & adhere to wire loops formed in step 8.
10) Glue a brooch pin on the back, if you like.


Not sure what they'll end up as but they have more
possibilities open to them on their career path now. ;)
2) Flip printed flower template over (so the flowers are on the back & you can work on the blank side).
3) Stamp on blank side of the cardstock with a background stamp & heat emboss in versamark ink and white embossing powder.
4) Brush on some ink with water for colour (i used SU river rock ink).
5) Let dry the flowers dry for easier cutting.
6) Cut flower shapes out (following lines on template roughly).
7) To shape (one flower at a time works nicely): Mist flowers with a fine spray of water to make them pliable. Lay flowers on some fun foam (to cushion shaping) Use a stylus to shape each of the petals. Press once in the middle down firmly to give more of a bowl shape to the whole flower.
8) To put it together on a stem or as a brooch with leaves: pierce a hole in the center of each flower; take a long piece of wire (or floral wire with the thread on it) and twist the end so it will hold the flower, slide each flower onto the wire (glue to secure petals the way you like. I like them to be alternated so they aren't all lined up unnaturally); twist the wire at the back to keep them in place. Fold excess wire to make loops as a base to stick the leaves on.
9) To make the leaves: stick silk tape (the kind for first aid is cheap and lovely) onto graph paper. Cut shape & adhere to wire loops formed in step 8.
10) Glue a brooch pin on the back, if you like.

Here's my own flower template
in case you might like to use it
[for this, or whatever you'd like to make.
But no resale please]:

Available here on SplitCoastStampers (PDF and JPG)
or
available here on flickr (PNG)
in case you might like to use it
[for this, or whatever you'd like to make.
But no resale please]:
Available here on SplitCoastStampers (PDF and JPG)
or
available here on flickr (PNG)

gesso painted chipboard letters:
Have chipboard letters and you're not crazy for the colour?
These ones are sanded & painted with gesso:
These ones are sanded & painted with gesso:
Not sure what they'll end up as but they have more
possibilities open to them on their career path now. ;)

heat embossed stick back canvas with vintage graph paper transfer:
This was a fun experiment in layers...
Canvas with heat embossing & paper transfer:
1) Cut a piece of sticky back canvas to size.
2) Peel off backing from canvas.
3) Stick adhesive side of canvas to a Spellbinders Impressabilities (caution residue can definitely get on the Impressabilities die or misshaping).
4) Sprinkle the still exposed stick back of the canvas with embossing powder & remove excess (I used Vanilla embossing powder.
5) Heat with a heat gun the embossing powder (with the Impressabilities still attached).
6) After the powder is melted, remove the Impressabilities carefully so as not to overly misshape it.
Use the embossed canvas as is, or colour it or whatever
I added a bit of transfer (to get the blue graph paper lines):
1) Paint on gel transfer medium
2) Stick paper onto it
3) Let it dry (overnight is awesome for a good transfer)
4) Wet back of paper & roll it off, exposing the transferred image


To make QUICK Solid silver leafed sticky back canvas:
Step 1) Cut the sticky back canvas to size.
Step 2) Peel off the backing to reveal the sticky side.
Step 3) Lay the canvas down onto the silver leaf (sticky side down). Cotton gloves work perfectly for handling silver leaf or a soft brush, but really just slapping the sticky canvas down onto it is so easy that you don't need an applicator.
Step 4) Press the canvas down well into the silver leaf & remove it from the remainder of the silver leaf sheet.
Step 5) If needed, patch in any gaps with more silver leaf sheet (I haven't found patching to be necessary yet though).
Step 6) To get more of the canvas weave to show through,
burnish it by pressing/rubbing it on the silver side with the tip of the cotton glove
Step 7) Dress it up however you like.


but uses paint stamped on with a Hero Arts stamp
to make a resist pattern on the sticky back canvas adhesive:

(The white parts were stamped in paint so the silver leaf won't stick
on that area & it will create the pattern of the stamp reversed.)
You can get a surprising amount of detail
(for silver leaf)

Hope you're doing wonderfully,

P.S. Product Links:
Hero Arts
Ancient Motif stamp

Skipping Stones Design's
Timeless Textures and Grunge sets:


(I'm not affiliated with either company, but in the interest of full-disclosure I want to mention again that I did receive the Timeless Textures stamps for free from lovely Heather at Skipping Stones Design.) :)
2) Peel off backing from canvas.
3) Stick adhesive side of canvas to a Spellbinders Impressabilities (caution residue can definitely get on the Impressabilities die or misshaping).
4) Sprinkle the still exposed stick back of the canvas with embossing powder & remove excess (I used Vanilla embossing powder.
5) Heat with a heat gun the embossing powder (with the Impressabilities still attached).
6) After the powder is melted, remove the Impressabilities carefully so as not to overly misshape it.
Use the embossed canvas as is, or colour it or whatever
I added a bit of transfer (to get the blue graph paper lines):
1) Paint on gel transfer medium
2) Stick paper onto it
3) Let it dry (overnight is awesome for a good transfer)
4) Wet back of paper & roll it off, exposing the transferred image
the transfer gel is really just like a clear paint that holds the
image (in this case the blue graph paper pattern)
but lets you roll the paper off for interesting transparency:

image (in this case the blue graph paper pattern)
but lets you roll the paper off for interesting transparency:

silver leaf on sticky back canvas:
(as is or with heat emboss stamping on it)
(as is or with heat emboss stamping on it)
Some stitched silver leaf canvas pieces for a project I'm making with those
Skipping Stones Design Timeless Textures elements:
Skipping Stones Design Timeless Textures elements:
To make QUICK Solid silver leafed sticky back canvas:
Step 1) Cut the sticky back canvas to size.
Step 2) Peel off the backing to reveal the sticky side.
Step 3) Lay the canvas down onto the silver leaf (sticky side down). Cotton gloves work perfectly for handling silver leaf or a soft brush, but really just slapping the sticky canvas down onto it is so easy that you don't need an applicator.
Step 4) Press the canvas down well into the silver leaf & remove it from the remainder of the silver leaf sheet.
Step 5) If needed, patch in any gaps with more silver leaf sheet (I haven't found patching to be necessary yet though).
Step 6) To get more of the canvas weave to show through,
burnish it by pressing/rubbing it on the silver side with the tip of the cotton glove
Step 7) Dress it up however you like.
I added heat embossing with different
Skipping Stones Design stamps:
Skipping Stones Design stamps:

This piece uses the same ingredients
to make a resist pattern on the sticky back canvas adhesive:
(The white parts were stamped in paint so the silver leaf won't stick
on that area & it will create the pattern of the stamp reversed.)
You can get a surprising amount of detail
(for silver leaf)
(and of course that yummy canvas texture)
Hope you're doing wonderfully,
P.S. Product Links:
Hero Arts
Ancient Motif stamp
Skipping Stones Design's
Timeless Textures and Grunge sets:
(I'm not affiliated with either company, but in the interest of full-disclosure I want to mention again that I did receive the Timeless Textures stamps for free from lovely Heather at Skipping Stones Design.) :)


0 comments:
Post a Comment