


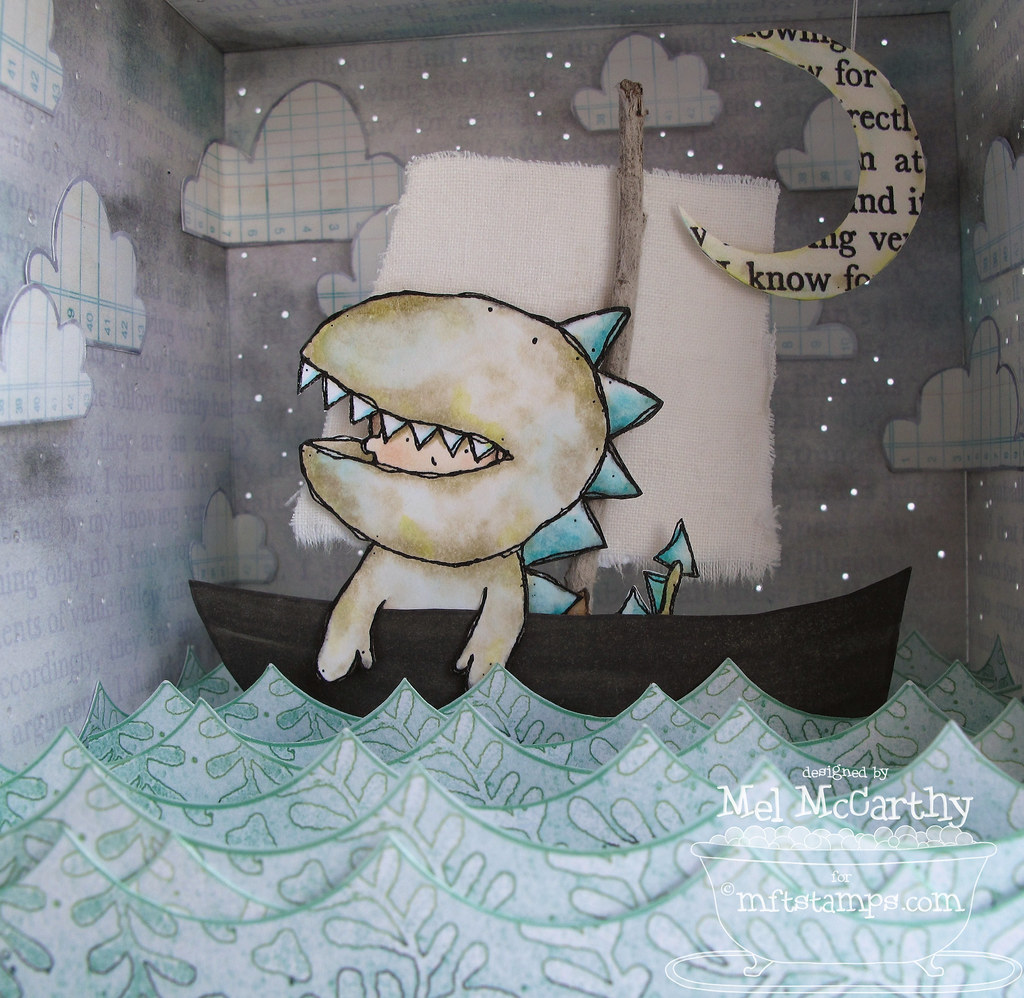
Here's that tutorial & freebies for that Loveosaurus diorama.
You can see this all at one glance in a slideshow
along with all the links to
the whole MFT team's great teasers here
This written tutorial, below, just has more description & the materials list, etc...


a little personal chat...
UH OH! Freeing up extra time has let the wild crafty thing out to play!
(Apologies in advance for how insanely long this (70-odd photo) tutorial is. Bad BAD craft beastie! I know, you may be shaking your head (Love you for it!).... All kidding aside, I think I may have a serious problem knowing when to stop. It's just so fun!)
However, your sage advice has helped me to set aside a block of time this week to start learning how to do video tutorials, so that should help prevent future disasters like this tutorial LOL. Been meaning to learn the ins & outs of video forever; I can be a very slow starter!
Hope this tickles your fancy some.
the front:

the side:

the inside:


1... Digital Stuff (Freebies to make a stage for the Loveosaurus stamp)
2... The template used for the box bottom & lid (MFT 4.5" box)
3... How to make this Loveosaurus Diorama
2... The template used for the box bottom & lid (MFT 4.5" box)
3... How to make this Loveosaurus Diorama
-1-

some freebies
Hopefully this free hybrid kit is something you can use with your kids
or use yourself just for fun, if you're a big kid at heart, like me. ;O)
Sheet #1 has...
the 3 pieces of the stage, the boat, the backdrop, & the clouds:
Click the photo or this link for the stage & scenery PDF:

or click here for the stage & scenery PNG
or click here for the stage & scenery JPG
(The sheet above is for printing & cutting out
This next one below is a labeled reference sheet) :o)
Click this link or the photo to download the REFERENCE sheet PDF
(not for printing) :o)

or click here for the REFERENCE sheet PNG
Sheet #2...
has all the waves:
Click the photo or this link for the waves PDF:

or click here for the waves PNG
or click here for the waves JPG
or
If your printer tends to print turquoise
as more warmer blue instead, you might want to try this greener
version of the waves (I used it on mine):
Click the photo or this link for the greener waves PDF:

or click here for the greener waves PNG
or click here for the greener waves JPG
Sheet #3 is...
a plain sheet of matching text paper
(in dark or light (to make the 4 side pieces):
Click the photo or this link for the text paper PDF:

or click here for the text paper PNG
or click here for the text paper JPG
and
Click the photo or this link for the DARK text paper PDF:

or click here for the DARK text paper PNG
or click here for the DARK text paper JPG
[All of the text used on these is a snippet scanned from the last page of Freud's
Civilization and Its Discontents. (I'm much more of a Jungian myself, but liked the word "illusion") LOL]

These were designed to work with
my MFT 4.5" square box templates ($3.95 here.)
Of course, you could make a card instead, or whatever strikes your fancy!
 &
&  ;0)
;0)
You are more than welcome to adapt any part of the freebies in
any fashion you would like for personal use:
If you do use these would you link to this post, pretty please? (if you put
your project on the internet somewhere) or let others know
where you found them. That way everyone can play, if they want! :-D
or use yourself just for fun, if you're a big kid at heart, like me. ;O)
Sheet #1 has...
the 3 pieces of the stage, the boat, the backdrop, & the clouds:
Click the photo or this link for the stage & scenery PDF:
or click here for the stage & scenery PNG
or click here for the stage & scenery JPG
(The sheet above is for printing & cutting out
This next one below is a labeled reference sheet) :o)
Click this link or the photo to download the REFERENCE sheet PDF
(not for printing) :o)
or click here for the REFERENCE sheet PNG
Sheet #2...
has all the waves:
Click the photo or this link for the waves PDF:
or click here for the waves PNG
or click here for the waves JPG
or
If your printer tends to print turquoise
as more warmer blue instead, you might want to try this greener
version of the waves (I used it on mine):
Click the photo or this link for the greener waves PDF:
or click here for the greener waves PNG
or click here for the greener waves JPG
Sheet #3 is...
a plain sheet of matching text paper
(in dark or light (to make the 4 side pieces):
Click the photo or this link for the text paper PDF:
or click here for the text paper PNG
or click here for the text paper JPG
and
Click the photo or this link for the DARK text paper PDF:
or click here for the DARK text paper PNG
or click here for the DARK text paper JPG
[All of the text used on these is a snippet scanned from the last page of Freud's
Civilization and Its Discontents. (I'm much more of a Jungian myself, but liked the word "illusion") LOL]

These were designed to work with
my MFT 4.5" square box templates ($3.95 here.)
Of course, you could make a card instead, or whatever strikes your fancy!
 &
&  ;0)
;0)You are more than welcome to adapt any part of the freebies in
any fashion you would like for personal use:
- Feel free to print, cut & use the backside for plain versions...
- Darken up the text or shapes...
- Change the colours to suit your printer or your taste...
- Print in black & white and ink or colour them...
- Cut bits up...
- Digitally alter it (for personal use)...
If you do use these would you link to this post, pretty please? (if you put
your project on the internet somewhere) or let others know
where you found them. That way everyone can play, if they want! :-D
-2-

...make this diorama box:

- MFT 4.5" square box templates ($3.95 here.)
- New stamp set from MFT: Loveosaurus
- ...stamped on Perfect paper panels
- ...with Black Brilliance ink, clear embossing powder & a heat gun
- Sweet tooth MFT heavy weight 100lb cardstock
- Hybrid Kit freebies (linked above); Computer & Printer
- Scissors/Paper cutter; scoring tools; pencil & eraser
- Copic markers (colours listed below)
- A stick, fabric, Mod Podge, cardstock (boat mast & sail)
- Beacon's 3 in 1 (strong glue)
- Chalk pastels & a paint brush/another distressing medium
- Paper piercer, needle & thread.

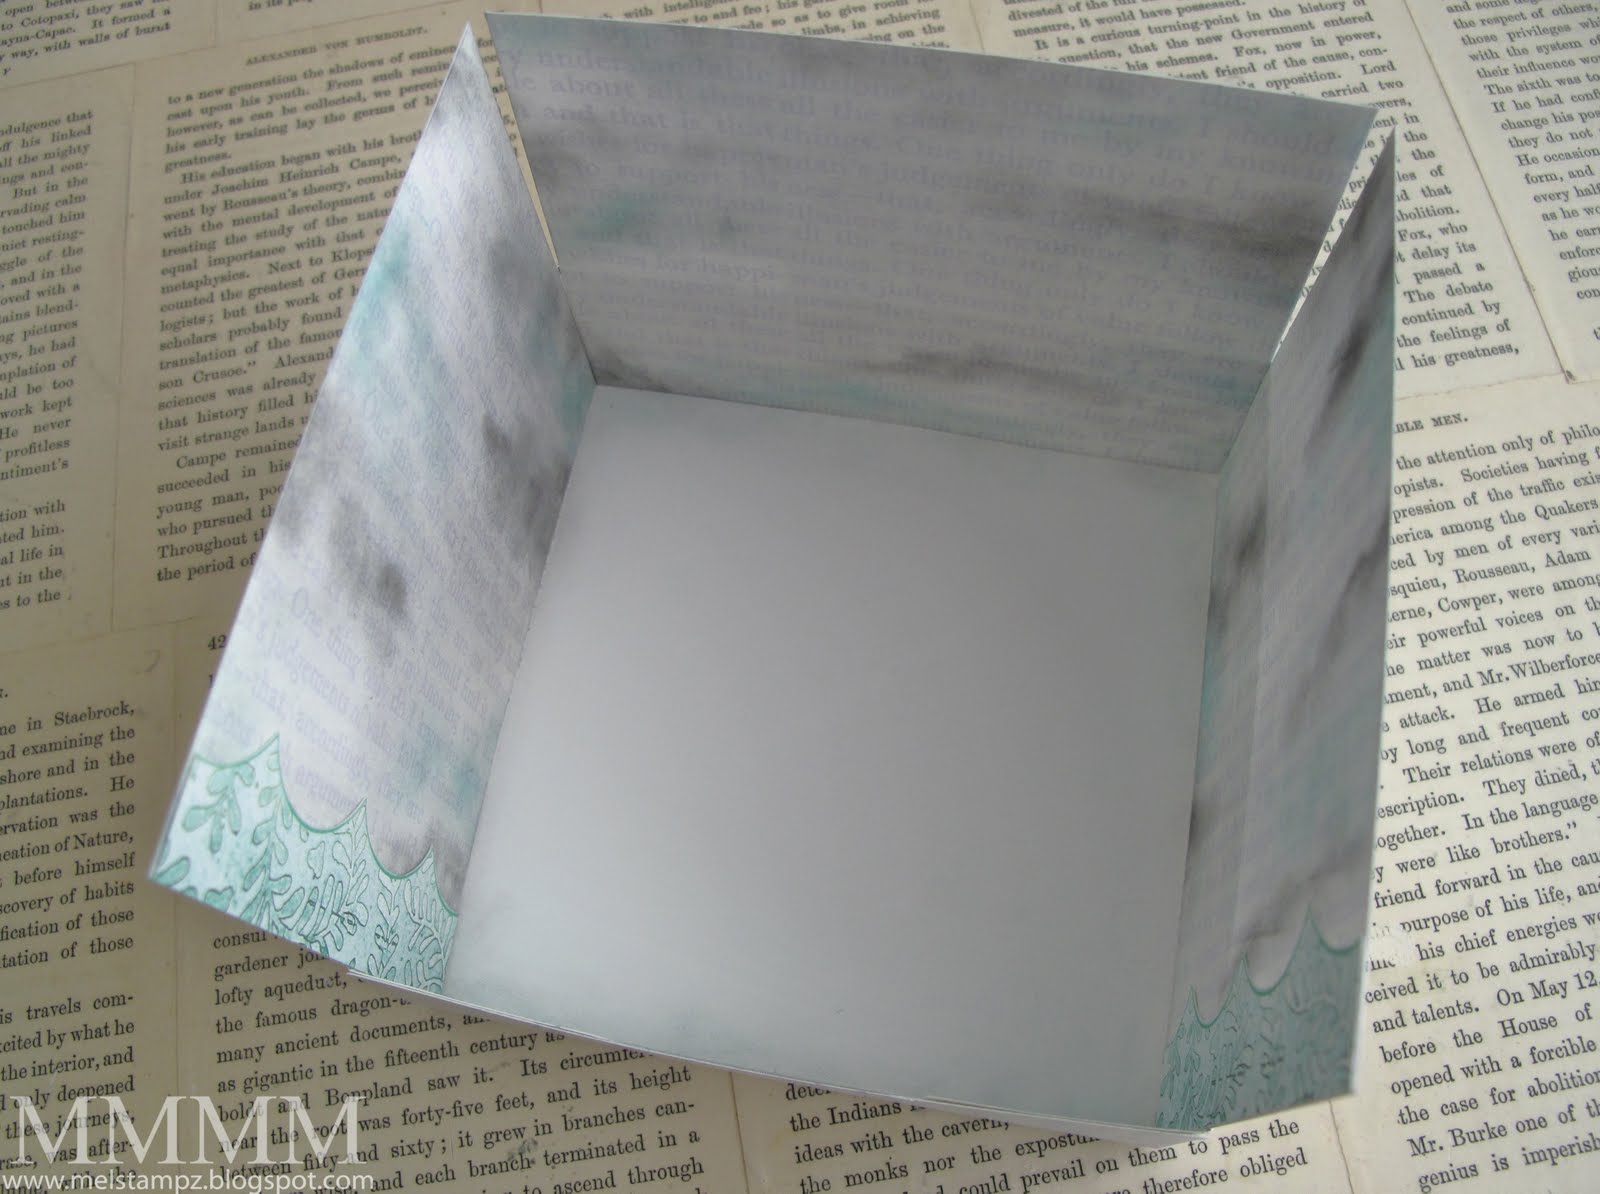
Making the Box Template:
Make the box bottom & lid: Print, cut, & score the MFT 4.5 inch Square Box templates for the bottom & the lid.

Print the box bottom. (I printed the light text freebie on the back side of it)

Print the box lid. (I printed the light text freebie on the both sides of it)

Score the bottom & lid. (I like to use a ruler & a paper piercer.)
I used the version of the MFT 4.5" box template that has no dotted lines just these tick marks to show where to score:

(that way it looks nice & clean when the box is done) :-D
Then cut and...

...crease the folds. [Don't assemble just yet, until you've had fun embellishing things.] :-D
Make the box bottom & lid: Print, cut, & score the MFT 4.5 inch Square Box templates for the bottom & the lid.

Print the box bottom. (I printed the light text freebie on the back side of it)

Print the box lid. (I printed the light text freebie on the both sides of it)

Score the bottom & lid. (I like to use a ruler & a paper piercer.)
I used the version of the MFT 4.5" box template that has no dotted lines just these tick marks to show where to score:

(that way it looks nice & clean when the box is done) :-D
Then cut and...
...crease the folds. [Don't assemble just yet, until you've had fun embellishing things.] :-D

Printing the Digital Stuff:
Print the 3 sheets of digital/hybrid freebies:


- Sheet #1 (stage, boat, backdrop, & clouds.)
- Sheet #2 (waves.)
- Sheet #3 (matching text to make the 4 side pieces.)
Print the text pieces:

A) Print the sheet of text paper onto cardstock
(I printed the light one double sided & one dark one)
Create the sky
A) Print the sheet of text paper onto cardstock
(I printed the light one double sided & one dark one)

(the side pieces & the backdrop):
Cut the paper pieces to extend the box sides with :
(Three of them will end up as sky & one will be a stage bottom)

Cut the sheet of double-sided light text paper into 3 pieces that each measure 4.5" x 3.5" inches (arranging the text as shown above, if you like.)
The backdrop:
(Use the light square piece of text from the hybrid stage kit)

Trim the backdrop to measure a hair under 4.5 inches square.
Embellishing:

Add cloud texture to the sides & backdrop.
I did this stuff to make these stormy skies...
...smudged all over the sky pieces with a black tinted Versamark pad (homemade by stamping dirty black stamps on an old one)
...Brushed on pastels with a paint brush (black & tuquoise)

Cut out the clouds & stick them on (some are popped up on foam tape & some are folded to go around the corner of the sides.)

Step 5) Stick two waves to the two tall side pieces of sky (those 4.5" x 3.5" pieces) so that their bottoms are on the side that measures 3.5 inches. Trim .5 of an inch off of the bottom of the 2 waves & trim the excess off of their sides to make the waves flush with the edge of the side piece. Adhere clouds up above the waves.

Make waves that stick up:
Make waves that stand up:

1A) Print the waves (in whichever colour you like best, or alter it to suit your printer or your taste) I used the greener wave (on the right.)

Step 2) Cut the 10 the waves out. (Set aside 3 waves to use later.)

2A) Cut the straight lines with a paper cutter, if you have one, to make the cutting faster & tidier.

2B) Cut the bottoms of the waves on the paper cutter as well.

2C) Cut the curvy wave bits by hand using scissors.

Step 3) Score several of the wave pieces at .5" (or 1/2 inch) from the flat bottom. Trim some of them shorter if you want variety in how the waves sit

Step 4) Adhere the scored waves to one of the side pieces (to the 4.5" wide x 3.5" deep piece that ends up being the stage bottom.) Adding adhesive to the long skinny tab made by scoring at .5" (or 1/2 inch.)
Little tip: If you'd like the waves staggered (so that they're not all lined up but staggered instead.) Adhere them so they're staggered:

Sticking the first one so it's flush with the left, then the second so that it's flush with the right & repeating for the rest of the waves.

Trim the edges flush with the side piece of the box.

The Star of the Show
(Loveosaurus & his boat):
(Loveosaurus & his boat):


Make the star of the show: Stamp the Loveosaurus: This little guy is heat embossed in black ink & clear embossing powder and a heat gun.

Colour him & cut him out (I coloured with Copic markers.)

Copic Colouring: Loveosaurus's dino suit: Putty YG91 (stippled in spots & blended well with colourless blender), Canary Yellow Y02, Cool Shadow BG10; his face: E50 egg shell & E00 skin white (cheeks); his hair: Clay E44; his dino spikes: shaded with Putty YG91 & added over these turquoise shades over that: Cool Shadow BG10; Frost Blue B00; Ice Ocean BG72; Duck Blue BG49 & his teeth: a wee bit of Frost Blue B00. the boat: quick stripes of warm Gray no 7 W7

Cutting pointer: I cut him so that his arms so they could hang over the edge of the boat (just snip up into the image; if you don't want any white to show where you've cut, you can colour the white cut edges with marker. I used the boat colour: Copic W7.)
His bottom half is cut off (poor fella) & his tail is cut off as well, so that it can stick out of the boat.
Adhere the Loveosaurus the back of the boat
Add the other boat bits:

Make fabric paper: Spread some Mod Podge on a piece of cardstock & stick some fabric to it. While the Mod Podge is wet, cut the fabric into a sail shape & fray it.
Adhere the sail to a stick (mast) Curl the damp Mod Podge fabric a bit, shaping with your hands. Lay it to dry over something like a marker to preserve the curve.

Adhere the mast to the back of the boat & reinforce with a strip of scrap paper. (I used Beacon's 3 in 1 adhesive. It held instantly--Love that stuff; just be sure to ventilate well.)

Stick the Loveosaurus & his boat to the back of one of the waves.

Make the Lid (window)
(the stage frame & curtains)
(the stage frame & curtains)

I've created this to work with Labels Nine Nestabilities by Spellbinders, since it's one of the Nesties that I bought. So you can use it if you have it, but you don't need it to make this box window.
To make a window without a die, just follow these steps:

Cut out:
- the stage frame (label-shaped piece with the text on it.)
- the stage platform (darker text piece that's a long rectangle)
- the stage base (rectangle with a label bit cut out of it at the bottom.)

Adhere the stage frame & platform temporarily to the outside of the box lid.

Trace the shape that the stage pieces form, with a pencil.

Remove the stage pieces & cut out the shape. Erase any remaining pencil line.
Tip: You can use a hobby blade, if you're comfortable with that, or just stab a sharp-tipped pair of scissors into the center of the shape you traced:

...hack out a rough shape:

(to make it easier to cut along the pencil line)

...and cut it out from there (I cut a ways in from the pencil line to make the window smaller than the stage pieces, so it wouldn't show)

Embellish & Adhere the 3 stage pieces:
Embellish the stage platform (plain rectangle piece.) I've embossed it in Versamark and clear embossing powder for a little shine.
I adhered the stage base to it, temporarily & pierced holes in it...

...then stitched on some large silver and clear seed beads:

(for stage lights)

Adhere the stage platform (smaller rectangle piece with the label cut out.) I used foam tape to stick it on as well.

Adhere the stage base (smaller rectangle piece with the label cut out.) I used foam tape to stick it on as well.
Cut out & embellish the stage frame
(large label shaped piece):

I've stuck curtains (made from pieces of ribbon) onto the back of the frame

...and used foam tape to stick a second stage frame onto it on for dimension.

(large label shaped piece):

I've stuck curtains (made from pieces of ribbon) onto the back of the frame
...and used foam tape to stick a second stage frame onto it on for dimension.
--Adhere the stage frame & Stick the last wave piece in behind it (I added black marker outline as a last minute crazy thing.)

The Assembly:

This is really basic:
- Assemble the box bottom.
- Stick the decorated sides on the inside of the bottom.
- Then assemble the lid & stick it on.
Here it is broken down step by step
with all the details I added
(just in case you'd to see 'em)...
with all the details I added
(just in case you'd to see 'em)...

Add a little chalk pastel to the perimeter of the box bottom (inside).

Assemble the box bottom (small tabs adhered on the inside.)

Stick the 3 side pieces onto the sides of the box bottom (the 3 pieces of sky with waves on them.

Adhere the backdrop piece in the bottom (of the bottom) ;o) (the 4.5" square piece with the clouds on it)

Add the rest of the clouds to the left & right sides
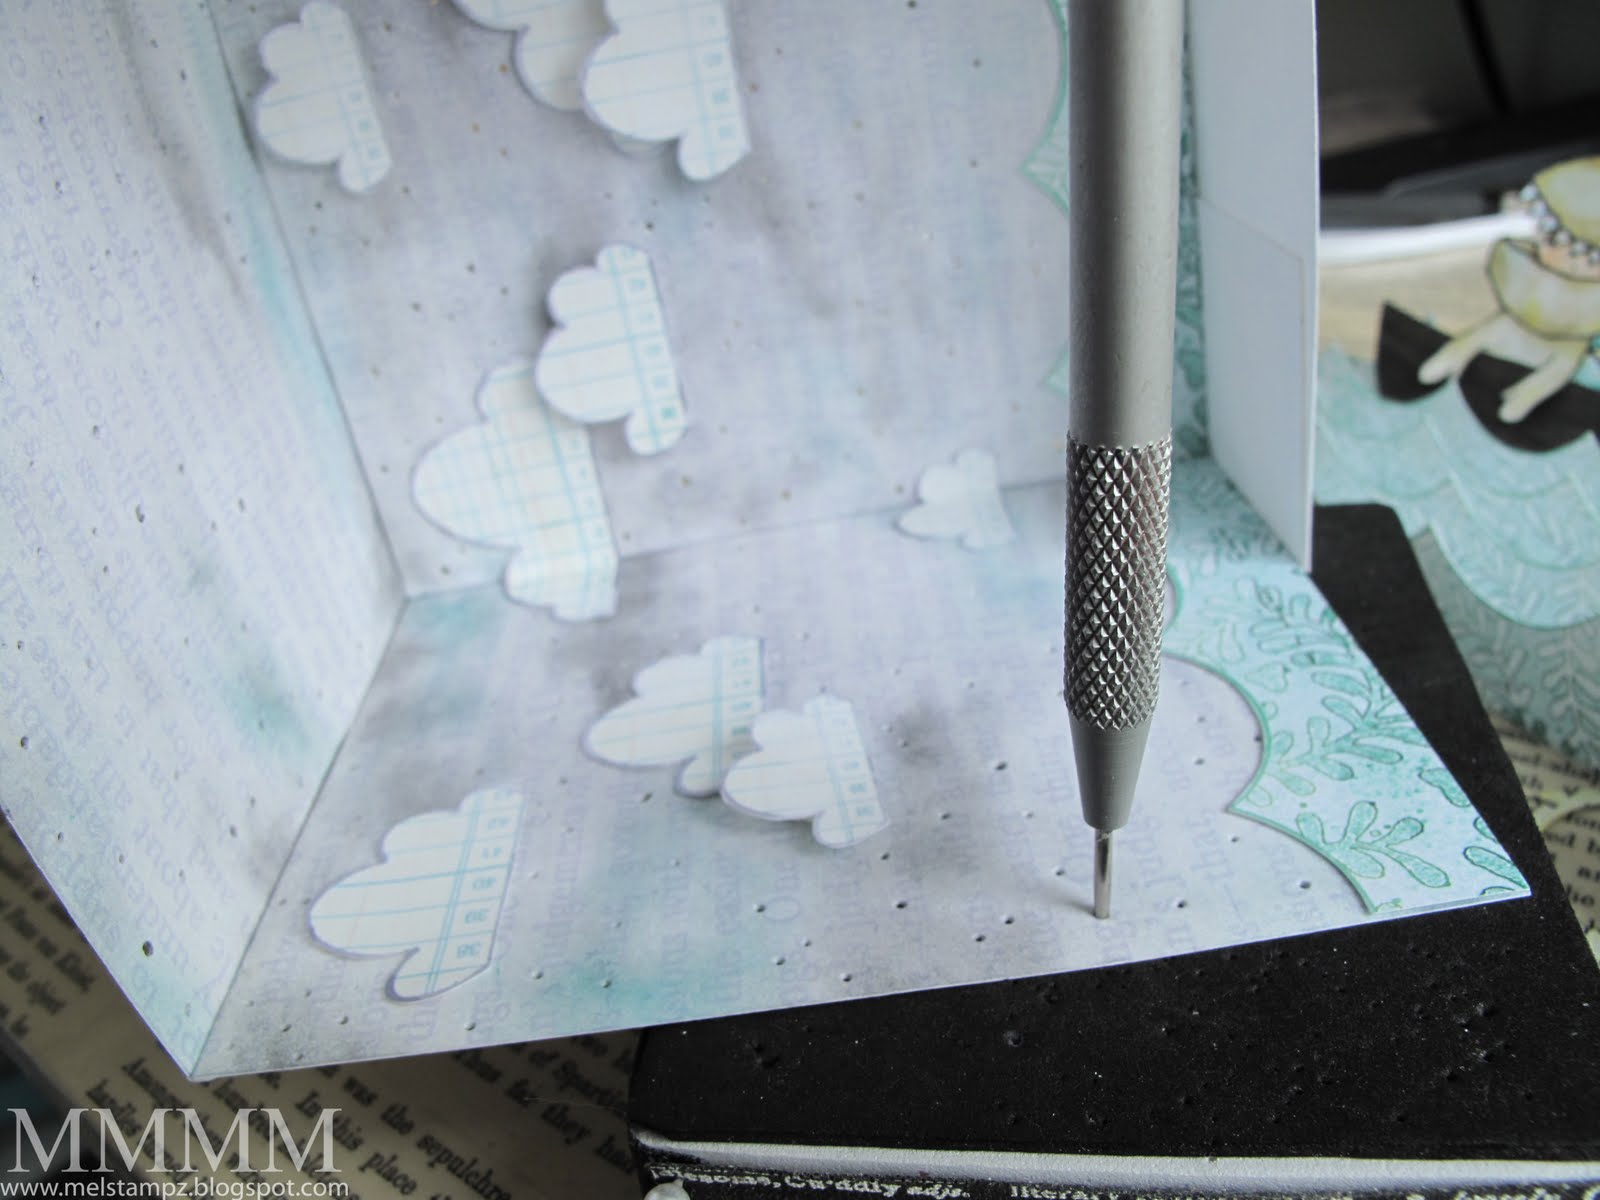
Pierce the sky to make stars with a paper piercer or a pin.
The stars will glitter from the daylight coming through the holes:

(It's SUCH fun!) :-D

Reinforce the sides with extra clouds (folded & stuck on)

Make a double-sided crescent moon. Trace something round to cut 2 moons from the paper scraps. (I traced a spool of thread.) Stick them to a threaded needle...

Pull the needle through one of the pierced star holes up to the top of the diorama. So you have a hanging moon:

(It will spin around) :-D

Adhere the stage bottom (the piece with the waves & the Loveosaurus in his boat)
Reinforce the bottom with some extra waves:

Two cut shorter, folded, & adhered to the bottom corners, left & right.

Two waves (left whole) scored & glued onto the bottom (again, left & right)
One wave (cut short) & adhered to finish up the front.

Stamp, cut, & colour a whole Loveosaurus & a Wild Thing sign (from one of the sentiments in the set.)

Cut his hands & adhere the sentiment so it looks like he's holding a sign.

Adhere the "wild thing" to the stage (lid)

Stick the lid onto the box...

Stick the lid onto the box...
And then you have a stage diorama...

box...

Happy International Scrap day!

P.S. Please forgive any glaring typos; they get the best of me with short posts even, so you can imagine how they might sneak in here... (Through the dyslexia door!)
And do you guys like the slideshow thing? Is it something you'd like to see more of or no?
And do you guys like the slideshow thing? Is it something you'd like to see more of or no?
P.P.S. If you'd like the matching ledger paper or some darker clouds,
please visit this post to download those freebies


please visit this post to download those freebies


0 comments:
Post a Comment