StampznewBright

  • Subscribe to our RSS feed.
  • Twitter
  • StumbleUpon
  • Reddit
  • Facebook
  • Digg

Friday, 26 February 2010

Babushka-Doll-shaped Swing Card

Posted on 00:02 by Unknown
This Babushka doll has some news for her husband...

Squigglefly Babushka Matrushka Momma melstampz

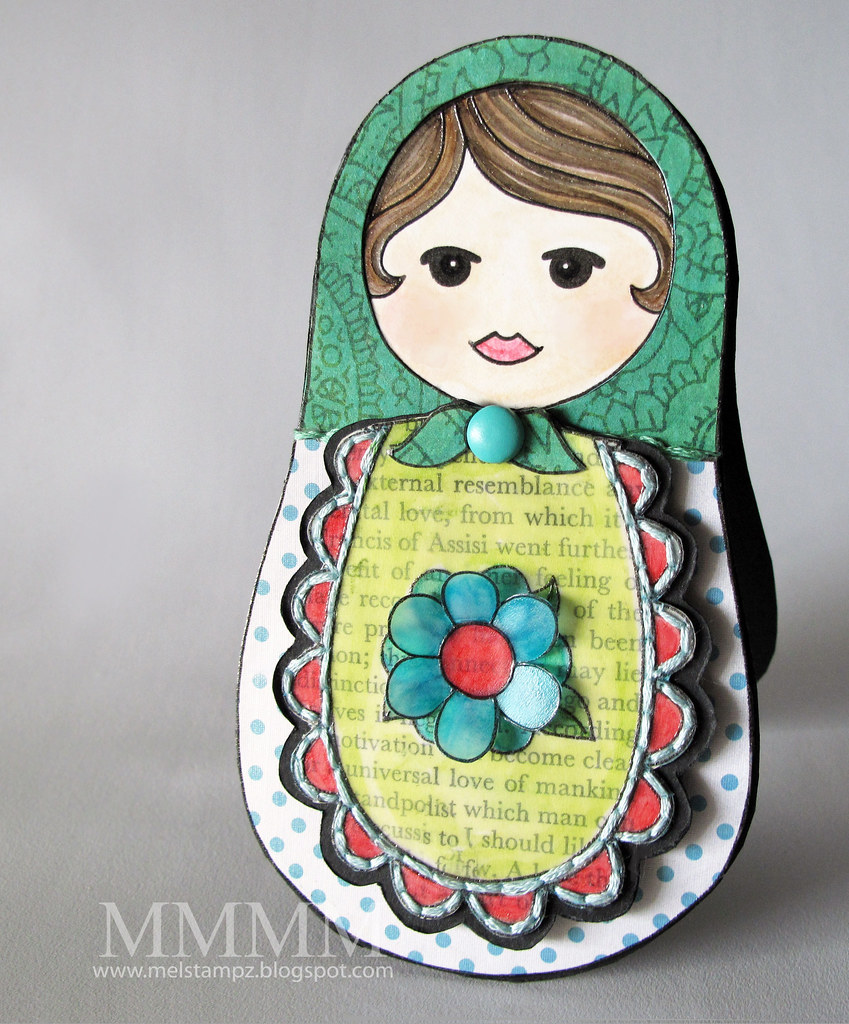
...She's expecting a...

Squigglefly OPEN Babushka Matrushka Baby melstampz

...baby Babushka!
(and no, Honey, this is not my way of trying to tell you something...heeheehee) ;o)


the Babushka Doll is a digital image

(from Squigglefly
)


...make this Babushka Swing card:


  • Digital Image: Babushka doll from Squigglefly
  • SRM's Quick Cards Baby Girl #52002
  • Inkjet printer, Vellum cardstock, clear embossing powder, heat gun
  • Neenah Classic Crest Solar white cardstock, matte medium
  • Dotted paper is (GCD Party it Up collection)
  • Copic markers, Book paper
  • Paper piercer, needle, & green & turquoise embroidery thread
  • Large BasicGrey brad,

making the basic shape & colouring her head:


A) Erase the flower--digitally--from the apron of the Squigglefly Olga Babushka Doll. (I used Photoshop to erase it.)

B) Print & emboss the doll 2 times on White cardstock (Once, for the face & the main shape & once for the apron bit.) To emboss it, I treated the paper with Matte Medium (Embossing note: this does change the way the paper takes Copic markers; it's quite different feel, but I like the digital embossing so much.

C) Colour the face & hair & cut the doll & the apron bit out.

a note on cutting (in other words, what I messed up here) ;o): In the photo above I cut out the apron & set it aside for later (to save paper) but in hindsight I would have just printed two of the dolls (with the flowers erased) and used one as a solid background (not cut) and one as the plain apron piece--since that would make it easier to work with. Clear as mud? ;o)


To make her look like a happy pregnant lady, I added a bit of Copic multiliner to her mouth (the aim was to make the corners of her mouth seem like they were going up in a bit of a Mona Lisa smile):

Mommy Matrushka Smile Squigglefly digi mel_stampz

I coloured her hair with these 3 Copic markers: E71Champagne, E44 Clay, & Warm Gray No-7 and her skin with E50 Eggshell, E00 Skin White, & Sugared almond pink RV02.

making the apron:


A) Print one of the the Babushka Dolls (I chose Olga) onto vellum cardstock, emboss the wet inkjet printer ink with clear embossing powder & heat gun it gently to melt the powder. Adhere the embossed vellum to book paper & cut it out.


B)
Adhere it to black cardstock & cut it out (leaving a bit of a black border)


C) Pierce around the scallop of the apron with a paper piercer, colour the vellum & stitch it with embroidery thread. Pierce a hole in the knot of the Babushka's scarf (for a brad later.)


Paper piecing

This is super easy since the shapes of this doll are so nice & simple, but of course you'll
just be sure to print your pieces using the same scale for all the pieces. :o)


A) Print the doll again to get the dotted patterned bottom--the dotted paper used here is from the GCD Party it Up collection. Like, vellum it lets you emboss from the printer because of the non-porous (metallic) finish.


B) Print the scarf (on patterned paper & cut it out) Cheap Trick: Want your paper bits another colour? Copic markers will do the trick. I used two Copic colours to match the BasicGrey brad: YG23 New Leaf & Aqua BG15.

(Sorry, can't for the life of me find the name of this paper. It has colourful orange/blue/green leaves on the other side.)

Adding the swinging apron
(and a baby Babushka):


Step 1) Colour the scallops on the dotted apron.


Step 2) Print & colour a teeny version of the doll (as a wee baby to match Mommy.) Cut the baby image out.


Step 3) Adhere baby the white cardstock apron bit (with the scallops cut off) Stick some SRM sentiment stickers onto it. (These are from SRM's Quick Cards Baby Girl #52002)


Step 4) Adhere baby in the Matrushka-Babushka Mommy's Tummy--so it will show from under the swinging apron.


Step 5) Cut the scarf into three pieces & Adhere the two scarf ends to the vellum apron section. If you don't have a matching brad, you can make one by gluing the paper-pieced center knot of the scarf onto any brad you have. I just discarded it, since the BasicGrey brad matched.


Step 6) Use a brad to attach the apron...


....so that it swings open...


and you can see the itty bitty baby Babushka in her tummy!

Step 7) Add an extra 3D flower:


(this one is embossed on vellum & coloured with Copics)

Making the card base:


Make a Babushka shaped card:

A) Fold a piece of cardstock (I used a standard piece of black cardstock folded on the diagonal to get it long enough.)

B) Trace the Babushka shape onto it (making sure it overlaps a little to keep a fold intact in the card (at the top, or wherever you prefer.)

C) Cut it out and...

...then mount the Babushka on the front of the card:

...and there she is...

these are click-able Blogger photos (to enlarge)


Thank You so much for taking time to visit;
hope you
have an amazing day!


(click to visit the blog from an email or reader)
Email ThisBlogThis!Share to XShare to FacebookShare to Pinterest
Posted in Digital-Images, Faves, Squigglefly, techniques, Tutorials | No comments
Newer Post Older Post Home

0 comments:

Post a Comment

Subscribe to: Post Comments (Atom)

Popular Posts

  • free Butterfly Silhouette .studio cut files (in 3 styles)
    Hi, All! Here are those butterfly Silhouette .studio cut files. They are for only for the Silhouette machine... But I do hope to share other...
  • DIY digital paper (some freebies)
    The lull in posts (over the last couple of days) was for me to finish up this looooong post I've been wanting to share with you for eons...
  • New Popcorn Box template set (pretty stamp room storage) :o)
    Are you in the mood for a template or two? I was going to wait until I had really good photos and a full pictorial, but then I would take fo...
  • Missing with a migraine, Craft room BEFORE pics, & LINKs for Organizing the craft room
    Edited to add: Sorry guys. I feel like I was hit by a truck. Migraine's lasted so long... but I will be back with a post by tomorrow eve...
  • Graphics Fairy Inspiration (+vintage printables)
    Thank You all so much for your wonderful comments about the papers I've been obsessed with. Your kind words make me grin so big that I g...
  • "Honey, I shrunk the stationery!" (Hero Arts typewriter notebook)
    Still trying to make more of my cards into little gifts. This Hero Arts typewriter card is another take on the card turned refillable notebo...
  • 3 Clean And Simple cards (with SRM stickers)
    You guys may know that I was tragically born without the gene that let's you achieve a C lean A nd S imple card. ;-) Not sure why I find...
  • Making Your Own Colour Shimmer Sprays--Links & Info
    Info & Links Links for how to Mak e yo ur o w n Sh im mery s prays: (These are for you sweet Beth! oxo) ( more info on these colours in...
  • over 100 free pattern overlays ... at a glance
    Would you believe that the free overlay total is at 139 overlays and counting? (I might have a wee little addiction) ;-) Since overlays can ...
  • Felt-based cards (Rock-a-Bye Baby tutorial)
    New idea, Old projects.... I've been debating whether or not to post some older projects/tutorials since the big bad insecurity beast...

Categories

  • 'Mouse'-the-cat (10)
  • *TEMPLATEs (98)
  • 3D-projects (144)
  • A-Day-For-Daisies (7)
  • Amber Ink (9)
  • Angel's-Landing (2)
  • BASICS (47)
  • Blogging-tips (7)
  • Caardvarks (48)
  • Cat's-Pajamas (2)
  • cheap-tricks (224)
  • Christmas (33)
  • Claire-Keay (2)
  • Cricut (3)
  • cut-file (2)
  • Cuttlebug (45)
  • decor (6)
  • Digital-Images (131)
  • Distress-Inks-etc (14)
  • DIYstamps (1)
  • Eat-Cake-Graphics (11)
  • Faves (207)
  • Fred-She-Said (5)
  • Freebies (77)
  • GESSO (9)
  • Halloween (10)
  • Heather Ellis (3)
  • Hero-Arts (14)
  • ISC (7)
  • Jessica-Sprague (2)
  • Just-Rite (2)
  • LPS (63)
  • Mo's-Digital-Pencil (16)
  • My-Favorite-Things (33)
  • organizing (7)
  • Other-People's-Tutorials (36)
  • Paper-Garden-Projects (54)
  • Paper-Temptress (39)
  • Punches (21)
  • Purple-Onion-Designs (23)
  • S.U. (1)
  • SCOR-PAL (4)
  • silhouette (4)
  • Skipping-Stones-Design (7)
  • Squigglefly (6)
  • SRM-Stickers (8)
  • techniques (191)
  • templates (26)
  • Tiffany-Doodles (4)
  • Tutorials (252)

Blog Archive

  • ►  2013 (16)
    • ►  July (4)
    • ►  June (4)
    • ►  May (3)
    • ►  April (1)
    • ►  March (1)
    • ►  February (3)
  • ►  2012 (53)
    • ►  December (2)
    • ►  November (2)
    • ►  October (1)
    • ►  August (3)
    • ►  July (2)
    • ►  June (5)
    • ►  May (7)
    • ►  April (8)
    • ►  March (9)
    • ►  February (13)
    • ►  January (1)
  • ►  2011 (74)
    • ►  December (1)
    • ►  November (5)
    • ►  October (10)
    • ►  September (9)
    • ►  August (12)
    • ►  July (5)
    • ►  June (9)
    • ►  May (2)
    • ►  April (6)
    • ►  March (7)
    • ►  February (4)
    • ►  January (4)
  • ▼  2010 (84)
    • ►  December (7)
    • ►  October (1)
    • ►  September (6)
    • ►  August (1)
    • ►  June (1)
    • ►  May (7)
    • ►  April (21)
    • ►  March (3)
    • ▼  February (17)
      • MFTeaser Joy Ride! (and painting chit chat too)
      • Babushka-Doll-shaped Swing Card
      • Caardvarks SRM sticker tutorial & Squigglefly pears
      • Caardvarks (mojolicious) SRM Stickers Challenge!
      • Squigglefly Baby--Towels & Teensy Bathmat tutorial
      • And now we bring you... today's short delay (Googl...
      • What's Crackin? A VIP hop! (+Milk-painted "wooden"...
      • Fond Farewell: Mo Valentine's ATC matchbox
      • Embossed Fred Flowers--from Caardvarks Wedding Bou...
      • It's Here! it's Here! Caardvarks "Get Published" ...
      • Squigglefly Bubbly Baby! (and a very personal note...
      • Squigglefly sneak peek (technical difficulties)
      • MFT Hop!!! Chocolate anyone?
      • SCS excitement!!!!!!!!
      • MFTeaser--the last day! Lovin From the Oven (gift ...
      • New MFT Illustrator! (and MFTeaser tutorial)
      • MFTeaser Day #3--New Pure Innocence Sets! (Warning...
    • ►  January (20)
  • ►  2009 (234)
    • ►  December (16)
    • ►  November (21)
    • ►  October (11)
    • ►  September (23)
    • ►  August (29)
    • ►  July (26)
    • ►  June (10)
    • ►  May (16)
    • ►  April (26)
    • ►  March (22)
    • ►  February (27)
    • ►  January (7)
  • ►  2008 (39)
    • ►  December (14)
    • ►  November (25)
Powered by Blogger.

About Me

Unknown
View my complete profile