StampznewBright

  • Subscribe to our RSS feed.
  • Twitter
  • StumbleUpon
  • Reddit
  • Facebook
  • Digg

Saturday, 27 February 2010

MFTeaser Joy Ride! (and painting chit chat too)

Posted on 21:30 by Unknown
Welcome to day 2 of MFTeasers & thanks for stopping in! If you missed yesterday's teasers for "I want candy" you can find them all linked up on Kim's blog. Such sweet stuff those gals made!

You can see all of today's My Favorite Things teasers on Kim's blog too
(starting at 11:00am EST.)

MFTeaser Joy Ride mel stampz

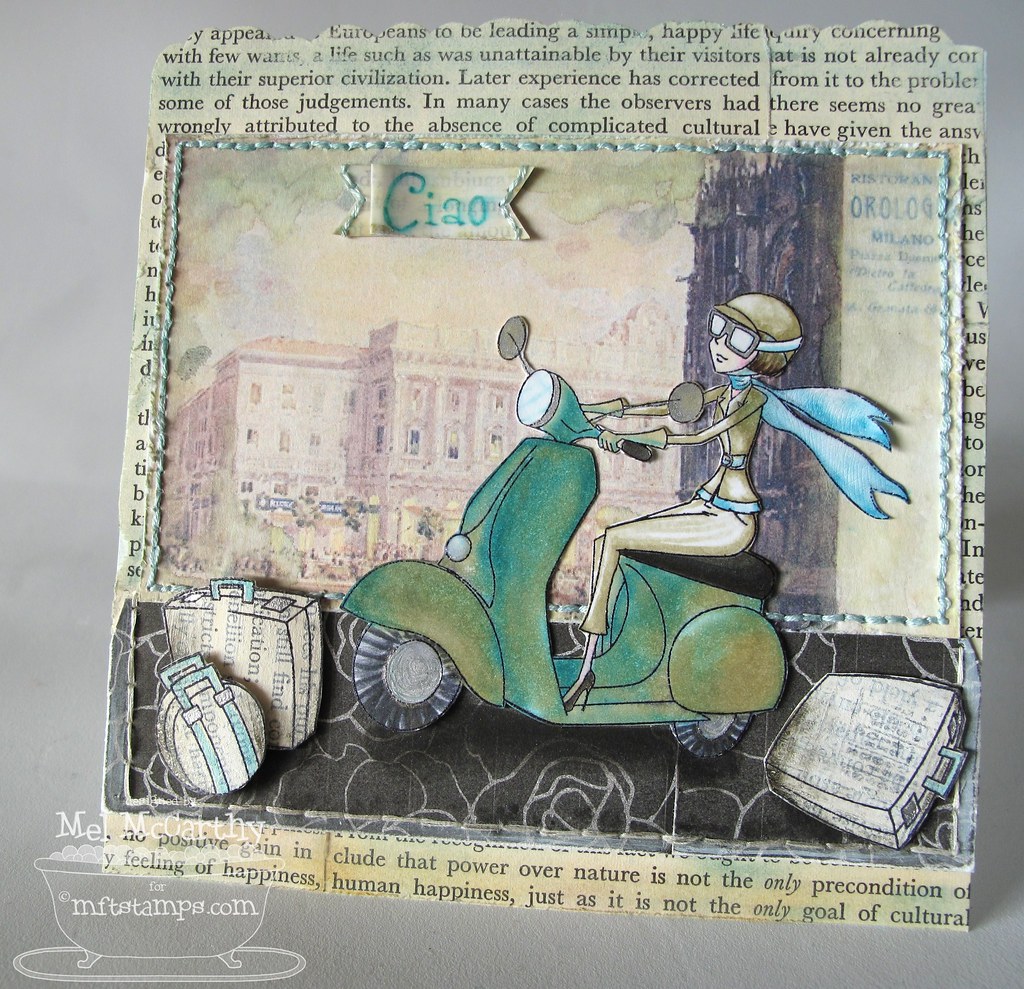
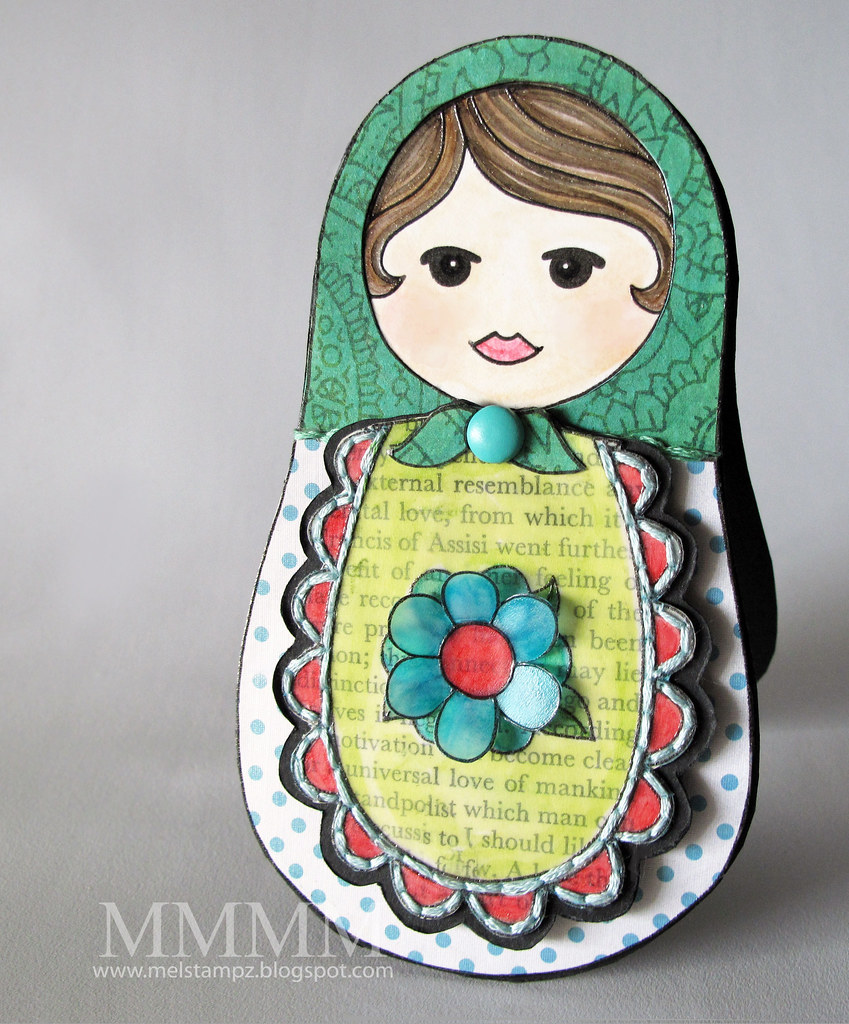
Today, a card to share
(as a teaser for My Favorite Things new set Joy Ride)

I love the Vespa madly:

MFTeaser Joy Ride vroom vroom mel stampz

It was coloured with two shades of Copic marker: Aqua & Putty.
(and check out her heels, hey? giggle giggle.)

The lights have Crystal Lacquer on them to make 'em look like glass:

MFTeaser Joy Ride GLOSSY lights mel stampz

(and her oh so fashionable goggles have some glassy lacquer too.)

These suitcase stamps make me grin (They're in the Joy Ride stamp set too.)
(don't know why, but I have a real thing for suitcases.)

MFTeaser Joy Ride SUITcase mel stampz

These ones were stamped on book paper that was painted with whit acrylic paint &
stamped with a background number stamp while the paint was wet. Then they're distressed with Copic marker (Warm Gray no-7)

MFTeaser Joy Ride Suitcases mel stampz

(and coloured with an Aqua Copic marker & silver metallic pen.)
I can't wait to paper piece these suitcases!

The "Ciao" sentiment is also part of the Joy Ride set.
Here, it's on a stitched flag thinger:

MFTeaser Joy Ride SENTIMENT mel stampz

To make the background, I printed out a vintage postcard & painted around the edges with water to antique it (Then glued some book paper to the 5 1/2 inch square card, cut a free-hand cloud shape on the top & chalked it to add colour.)

and that's it...


(Clickable Blogger photo--in case the flickr one don't work for ya)

On a chit-chatty moving painting life note: I'm so excited to have started painting our new place today! Sore but so thrilled. We had to pick the colour having only seen the place once (and not remembering the kitchen cupboard finish or counters etc.) Charles was in a rush to get back & watch Olympic hockey & he needed to drop me off to paint today.

So... "we" went for a Expressions Gallery Sparrow Grey a Rona brand...(I got to be the boss of paint.) ;o) As I started rolling on the paint, it looked a fair bit purple (fine if ya like purple, but we were going for warm grey & I thought to meself: "Eeep, Charles is not going to like this!") It dried wonderfully, though. Never been more pleased with a paint shade in all my years of painting (and i mean LOTs of painting! methinks I've moved more times than the circus.) Better yet, C is twitterpated with the paint colour too (as twitterpated as C gets over paint, that is!) ;o) Ahhhhhhh life is good.

And no VOC paint seems to make quite the difference...

If your curious what our paint colour looks like; it looks something like this (the top two photos) but our household "stuff" is not nearly that hip! :o)


Here's the link again where you can find all the project links to today's
My Favorite Things teasers on Kim's blog
. ;O)


Thank You SO much for stopping in;
hope your day is simply fantabulous!


(click to visit the blog from an email or reader)
Read More
Posted in Faves, My-Favorite-Things | No comments

Friday, 26 February 2010

Babushka-Doll-shaped Swing Card

Posted on 00:02 by Unknown
This Babushka doll has some news for her husband...

Squigglefly Babushka Matrushka Momma melstampz

...She's expecting a...

Squigglefly OPEN Babushka Matrushka Baby melstampz

...baby Babushka!
(and no, Honey, this is not my way of trying to tell you something...heeheehee) ;o)


the Babushka Doll is a digital image

(from Squigglefly
)


...make this Babushka Swing card:


  • Digital Image: Babushka doll from Squigglefly
  • SRM's Quick Cards Baby Girl #52002
  • Inkjet printer, Vellum cardstock, clear embossing powder, heat gun
  • Neenah Classic Crest Solar white cardstock, matte medium
  • Dotted paper is (GCD Party it Up collection)
  • Copic markers, Book paper
  • Paper piercer, needle, & green & turquoise embroidery thread
  • Large BasicGrey brad,

making the basic shape & colouring her head:


A) Erase the flower--digitally--from the apron of the Squigglefly Olga Babushka Doll. (I used Photoshop to erase it.)

B) Print & emboss the doll 2 times on White cardstock (Once, for the face & the main shape & once for the apron bit.) To emboss it, I treated the paper with Matte Medium (Embossing note: this does change the way the paper takes Copic markers; it's quite different feel, but I like the digital embossing so much.

C) Colour the face & hair & cut the doll & the apron bit out.

a note on cutting (in other words, what I messed up here) ;o): In the photo above I cut out the apron & set it aside for later (to save paper) but in hindsight I would have just printed two of the dolls (with the flowers erased) and used one as a solid background (not cut) and one as the plain apron piece--since that would make it easier to work with. Clear as mud? ;o)


To make her look like a happy pregnant lady, I added a bit of Copic multiliner to her mouth (the aim was to make the corners of her mouth seem like they were going up in a bit of a Mona Lisa smile):

Mommy Matrushka Smile Squigglefly digi mel_stampz

I coloured her hair with these 3 Copic markers: E71Champagne, E44 Clay, & Warm Gray No-7 and her skin with E50 Eggshell, E00 Skin White, & Sugared almond pink RV02.

making the apron:


A) Print one of the the Babushka Dolls (I chose Olga) onto vellum cardstock, emboss the wet inkjet printer ink with clear embossing powder & heat gun it gently to melt the powder. Adhere the embossed vellum to book paper & cut it out.


B)
Adhere it to black cardstock & cut it out (leaving a bit of a black border)


C) Pierce around the scallop of the apron with a paper piercer, colour the vellum & stitch it with embroidery thread. Pierce a hole in the knot of the Babushka's scarf (for a brad later.)


Paper piecing

This is super easy since the shapes of this doll are so nice & simple, but of course you'll
just be sure to print your pieces using the same scale for all the pieces. :o)


A) Print the doll again to get the dotted patterned bottom--the dotted paper used here is from the GCD Party it Up collection. Like, vellum it lets you emboss from the printer because of the non-porous (metallic) finish.


B) Print the scarf (on patterned paper & cut it out) Cheap Trick: Want your paper bits another colour? Copic markers will do the trick. I used two Copic colours to match the BasicGrey brad: YG23 New Leaf & Aqua BG15.

(Sorry, can't for the life of me find the name of this paper. It has colourful orange/blue/green leaves on the other side.)

Adding the swinging apron
(and a baby Babushka):


Step 1) Colour the scallops on the dotted apron.


Step 2) Print & colour a teeny version of the doll (as a wee baby to match Mommy.) Cut the baby image out.


Step 3) Adhere baby the white cardstock apron bit (with the scallops cut off) Stick some SRM sentiment stickers onto it. (These are from SRM's Quick Cards Baby Girl #52002)


Step 4) Adhere baby in the Matrushka-Babushka Mommy's Tummy--so it will show from under the swinging apron.


Step 5) Cut the scarf into three pieces & Adhere the two scarf ends to the vellum apron section. If you don't have a matching brad, you can make one by gluing the paper-pieced center knot of the scarf onto any brad you have. I just discarded it, since the BasicGrey brad matched.


Step 6) Use a brad to attach the apron...


....so that it swings open...


and you can see the itty bitty baby Babushka in her tummy!

Step 7) Add an extra 3D flower:


(this one is embossed on vellum & coloured with Copics)

Making the card base:


Make a Babushka shaped card:

A) Fold a piece of cardstock (I used a standard piece of black cardstock folded on the diagonal to get it long enough.)

B) Trace the Babushka shape onto it (making sure it overlaps a little to keep a fold intact in the card (at the top, or wherever you prefer.)

C) Cut it out and...

...then mount the Babushka on the front of the card:

...and there she is...

these are click-able Blogger photos (to enlarge)


Thank You so much for taking time to visit;
hope you
have an amazing day!


(click to visit the blog from an email or reader)
Read More
Posted in Digital-Images, Faves, Squigglefly, techniques, Tutorials | No comments

Monday, 22 February 2010

Caardvarks SRM sticker tutorial & Squigglefly pears

Posted on 21:10 by Unknown


Another card for the Caardvarks SRM sticker challenge...

Caardvarks SRM stickers mel stampz

I'm calling this a technique a "vellum sticker-sentiment collage" (since you could collage all kinds of phrases & things under the vellum image...and/or stamp...) but secretly I think I just like to say the big fancy word "collage." ;O) It's really just sticking some sentiment stickers on cardstock & adding a reverse-coloured vellum image over it. LOL.

The Squigglefly Pears image is heat embossed on vellum cardstock, out of an inkjet printer (just print, sprinkle on clear embossing powder, & heat set with a heat gun):

kisses

and the SRM sentiment stickers show through the vellum.


1... Caardvarks sticker Challenge & SRM stickers links
2...Image used here (Squigglefly Pears!)
3...How to make a vellum sticker collage with a speedily embossed digital image

-1-


Have you seen the crew cards & the entries for the
latest Caardvarks Challenge? Gorgeous stuff!

See it all here at...

(Sticker Challenge!) Hope you can play with us!
&
Links for the SRM stickers...


Click to visit the SRM store
or
The SRM Design Team blog

-1-


When I saw this image I knew i hadda buy it.

Am I completely crazy, or do the two pears on the left look like a couple of smoochy
people in love? (I think the pair of pears on the right might be jealous--or just married for a long time. hehehe) ;O)


Squigglefly Pears (digital image)

I've always wanted to colour me some bright green pears.
Pears are oddly nostalgic for me. We had pear trees growing up. I used to stash some pears I'd picked under my pillow & in my embroidery basket--for some weird reason. It wasn't pretty when I forgot them there (as you can well imagine.) I really love pears. Unripe ones especially. Do you like pears? Got any unusual fruit memories?


...make a vellum sticker collage
(with a speedily embossed digital image)


  • Squigglefly Pears (digital image) printed on Heavyweight vellum
  • ...with inkjet printer ink, clear embossing powder & heat gun
  • Neenah Classic Crest Solar White 100#
  • Black Pop Tones 100lb cardstock from MFT
  • Glue Glider Pro adhesive gun & Tombow monomulti
  • Paper piercer, needle & black thread
  • Copic markers
  • May Arts ribbon--double faced satin HA66

You can click these photos for a closer look, if you like:


Step 1) Heat emboss the digital image from an inkjet printer. Print Squigglefly Pears digital image on vellum cardstock. Sprinkle clear e.p. on wet inkjet printer in & use heat-gun to melt it.


Step 2) Trim the image, flip it over & colour on the back unembossed side of the vellum with Copic markers (or your choice of colouring medium for vellum.)

Copic colours used here: YG11 Mignonette, YG23 New Leaf, Yellowish Green YG06, YG67 Moss, and to make the bride & groom pair of pears blush: R35 Coral (Here comes the Blushing Bride Blushing Bartlet, giggle giggle)

For the brownish-gray base, I used Warm Gray W-7 allover, with shadows of Black 100, & cool gray C-7


Step 3) Tape the image to a window or light box--in order to add the stickers under the image--vellum side facing you--for the collage look (and get them placed just so...)


Step 4) Next tape up your cardstock over it (this layer will end up under the vellum image when it's all put onto your card.) While the cardstock is on the window, atop the vellum, adhere the stickers to the cardstock--in the places where you want them to show through the vellum.

I've used white cardstock to try and make the colours pop, but you could use any colour or pattern you like, of course.


Step 5) Line the image & sentiments up: Place the vellum image over the SRM sticker sentiment "collage" (no adhesive yet at this point) & trim or mark it according to how you want it to sit.


Step 6) Adhere the embossed vellum image over top of the SRM stickers (embossed side up with the colouring on the back.) I like a VERY thin application of tombow monomulti, mostly because it's what I have on hand & it seems to disappear fairly well under the vellum.


Step 7) Pierce around the image to make holes for easy hand sewing (or faux sewing) (As an afterthought, I decided to add more piercing to this later for a more distressed stitching look, as you can see in the next photo...)


Step 8) Stitch the image with black thread (extra distressed style) ;o)


Step 9) Distress the cardstock edges (using the edge of your scissors, your fingernails, or a distressing tool.


Step 10) Add inky distressing with a Copic marker. This is Warm Gray no 1 (very lightly applied.)


Step 11) Adhere a strip of green satin may arts ribbon to a black standard A2 sized card & then stick the sticker collage pear image on.


Step 12) Create an SRM sticker sentiment frame. This one is very distressed (on purpose) ;o) The SRM "mr. & mrs." sticker is trimmed to fit-then pasted on paper (stamped with words & acrylic painted.) Sticker corners roughed up like crazy & a little bit of stazon ink (a very very little bit of black Stazon ink on a finger tip) is rubbed here & there.


Step 13) Stitch black crystal beads to cover the holes of the hardware frame & embellish it. (This was a cream metal frame-but now it's covered with black stazon & silver zigpainty pen)

Step 14) Finally, Make a bow & add it to the card with the sticker sentiment frame:


(click-able Blogger photo)

Last but not least, the bow was made with a tool called a Bow Easy. Thanks to my fantabulously sweet & generous friend Dawn. She surprised me & sent me one with this stunning creation---and I'm in bow heaven now! Thank You Dawn!!! You sure are a darlin'! Mwah!

Never tried a Bow Easy? You won't believe it. Here's a video or two:

Suzanne's perfect Bow Easy video tutorial (so easy to follow)

Gina's great video tutorial on the bow easy with a cool double-looped bow & a nifty trick using thread


Thanks for stopping in!


(click to visit the blog from an email or reader)

P.S. Moving & Blogging....All the packing is a tad nerve-wracking, but we're so excited to be moving to our new place in Port Moody. ;O) Posts will sadly continue to be a little sparse, since I have to pack up my crafting goodies... BUT starting on the 27th I'll have a few days of MFT projects to share with ya. Thanks for your continued patience! :o)

Read More
Posted in Caardvarks, Squigglefly, SRM-Stickers | No comments
Newer Posts Older Posts Home
Subscribe to: Posts (Atom)

Popular Posts

  • free Butterfly Silhouette .studio cut files (in 3 styles)
    Hi, All! Here are those butterfly Silhouette .studio cut files. They are for only for the Silhouette machine... But I do hope to share other...
  • DIY digital paper (some freebies)
    The lull in posts (over the last couple of days) was for me to finish up this looooong post I've been wanting to share with you for eons...
  • New Popcorn Box template set (pretty stamp room storage) :o)
    Are you in the mood for a template or two? I was going to wait until I had really good photos and a full pictorial, but then I would take fo...
  • Missing with a migraine, Craft room BEFORE pics, & LINKs for Organizing the craft room
    Edited to add: Sorry guys. I feel like I was hit by a truck. Migraine's lasted so long... but I will be back with a post by tomorrow eve...
  • Graphics Fairy Inspiration (+vintage printables)
    Thank You all so much for your wonderful comments about the papers I've been obsessed with. Your kind words make me grin so big that I g...
  • "Honey, I shrunk the stationery!" (Hero Arts typewriter notebook)
    Still trying to make more of my cards into little gifts. This Hero Arts typewriter card is another take on the card turned refillable notebo...
  • 3 Clean And Simple cards (with SRM stickers)
    You guys may know that I was tragically born without the gene that let's you achieve a C lean A nd S imple card. ;-) Not sure why I find...
  • Making Your Own Colour Shimmer Sprays--Links & Info
    Info & Links Links for how to Mak e yo ur o w n Sh im mery s prays: (These are for you sweet Beth! oxo) ( more info on these colours in...
  • over 100 free pattern overlays ... at a glance
    Would you believe that the free overlay total is at 139 overlays and counting? (I might have a wee little addiction) ;-) Since overlays can ...
  • Felt-based cards (Rock-a-Bye Baby tutorial)
    New idea, Old projects.... I've been debating whether or not to post some older projects/tutorials since the big bad insecurity beast...

Categories

  • 'Mouse'-the-cat (10)
  • *TEMPLATEs (98)
  • 3D-projects (144)
  • A-Day-For-Daisies (7)
  • Amber Ink (9)
  • Angel's-Landing (2)
  • BASICS (47)
  • Blogging-tips (7)
  • Caardvarks (48)
  • Cat's-Pajamas (2)
  • cheap-tricks (224)
  • Christmas (33)
  • Claire-Keay (2)
  • Cricut (3)
  • cut-file (2)
  • Cuttlebug (45)
  • decor (6)
  • Digital-Images (131)
  • Distress-Inks-etc (14)
  • DIYstamps (1)
  • Eat-Cake-Graphics (11)
  • Faves (207)
  • Fred-She-Said (5)
  • Freebies (77)
  • GESSO (9)
  • Halloween (10)
  • Heather Ellis (3)
  • Hero-Arts (14)
  • ISC (7)
  • Jessica-Sprague (2)
  • Just-Rite (2)
  • LPS (63)
  • Mo's-Digital-Pencil (16)
  • My-Favorite-Things (33)
  • organizing (7)
  • Other-People's-Tutorials (36)
  • Paper-Garden-Projects (54)
  • Paper-Temptress (39)
  • Punches (21)
  • Purple-Onion-Designs (23)
  • S.U. (1)
  • SCOR-PAL (4)
  • silhouette (4)
  • Skipping-Stones-Design (7)
  • Squigglefly (6)
  • SRM-Stickers (8)
  • techniques (191)
  • templates (26)
  • Tiffany-Doodles (4)
  • Tutorials (252)

Blog Archive

  • ►  2013 (16)
    • ►  July (4)
    • ►  June (4)
    • ►  May (3)
    • ►  April (1)
    • ►  March (1)
    • ►  February (3)
  • ►  2012 (53)
    • ►  December (2)
    • ►  November (2)
    • ►  October (1)
    • ►  August (3)
    • ►  July (2)
    • ►  June (5)
    • ►  May (7)
    • ►  April (8)
    • ►  March (9)
    • ►  February (13)
    • ►  January (1)
  • ►  2011 (74)
    • ►  December (1)
    • ►  November (5)
    • ►  October (10)
    • ►  September (9)
    • ►  August (12)
    • ►  July (5)
    • ►  June (9)
    • ►  May (2)
    • ►  April (6)
    • ►  March (7)
    • ►  February (4)
    • ►  January (4)
  • ▼  2010 (84)
    • ►  December (7)
    • ►  October (1)
    • ►  September (6)
    • ►  August (1)
    • ►  June (1)
    • ►  May (7)
    • ►  April (21)
    • ►  March (3)
    • ▼  February (17)
      • MFTeaser Joy Ride! (and painting chit chat too)
      • Babushka-Doll-shaped Swing Card
      • Caardvarks SRM sticker tutorial & Squigglefly pears
      • Caardvarks (mojolicious) SRM Stickers Challenge!
      • Squigglefly Baby--Towels & Teensy Bathmat tutorial
      • And now we bring you... today's short delay (Googl...
      • What's Crackin? A VIP hop! (+Milk-painted "wooden"...
      • Fond Farewell: Mo Valentine's ATC matchbox
      • Embossed Fred Flowers--from Caardvarks Wedding Bou...
      • It's Here! it's Here! Caardvarks "Get Published" ...
      • Squigglefly Bubbly Baby! (and a very personal note...
      • Squigglefly sneak peek (technical difficulties)
      • MFT Hop!!! Chocolate anyone?
      • SCS excitement!!!!!!!!
      • MFTeaser--the last day! Lovin From the Oven (gift ...
      • New MFT Illustrator! (and MFTeaser tutorial)
      • MFTeaser Day #3--New Pure Innocence Sets! (Warning...
    • ►  January (20)
  • ►  2009 (234)
    • ►  December (16)
    • ►  November (21)
    • ►  October (11)
    • ►  September (23)
    • ►  August (29)
    • ►  July (26)
    • ►  June (10)
    • ►  May (16)
    • ►  April (26)
    • ►  March (22)
    • ►  February (27)
    • ►  January (7)
  • ►  2008 (39)
    • ►  December (14)
    • ►  November (25)
Powered by Blogger.

About Me

Unknown
View my complete profile