StampznewBright

  • Subscribe to our RSS feed.
  • Twitter
  • StumbleUpon
  • Reddit
  • Facebook
  • Digg

Monday, 20 April 2009

LPS sneak peek {Growing Old} (and Mod Podge Faux Copper verdigris)

Posted on 08:16 by Unknown


This is a sneak peek at the new LPS sentiment set {Growing Old} It releases tomorrow at Little Paper Shop, so you can see the whole thing then. This sentiment says:

"Don't worry about wrinkles, they're just antique smiles"....

I cut it up to fit this layout. That cute girl on a book stack (Jena Book) is one of the sweet digital images at LPS here.

She's printed on wrinkle paper too hehehe

click to see the texture...

Wrinkle paper?
Nah, it's actually White Leather cardstock from Paper Temptress. I think it's my new mission to find different papers that you can emboss digital images on & this leather worked like a charm. It wasn't shiny (has a classy smooth finish) and it let the ink stay wet enough to emboss. It's a pleasure to colour too.

The other papers used here are from Paper Temptress POP Tones:
  • Berrylicious (that gorgeous aqua colour)
  • Hot fudge (the perfect brown in my book, not too orangey at all)
The patterned paper (punched with SU's notebook spiral punch) is Tim Holtz (Distressables 0733 "time")


I knew I wanted an antique strip (the dark old- metal looking schtuff ...along the left like a book spine) to go with that great "antique smiles" sentiment, so I messed around with some Faux Copper Verdigris...
-1-

...make mod podge texture paper

This is similar to Gesso textured cardstock, but different LOL. It's messy fun that gives you a fancy paper with nifty texture.


  • wax paper
  • mod podge
  • cardstock
BASIC MOD PODGE CARDSTOCK :

Step 1) Cut piece of cardstock to desired size (half sheet size (5 1/2 x 8 1/2 inches) is nice to work with)


Step 2) Paint mod podge (matte*) onto a piece of wax paper

*Glossy mod podge might be neat over patterned papers & then embossed, but I might worry about whether it has enough tooth to accept any ink colours...)

Step 3) Let dry a little until tacky but not wet (about 30 seconds to a minute; you can test a corner of your paper to see if it has the desired effect by trying a bit of the final step which is...)

Step 4) Press the cardstock onto the wax paper & pull it off again (it creates a great texture)

Repeat the pressing & pulling off process as much as you like until the texture is how you want it. You can also brush more Mod Podge on & press and pull it some more. It will look something like this:


Step 5) Allow to dry to the touch and set under a book to flatten (if it curls at all)

Step 6) Colour how you like (alcohol inks work well but the blending solution seems to make the mod podge melt.)
-1-

...get faux verdigris colouring

Since this is mod podge & waterproof it won't take all inks. You should be able to use any ink that suits a slick surface, like solvent inks. Alcohol inks were fun with it...


mod podge paper (above)
sand paper
alcohol ink
any waterproof ink
walnut ink
paper towel
Optional: spray sealant

Step 1) Make the Mod Podge textured cardstock (as above)


Step 2) Sand it well with fairly course sand paper


Step 3) Create base colour with alcohol ink (or something akin to it) for good vibrancy & coverage. I used "Stream" alcohol ink from Ranger. Other inks (like Stampin' Up!'s classic dye based ink) will give you dark colour where the paper was untouched by the mod podge in the texturizing process, but it won't colour the Mod Podge very much. [You might like 'dat look though]

Step 4) Add dark aging: Spray with walnut ink and wipe it with a sponge to spread the ink (I used Java's walnut ink)

Step 5) Add metallic embossing: Sprinkle on a little copper embossing powder (from high up for an even light coverage) & Heat set it (gently without breathin' in too many fumes of course)

Step 6) Wipe extra ink off (following the grain of your piece seems to work nicely.) :O)
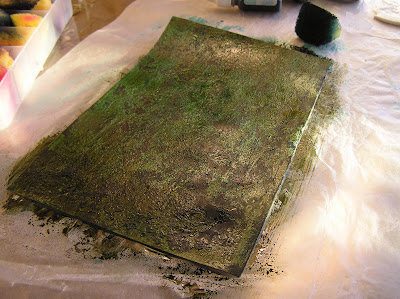


Step 7) Spray with sealer like Krylon matte finish (the walnut ink may stay wet otherwise)

or...seal (and add more texture at the same time) with another coat of mod podge:

A) Brush on a top coat of mod podge quickly (it'll look a little muddy, I found i had to be wary of overworking)
B) Then fold your piece inside a sandwich of wax paper so that the wax paper pulls some of the mod podge ink mix off of the cardstock.
C) Reveal colour if you like by using a paper towel to blot it & pull off more of the mod podge top coat.
D) Let dry to the touch (flatten under a book if needed)

Alcohol ink Application Pointers: Sponging or spraying on fairly quickly is good...with no blending solution since blending solution seems to make the mod podge too tacky/sticky (and blending solution should never be sprayed because the resin in it can get in your eyes.)

and that's it....


Whew that's a lot for one day, hey? :O)
Thanks so much for stopping in!


You can win this set here!
&
for another chance to win that sweet butterfly set
make something inspired by this cute cake:

submit your card by Sunday, April 26th at 11:59 CST
If you choose to upload to SCS or PCP, use keyword LPSC12.


For other sneak peeks at this {Growing Old} set, visit my talented Little Paper Shop peeps:

  • ALLISON- Stampin' When I Can

  • BONNIE- The Lucky Clucker

  • CINDY-Cindy Haffner's Corner

  • JESSICA- The Whimsical Butterfly
  • JULIA-Addicted To Paper
  • JULIE-Stamps and Taxes!
  • LORI-Inkingly Yours...
  • SARAH- my scrapbook table
  • SILVIA- Mabie Stampin'
  • TAYLOR-Musings of an Addict


P.S.
Scroll down or click here for the Caardvarks news that has me crazy happy...
Email ThisBlogThis!Share to XShare to FacebookShare to Pinterest
Posted in cheap-tricks, LPS, Paper-Temptress, techniques, Tutorials | No comments
Newer Post Older Post Home

0 comments:

Post a Comment

Subscribe to: Post Comments (Atom)

Popular Posts

  • free Butterfly Silhouette .studio cut files (in 3 styles)
    Hi, All! Here are those butterfly Silhouette .studio cut files. They are for only for the Silhouette machine... But I do hope to share other...
  • DIY digital paper (some freebies)
    The lull in posts (over the last couple of days) was for me to finish up this looooong post I've been wanting to share with you for eons...
  • New Popcorn Box template set (pretty stamp room storage) :o)
    Are you in the mood for a template or two? I was going to wait until I had really good photos and a full pictorial, but then I would take fo...
  • Missing with a migraine, Craft room BEFORE pics, & LINKs for Organizing the craft room
    Edited to add: Sorry guys. I feel like I was hit by a truck. Migraine's lasted so long... but I will be back with a post by tomorrow eve...
  • Graphics Fairy Inspiration (+vintage printables)
    Thank You all so much for your wonderful comments about the papers I've been obsessed with. Your kind words make me grin so big that I g...
  • "Honey, I shrunk the stationery!" (Hero Arts typewriter notebook)
    Still trying to make more of my cards into little gifts. This Hero Arts typewriter card is another take on the card turned refillable notebo...
  • 3 Clean And Simple cards (with SRM stickers)
    You guys may know that I was tragically born without the gene that let's you achieve a C lean A nd S imple card. ;-) Not sure why I find...
  • Making Your Own Colour Shimmer Sprays--Links & Info
    Info & Links Links for how to Mak e yo ur o w n Sh im mery s prays: (These are for you sweet Beth! oxo) ( more info on these colours in...
  • over 100 free pattern overlays ... at a glance
    Would you believe that the free overlay total is at 139 overlays and counting? (I might have a wee little addiction) ;-) Since overlays can ...
  • Felt-based cards (Rock-a-Bye Baby tutorial)
    New idea, Old projects.... I've been debating whether or not to post some older projects/tutorials since the big bad insecurity beast...

Categories

  • 'Mouse'-the-cat (10)
  • *TEMPLATEs (98)
  • 3D-projects (144)
  • A-Day-For-Daisies (7)
  • Amber Ink (9)
  • Angel's-Landing (2)
  • BASICS (47)
  • Blogging-tips (7)
  • Caardvarks (48)
  • Cat's-Pajamas (2)
  • cheap-tricks (224)
  • Christmas (33)
  • Claire-Keay (2)
  • Cricut (3)
  • cut-file (2)
  • Cuttlebug (45)
  • decor (6)
  • Digital-Images (131)
  • Distress-Inks-etc (14)
  • DIYstamps (1)
  • Eat-Cake-Graphics (11)
  • Faves (207)
  • Fred-She-Said (5)
  • Freebies (77)
  • GESSO (9)
  • Halloween (10)
  • Heather Ellis (3)
  • Hero-Arts (14)
  • ISC (7)
  • Jessica-Sprague (2)
  • Just-Rite (2)
  • LPS (63)
  • Mo's-Digital-Pencil (16)
  • My-Favorite-Things (33)
  • organizing (7)
  • Other-People's-Tutorials (36)
  • Paper-Garden-Projects (54)
  • Paper-Temptress (39)
  • Punches (21)
  • Purple-Onion-Designs (23)
  • S.U. (1)
  • SCOR-PAL (4)
  • silhouette (4)
  • Skipping-Stones-Design (7)
  • Squigglefly (6)
  • SRM-Stickers (8)
  • techniques (191)
  • templates (26)
  • Tiffany-Doodles (4)
  • Tutorials (252)

Blog Archive

  • ►  2013 (16)
    • ►  July (4)
    • ►  June (4)
    • ►  May (3)
    • ►  April (1)
    • ►  March (1)
    • ►  February (3)
  • ►  2012 (53)
    • ►  December (2)
    • ►  November (2)
    • ►  October (1)
    • ►  August (3)
    • ►  July (2)
    • ►  June (5)
    • ►  May (7)
    • ►  April (8)
    • ►  March (9)
    • ►  February (13)
    • ►  January (1)
  • ►  2011 (74)
    • ►  December (1)
    • ►  November (5)
    • ►  October (10)
    • ►  September (9)
    • ►  August (12)
    • ►  July (5)
    • ►  June (9)
    • ►  May (2)
    • ►  April (6)
    • ►  March (7)
    • ►  February (4)
    • ►  January (4)
  • ►  2010 (84)
    • ►  December (7)
    • ►  October (1)
    • ►  September (6)
    • ►  August (1)
    • ►  June (1)
    • ►  May (7)
    • ►  April (21)
    • ►  March (3)
    • ►  February (17)
    • ►  January (20)
  • ▼  2009 (234)
    • ►  December (16)
    • ►  November (21)
    • ►  October (11)
    • ►  September (23)
    • ►  August (29)
    • ►  July (26)
    • ►  June (10)
    • ►  May (16)
    • ▼  April (26)
      • Cheats for fabric & Leather: Black Satin Purse Box...
      • Paper Temptress Texture & Winnie the Pooh
      • Sealing Digital Images (+ a Huge Sale at LPS!)
      • Chef Ian Tea Cup card (+ embossing ribbon with no ...
      • Faux Fresco Background (with Border Embossing fold...
      • Miss Anya Fashionista (+ embossed vellum glass flo...
      • Glam it up: Princess Pig of the Farmyard Friends
      • Today's the LPS Release! (And Fancy Card Feet temp...
      • LPS sneak peek {Growing Old} (and Mod Podge Faux C...
      • Got some thrilling news (I'm branching out!!!!!) :O)
      • LPS Release Preview {Butterflies}
      • {Forest Critters} Preview! (+ a new curvy-top lumi...
      • Haute Couture Miss Anya appearing at Paper Garden ...
      • A Few Digital Images
      • Paper Temptress Bloggin' & Another Digi Image
      • I got a Cricut Expression! Squeal!!!! (+Round Skyl...
      • Happy Easter Carrot Tree
      • A Sneek Technique...Beaded Score Pal grid & a Snea...
      • Don't be Blue, I love Ewe! (DIY double-sided patte...
      • Miniature Carrot Tutorial (and 30+ Carrot Craft Li...
      • Girl Bunny Paper Pieces & Small version
      • Tadpoles & Dirty Toes (+New LPS Digis)
      • BOY Bunny: Parahopper number one ;o) (LARGE & SMALL)
      • Digi Bunnies & Thanks you Sweeties!!!
      • Parachuting Digi Bunnies?
      • Embossed faux watercolour: ISC "Men of Wisdom" (CAR)d
    • ►  March (22)
    • ►  February (27)
    • ►  January (7)
  • ►  2008 (39)
    • ►  December (14)
    • ►  November (25)
Powered by Blogger.

About Me

Unknown
View my complete profile