StampznewBright

  • Subscribe to our RSS feed.
  • Twitter
  • StumbleUpon
  • Reddit
  • Facebook
  • Digg

Wednesday, 22 April 2009

Glam it up: Princess Pig of the Farmyard Friends

Posted on 08:22 by Unknown


This Farmyard friends kit is just too cute for me to stop playing with. Gotta love this little piggy and all her possibilities. Here, she's living out a fantasty and glamming it up as the princess of glam ham! (Guess that makes me the queen of cheese, LOL)


1...make a layered flower mat (without die cuts)
2...paper-piece a piggy
3...make a be ribboned princess hat
4...create a simple paper jig for spacing gems/brads


(All these come in the Paper Garden Projects Farm Friends Stamp Kit)

Stamps: Piggy (Designed by Pink Cat Studio) & round "Happy Birthday" sentiment
Wedding White Cardstock (to print out text patterned paper)
Raven Bazzill cardstock (black textured)
Basic Grey Urban Prairie Paper: Petticoat

Other Materials:
(from your stash or Paper Garden Projects)

Tombow Monomulti
For the Piggy:
Black ink & clear embossing powder
Copic Markers: (BG-15 Aqua, & RV-11 Pink, Frost blue B00, & a colourless blender)
Optional extras:
Aqua gemstones
May Arts ribbon: Sheer dotted swiss Black
Lighter
Scissors
Black thread & needle
Clear seed beads


Click here to Download the
flower template PDF


or click this picture for the JPG:


-1-

...make a layered flower mat:

Just because you may not have Nestabilities doesn't mean you can't have shapes! (Don't get me wrong, I luv my Nesties)...but not having them doesn't limit you to square mats on your cards.

Here's one way to make a shaped, layered mat:


Step 1) Print or trace flower template on back of patterned paper or cardstock.


Step 2) Cut flower out.


Step 3) Adhere flower to black textured cardstock.


Step 4) Cut around (using the patterned paper flower as a guide) to make a black mat layer. If you're not comfortable cutting freehand, you could print the flower template using scaled printing just a bit bigger than the original.


Step 5) Cut black mat & patterned paper square:

For a 5 2/8 inch square card: the black mat measures 5 1/8 inch square (A circle is cut out of it using the gutting technique to save paper & reduce weight in the layers) The patterned paper measures 5 inches square


Step 6) Adhere the patterned paper to the black mat & pierce, if you like.

TIP: If sewing or faux-sewing, add adhesive where you won't hit it when you pierce holes around your square... I've had many a mucky needle from adhesive, LOL.


Step 7) Bead it if you like

-2-

...paper piece a pretty piggy:


Step 1) cut a circle & stamp just the curly tail on it.


Step 2)
Stamp part of piggy on wedding white cardstock & cut out her snout & hat


Step 3)
cut out and Colour the little snout & hat

and Stamp a whole piggy on the patterned paper
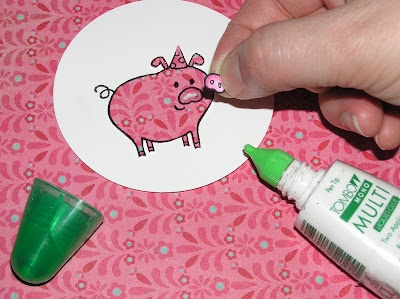


Step 4)
Glue piggy to the circle & glue her nose on (if you are making a princess hat, wait until later to stick her hat on.) :O)


-3-

make a piglet princess hat:


Step 1)
Pierce hole at top of piggy's hat

Step 2)
prepare ribbon:


A) Cut ribbon (to 3 inches) with ends on an angle, and B) gently singe both ends of ribbon with a lighter to melt (makes it easy to put through the hole)


Step 3) Thread ribbon through hole at top of hat. Adjust length to please (trim if needed)


Step 4) trim end of ribbon at back of image


Step 5) adhere end of ribbon at back of image


Step 6) Add a little dot of adhesive behind dot on ribbon (let dry a little)


Step 7)
Position ribbon & Hold down until adhesive sets


Step 8) Glue hat on (trim top of hat if needed)

-4-

create a simple paper jig
for spacing gems/brads


Step 1) Cut circle of black textured cs for mat


Step 2) Adhere glam piggy onto the black mat


Step 3) Use a small piece of paper to make a homemade paper jig for spacing gems or brads


Step 4) Repeat, moving the jig & adding gems


Step 5)
Pierce around image between gems (pins in fun foam hold it steady)


Step 6) Add a shadow to ground image (this is Frost blue B00, softened with a colourless blender)


The round sentiment is from the Farmyard Friends kit too.
Gotta love the teeny cupcake on it!


P.S. Here's a matching envelope tutorial:


(today the ol' blog should be called: Perty Pigginess)
Email ThisBlogThis!Share to XShare to FacebookShare to Pinterest
Posted in *TEMPLATEs, Faves, Paper-Garden-Projects, Tutorials | No comments
Newer Post Older Post Home

0 comments:

Post a Comment

Subscribe to: Post Comments (Atom)

Popular Posts

  • free Butterfly Silhouette .studio cut files (in 3 styles)
    Hi, All! Here are those butterfly Silhouette .studio cut files. They are for only for the Silhouette machine... But I do hope to share other...
  • DIY digital paper (some freebies)
    The lull in posts (over the last couple of days) was for me to finish up this looooong post I've been wanting to share with you for eons...
  • New Popcorn Box template set (pretty stamp room storage) :o)
    Are you in the mood for a template or two? I was going to wait until I had really good photos and a full pictorial, but then I would take fo...
  • Missing with a migraine, Craft room BEFORE pics, & LINKs for Organizing the craft room
    Edited to add: Sorry guys. I feel like I was hit by a truck. Migraine's lasted so long... but I will be back with a post by tomorrow eve...
  • Graphics Fairy Inspiration (+vintage printables)
    Thank You all so much for your wonderful comments about the papers I've been obsessed with. Your kind words make me grin so big that I g...
  • "Honey, I shrunk the stationery!" (Hero Arts typewriter notebook)
    Still trying to make more of my cards into little gifts. This Hero Arts typewriter card is another take on the card turned refillable notebo...
  • 3 Clean And Simple cards (with SRM stickers)
    You guys may know that I was tragically born without the gene that let's you achieve a C lean A nd S imple card. ;-) Not sure why I find...
  • Making Your Own Colour Shimmer Sprays--Links & Info
    Info & Links Links for how to Mak e yo ur o w n Sh im mery s prays: (These are for you sweet Beth! oxo) ( more info on these colours in...
  • over 100 free pattern overlays ... at a glance
    Would you believe that the free overlay total is at 139 overlays and counting? (I might have a wee little addiction) ;-) Since overlays can ...
  • Felt-based cards (Rock-a-Bye Baby tutorial)
    New idea, Old projects.... I've been debating whether or not to post some older projects/tutorials since the big bad insecurity beast...

Categories

  • 'Mouse'-the-cat (10)
  • *TEMPLATEs (98)
  • 3D-projects (144)
  • A-Day-For-Daisies (7)
  • Amber Ink (9)
  • Angel's-Landing (2)
  • BASICS (47)
  • Blogging-tips (7)
  • Caardvarks (48)
  • Cat's-Pajamas (2)
  • cheap-tricks (224)
  • Christmas (33)
  • Claire-Keay (2)
  • Cricut (3)
  • cut-file (2)
  • Cuttlebug (45)
  • decor (6)
  • Digital-Images (131)
  • Distress-Inks-etc (14)
  • DIYstamps (1)
  • Eat-Cake-Graphics (11)
  • Faves (207)
  • Fred-She-Said (5)
  • Freebies (77)
  • GESSO (9)
  • Halloween (10)
  • Heather Ellis (3)
  • Hero-Arts (14)
  • ISC (7)
  • Jessica-Sprague (2)
  • Just-Rite (2)
  • LPS (63)
  • Mo's-Digital-Pencil (16)
  • My-Favorite-Things (33)
  • organizing (7)
  • Other-People's-Tutorials (36)
  • Paper-Garden-Projects (54)
  • Paper-Temptress (39)
  • Punches (21)
  • Purple-Onion-Designs (23)
  • S.U. (1)
  • SCOR-PAL (4)
  • silhouette (4)
  • Skipping-Stones-Design (7)
  • Squigglefly (6)
  • SRM-Stickers (8)
  • techniques (191)
  • templates (26)
  • Tiffany-Doodles (4)
  • Tutorials (252)

Blog Archive

  • ►  2013 (16)
    • ►  July (4)
    • ►  June (4)
    • ►  May (3)
    • ►  April (1)
    • ►  March (1)
    • ►  February (3)
  • ►  2012 (53)
    • ►  December (2)
    • ►  November (2)
    • ►  October (1)
    • ►  August (3)
    • ►  July (2)
    • ►  June (5)
    • ►  May (7)
    • ►  April (8)
    • ►  March (9)
    • ►  February (13)
    • ►  January (1)
  • ►  2011 (74)
    • ►  December (1)
    • ►  November (5)
    • ►  October (10)
    • ►  September (9)
    • ►  August (12)
    • ►  July (5)
    • ►  June (9)
    • ►  May (2)
    • ►  April (6)
    • ►  March (7)
    • ►  February (4)
    • ►  January (4)
  • ►  2010 (84)
    • ►  December (7)
    • ►  October (1)
    • ►  September (6)
    • ►  August (1)
    • ►  June (1)
    • ►  May (7)
    • ►  April (21)
    • ►  March (3)
    • ►  February (17)
    • ►  January (20)
  • ▼  2009 (234)
    • ►  December (16)
    • ►  November (21)
    • ►  October (11)
    • ►  September (23)
    • ►  August (29)
    • ►  July (26)
    • ►  June (10)
    • ►  May (16)
    • ▼  April (26)
      • Cheats for fabric & Leather: Black Satin Purse Box...
      • Paper Temptress Texture & Winnie the Pooh
      • Sealing Digital Images (+ a Huge Sale at LPS!)
      • Chef Ian Tea Cup card (+ embossing ribbon with no ...
      • Faux Fresco Background (with Border Embossing fold...
      • Miss Anya Fashionista (+ embossed vellum glass flo...
      • Glam it up: Princess Pig of the Farmyard Friends
      • Today's the LPS Release! (And Fancy Card Feet temp...
      • LPS sneak peek {Growing Old} (and Mod Podge Faux C...
      • Got some thrilling news (I'm branching out!!!!!) :O)
      • LPS Release Preview {Butterflies}
      • {Forest Critters} Preview! (+ a new curvy-top lumi...
      • Haute Couture Miss Anya appearing at Paper Garden ...
      • A Few Digital Images
      • Paper Temptress Bloggin' & Another Digi Image
      • I got a Cricut Expression! Squeal!!!! (+Round Skyl...
      • Happy Easter Carrot Tree
      • A Sneek Technique...Beaded Score Pal grid & a Snea...
      • Don't be Blue, I love Ewe! (DIY double-sided patte...
      • Miniature Carrot Tutorial (and 30+ Carrot Craft Li...
      • Girl Bunny Paper Pieces & Small version
      • Tadpoles & Dirty Toes (+New LPS Digis)
      • BOY Bunny: Parahopper number one ;o) (LARGE & SMALL)
      • Digi Bunnies & Thanks you Sweeties!!!
      • Parachuting Digi Bunnies?
      • Embossed faux watercolour: ISC "Men of Wisdom" (CAR)d
    • ►  March (22)
    • ►  February (27)
    • ►  January (7)
  • ►  2008 (39)
    • ►  December (14)
    • ►  November (25)
Powered by Blogger.

About Me

Unknown
View my complete profile