Sorry, I've been on the lamb. I have a baaaad headache you wouldn't believe (no need to worry, just those migraine daze days.)
Here is something as fuzzy as my head: a woolly woolly black sheep. I wish you could pet him! It took a little time to knot him, but if you want something with an unusual texture then this may be the trick for ewe! hehehe
The Stamp & Supplies:
(more bang for your buck)
All the goodies here are from the new Faryard Friends kit. Me likey this sheep with his little cupcake and the Black & White dotted May Arts ribbon and that yummy Basic Grey paper. But those of you who are up on your product will notice that the paper & ribbon are altered. The dots used to be white & originally there's no text on that Basic Grey paper..."
You know how I loves me some cheap tricks! By altering these goodies you can save twice, once by purchasing in a kit, and again by making the contents work double duty.
Your own DIY Designer Text Paper:
You can add any text you want to your patterned papers. This Hayfield Basic Grey paper has text printed on (usin' a font made with my handwriting from the YourFont site.<--SO kewl.) You can make your very own or use this one if you like.
It reads: "Thank ewe for being my black sheep buddy ! No sheepishness about it, I just love ewe ! If ewe were normal, we wouldn’t have nearly as much baaad rambunctious fun! Like Thelma & Eweise, We’ll get sheep thrills while we’re three sheeps to the wind & on the lamb, cause Sheeps go to heaven & Goats go to hell ! Baa Baa Black sheep, have you any rules? No Sir, No Sir, rules are for fools! Call me a bleating heart, but we wool be friends forever! Can’t bleat our friendship!"
Please feel free to make any changes to the text that you like: Of course, you can change the font & colour, remove any of the sayings that you don't like, etc... if you use it, I'd love to see what you make! :O)
Supplies:
(All in the Paper Garden Projects FarmYard Friends Stamp Kit)
Stamps: Sheep holding a cupcake. (Designed by Pink Cat Studio)
Papers:
Wedding White cardstock (11 x 5 1/2) folded in half to make a card (4 2/8 x 5 1/2 inches)
1 Band of Wedding White cardstock 1 by 4 inches (under vellum strip)
1 piece of Hayfield Basic Grey patterned paper (cut 8.5 inches wide to print on--cut to measure)
1 piece of Bazzill Raven (black) textured cardstock (for sentiments)
Embellishments:
May Arts Black Sheer Dotted Swiss ribbon (5 1/2 inch strip & enough to tie a bow)
Turquoise Brads
Other Materials:
(from your stash or Paper Garden Projects)
1 sheet of vellum to print & create a strip 1 by 4 inches (or a strip of more patterned paper from the kit)
Scor-Pal
Tim Holtz Design Ruler
Scissors
For Sheep:
Black fuzzy wool
Black ink
Copic Markers: Black, BG-15 Aqua, & RV-11 Pink
watercolour pencil crayons
foam mounting tape
Tombow Monomulti
How To:

Step 1) Print your papers. Print the text onto Hayfield Basic Grey paper & trim it (to measure 3 3/4 by 5 inches.) I printed these at 30% in fit to scale printing. The teeny embossed writing is such a kick!
For this word document (or tips on making your own font) please check out this SCS post.

If you want to print onto Vellum as well, then you can emboss if you act while the ink is wet: sprinkle clear embossing powder, shake excess off, & heat it with a heat gun. Trim the vellum (to measure 1 by 4 inches.)

Step 2) Stamp/Emboss the sweet sheep & adhere it to the Basic Grey paper.

You can use Tim Holtz Design ruler to center pieces like this perfectly

Step 3) Pierce holes in the sheep for wooling

Step 4) Colour sheep fuzzy bits black (This is a black Copic )

Step 5) Thread the fibre onto an embroidery needle (double) & put it through a hole on the front of the image. Adhere the two ends to the back of your image.
Some tricks to getting soft fuzzy wool on a needle:
- Use an embroidery needle with a nice wide eye.
- Add a bit of Crystal Lacquer, or the like, onto the end of your wool. Let it set a bit & roll it between your fingers (or use a piece of masking tape rolled tightly.)
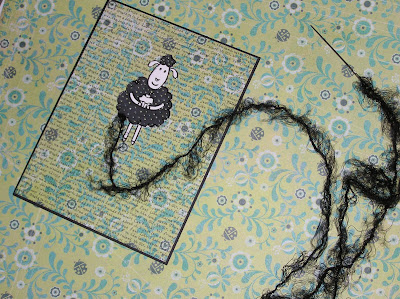
Step 6) Knot fiber (Tie knots close to the paper on the front.) Don't worry about having the knots exactly next to the front; you can pull them through from the back. Since the wool is fuzzy it can tangle on itself (The knotting takes some time too, but it so soft!) So to make it easier...
Some knotting tips:
- Use a double thread (threaded through once, with the two ends adhered to the back of your cardstock.)
- Use a shorter thread (less to tangle)
- Go fairly slowly & use your hand to hold the loop of the thread at the back of your project.
- Watch for tangles & pull them apart if/when they show up
- If you get a messy knot, never fear, just cut it off, pull the loose thread to the back, & start a fresh needle.

Step 7) Return down another hole near the knot you made & come up to make more knots

Step 8) Pierce more holes, if it looks like you need 'em :O)

Step 9) You can come up with your needle anywhere on the front that looks like it needs filling

Step 10) Colour your image (I'm a bacwards kind of girl; you may want to do this before stitching, LOL)
Step 11) Adhere the text vellum strip to the band of Wedding White cardstock (1 by 4 inches) You can use another piece of paper from the Kit if you have no vellum. Adhesive will be hidden by the ribbon. I placed both the adhesive & the ribbon over it, so that it was three quarters of the way up on the band.

Step 12) Adhere the ribbon over the vellum (with adhesive on the back)
Fun tip: You can use Copic Markers to colour the gorgeous white dotted May Arts ribbon from the Kit

Step 13) Stamp/Emboss the Sentiment, trim it to 1 5/8 inch wide by about 3/4 of an inch high, & adhere it to the back of the band
Step 14) Embellish: Pierce through ribbon & add the two turquoise Basic Grey Brads.
Step 15) Assemble: Adhere the Image to a mat of the Raven black cardstock (3 7/8 x 5 1/8 inches)
Step 16) Add the image to the the Wedding White card using foam mounting tape
The white card measures (11 x 5 1/2) folded in half to make a card (4 2/8 x 5 1/2 inches)
Step 17) Attach the band over the image using foam mounting tape.
Step 18) Pet the fuzzy sheep! hehehe

Hope all is well with Ewe.
Catch ya Sunday!
Catch ya Sunday!
Quick Links:
FarmYard Friends Stamp Kit
Cathy's Blog (She has the sweetest self-latching treatbox on there!!!)
Tracy's blog (Her designs have such a stunning style!!!)
:O)
FarmYard Friends Stamp Kit
Cathy's Blog (She has the sweetest self-latching treatbox on there!!!)
Tracy's blog (Her designs have such a stunning style!!!)
:O)


