StampznewBright

  • Subscribe to our RSS feed.
  • Twitter
  • StumbleUpon
  • Reddit
  • Facebook
  • Digg

Sunday, 18 September 2011

Cheap Tricks! Printed faux-paper-pieced backgrounds

Posted on 17:30 by Unknown
Edited to add:

So sorry to lecture, I just didn't want anyone else to get the wrong idea:

Having received some confused comments over this idea, I thought maybe I should be more clear. For the record, I never use anything I haven't bought or been given as a freebie. And this idea is intended only as a time saver, or a way to get more use out of your digital papers (bought or freebies). I always trust that my readers know I don't ever intend that anyone should take things that are not meant for use. (Such as previews that are online for that purpose only).

The idea here, if you're not scared away, LOL is to use digital previews that come with digi papers you buy (or get free) to get a quilted look but save yourself the time of cutting & pasting the different papers into a document.

Do you go gaga over the look of
all those paper pack covers?

& &

Or the other kinds of packaging that sometimes comes with them?

Is it just me, or is there something about those little strips of
different papers all cozy together like a quilt?


I love them! And since they often come as a preview sheet
with most digital packs nowadays, I thought I'd try
printing them out for hybrid projects

Well, this is the digital or hybrid equivalent of
recycling paper packaging in your projects...


(Altering digital papers to make
faux paper pieced backgrounds)
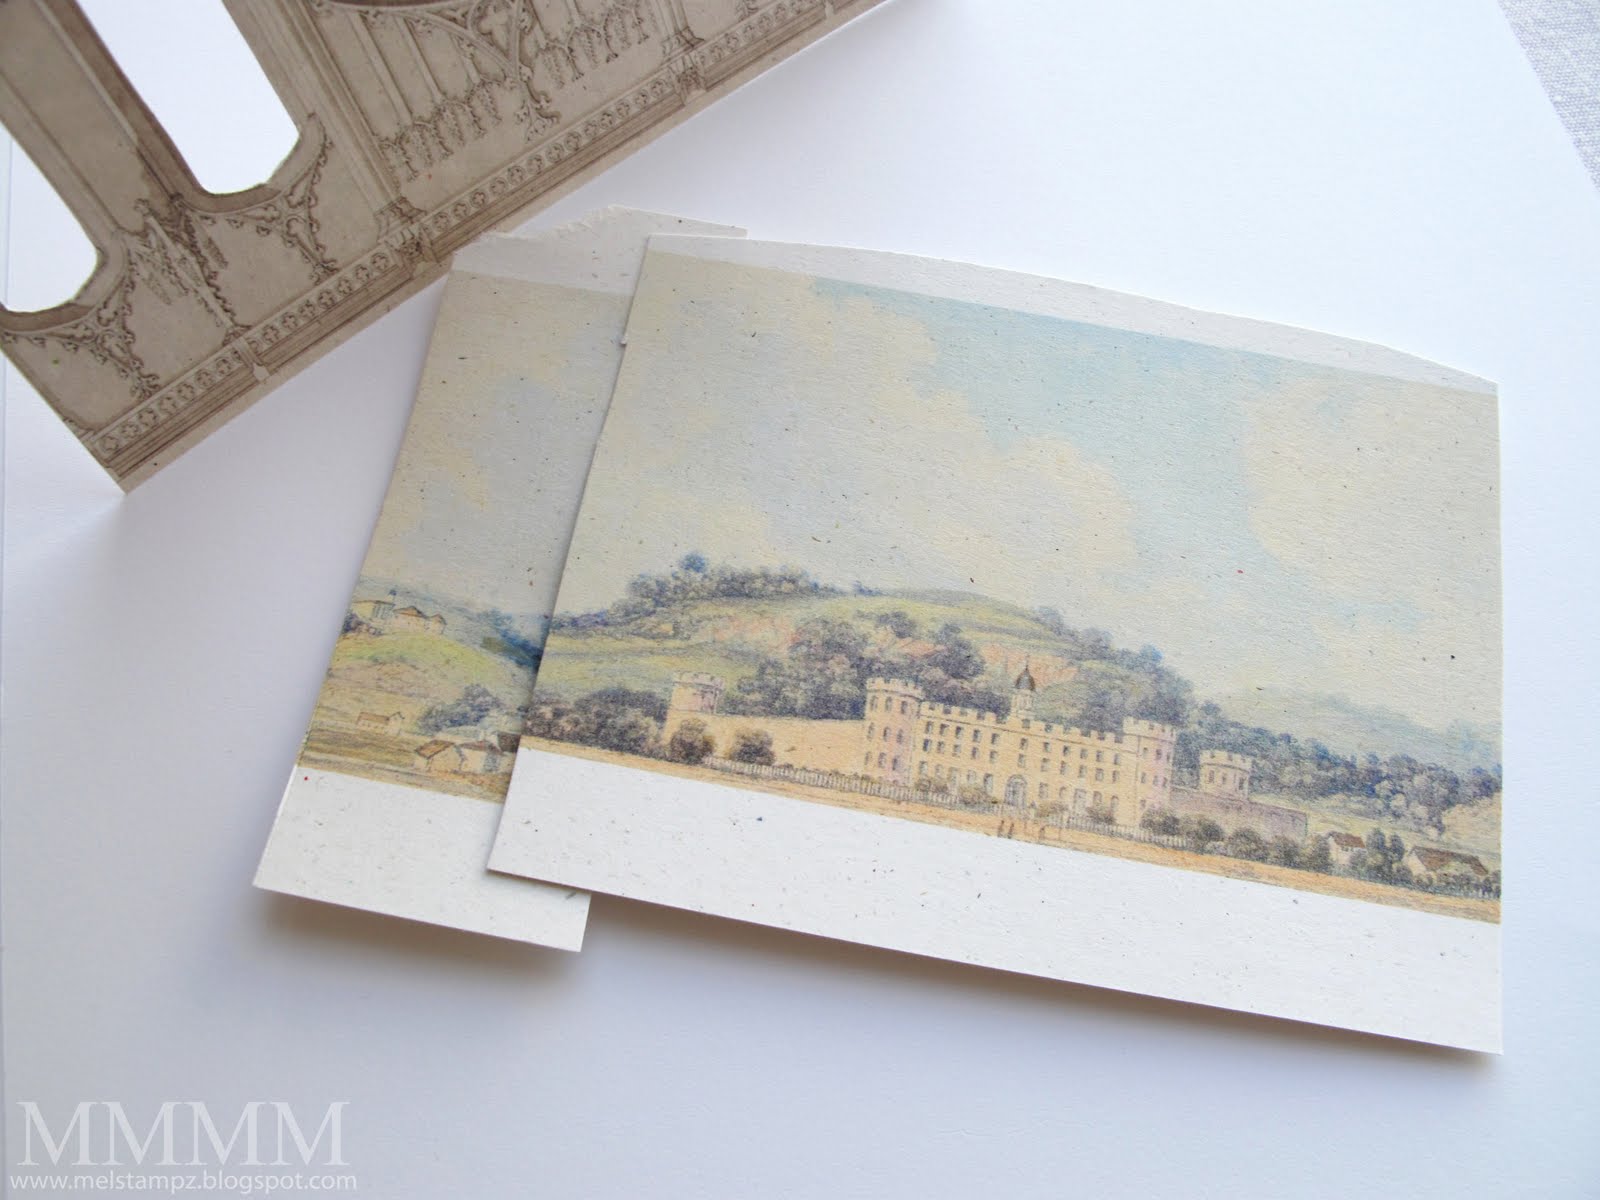

You can go
from this:

click to check it out at JessicaSprague.com

to this:

Printed digital preview sheet mel stampz

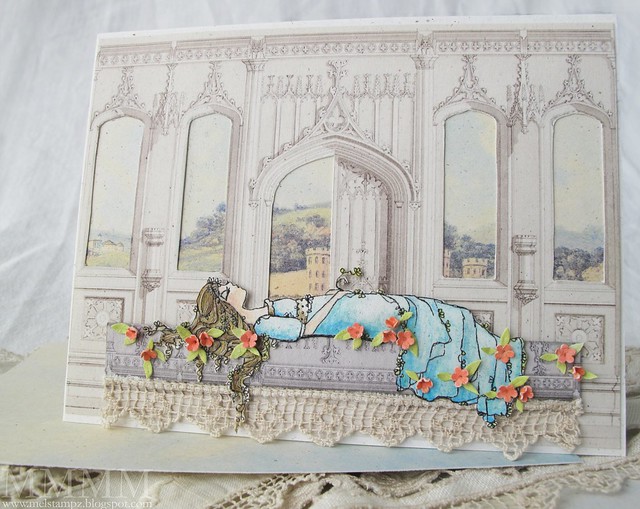
I printed the digital snippet above at a percentage to make
it teeny to fit a card & then stitched it.


-It saves ink since you are only printing bits
-It's faster than cutting up bits of papers.
-You can customize it to the size of your project background.
-And for me it's a way to force myself to use
colours that aren't turquoise. ;-)


This might not work with all brands of digital preview pages,
since quality likely differs, and not all of the Cosmo Cricket packs come
with them, but I thought I'd share this since it was such fun.


(use photoshop to create digital snippets
of digital paper pack "covers")


Step 1) Buy a digital paper pack, or download a free one. Open the preview sheet in PhotoShop or similar software & use the rectangular marquee tool & control C to copy a snippet of it.


Step 2) Create a new document & paste the snippet in it. Alter it however you like. You can desaturate it for black or grey and white. Change lightness or saturation, or even change the colour.


You can even change colours or patterns by copying & pasting strips!
If you want more of one colour or pattern than the original snippet has.

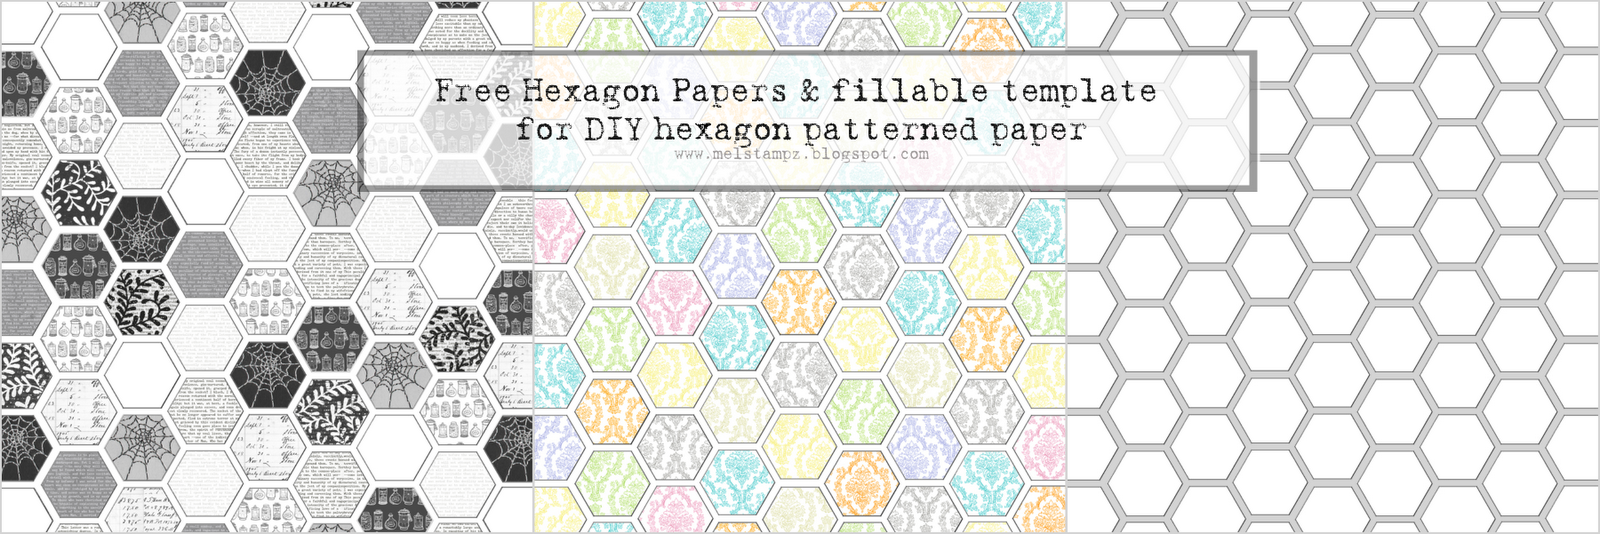
Here's an example of a hexagon paper I made:

cosmo cricket filled hexagon papers
(This won't print since it's a low res Photoshop document, but if you'd
like help with how to make your own please just let me know.)

It uses these Cosmo Cricket digital paper packages
that I bought at JessicaSprague.com:

Clementine:


Hey Sugar:


Odds & Ends:


Honey Pie:

Link
For a detailed tutorial on how to create custom patterns
& use them to fill, please visit this post:

For the hexagon template (free download),
please visit this post:


Hope this weird little tidbit is of use to some of You;
It just gives me the thrills! ;o)


P.S. I am not affiliated with any of these companies. This is just some stuff I bought & messed around with.
Read More
Posted in cheap-tricks, Digital-Images, Faves, Tutorials | No comments

Saturday, 17 September 2011

MFT Book Worm Office Hours sign

Posted on 14:30 by Unknown
Thanks so much for sharing your stories of your messy craft rooms.
It's so great to know that we are chaotic kindred spirits! ;o)

And for your kind wishes about banishing the migraine beast.
It's relatively tamed but curled up in my head snoring and making
my brain icky. lol


Did you know that my sweetie, Charles, is a bookworm?

Yup! And this strange little project is an Office Hours sign I made for him
a while ago to put up on his door at SFU (while he was an English T.A. there)
but we didn't feel comfortable sharing it then since it had such
personal work details on it. But now I can show ya!

MFT C's office hours sign -mel stampz

It is very distress-y...

The office hours are printed on vellum & heat embossed
with clear embossing powder. (I love doing that!)
Then glued on a library card with some bits of book pages
& hand writing.

The striped metallic paper in the back is from a
G.C.D. papier (Paris Nights) 12x12 paper pack.

MFT Paper pieced book worm & beaded cosmo cricket frame

That cute little worm is from the MFT set "Book worm"
(sorry I think he's discontinued)

He's stamped on a library card & cut out.
His glasses have clear lacquer on them for shine.
The book he's reading is paper pieced on book paper.

The frame is a piece from Comso Cricket's EverAfter kit
(which I am so excited to tell you, you can get in digital format
too! Here at Jessica Sprague!) I stitched on some beads.

There is a little dangling book hanging from
the sign on some thread:

book hangs down

The mini book has graph paper pages inside:

pages inside book

The stamping has a couple of snippets of book pages
collaged on & under it for texture:

bookshelves

another oldie...

The bookshelf stamping is on ledger paper
which you can find for free here, if you like it:


Thanks for having a peek!

Hope you're day is a lovely one,


P.S. Disclosure: This is a unsolicited post, but I was lucky enough to receive the patterned papers & the MFT stamp set free (a year or so ago) as part of design teams.

P.P.S. I am freaking out about Jessica Sprague digital brands & had to share. Who knew?!?
Read More
Posted in Freebies, My-Favorite-Things | No comments

Thursday, 15 September 2011

"What's on your workdesk? Wednesday..."

Posted on 02:35 by Unknown
"What's on your workdesk? Wednesday..."

Well, in my head it's still Wednesday,
since Mr. Migraine is keeping me awake,
but technically it's Thursday.

This is what was on my workdesks (all 4 of them):
Complete chaos!

1 & 2
Chaos on workdesk numbers one & two:


(the glass table is my official workdesk &
the dresser in back of it is supposed to be
a cutting/scoring table)

3
Chaos on workdesk number 3:


(The workdesk that should officially be called the
"piling junk up table" Well i guess they all fit that bill! *blush*)

4
Chaos on workdesk number 4:


(the computer work desk, which is usually where I craft)

So what's on your workdesk?
Bet it looks tidy to you, now!


Oh the shame of it all. ;o) (I did tidy up
a little bit since I took these, though, honest.)

Read More
Posted in | No comments

Monday, 12 September 2011

Sleeping Beauty has a New Fairy Godmother!

Posted on 12:45 by Unknown
ADFD sleeping beauty & graphics fairy castle

I've been working on some digital graphics for a hybrid sleeping beauty
card for a while now, but couldn't get the finishing touches right.
The Lily Pad Cards colour challenge was the perfect inspiration for
teeny coral flowers & wee green leaves!

And it's sponsored by my favourite artist,
Tammy of A Day for Daisies.

Here are Kathy's gorgeous colours for the challenge:


The Sleeping Beauty image is one I bought
a while back from A Day For Daisies

It's called Loves First Kiss


And Sleeping Beauty has a new Fairy Godmother:
(she's hip & hybrid)
The Graphics Fairy!

The Gothic Arches background is a free image shared
here by the generous Graphics Fairy, Karen.

[If you haven't seen her incredible blog, and you love clip art,
then you are in for a treat!]

Click the image, if you'd like to go to Karen's post & download it:
gothic-arch (free from Karen, The Graphics Fairy)

and this is the landscape behind it:

castle landscape (also free from Karen)

Alterations to the images:

1) I reduced the size of both graphics fairy images (since they were nice & big--which makes for great quality when you print them smaller).

2)
For the Gothic Arches image, I also reduced the saturation in Photoshop (making the image a little more "black-and-white-ish"... since my printer seemed to make it a little orange). I really wanted it to match kraft coloured cardstock & to be softer. :o)


Make a castle card with cut windows:

(or you could just print out the
combined digital image below)


  • Inkjet Printer, Matte medium & clear embossing powder
  • Speckled ivory cardstock
  • Copic markers & Prismacolour pencils
  • Edge punch, paper piercer, watercolour pencil to make flowers
I thought it might be fun to make a sleeping beauty card (on a standard A2 card background with Graphics Fairy images).

This method is the cut out the windows and layer the scene in behind method, but I've also combined them digitally and uploaded that in two sizes for you to download if you'd like to save time (linked below).

Print colour & cut sleeping beauty

Step 1) Print, colour, & cut out the sleeping beauty image.

I heat-embossed the ADFD Loves First Kiss digital image by painting matte medium onto speckled cardstock, but you could use Paris Bleedproof cardstock if you want a heat embossed digital image. More about the Paris Bleedproof paper for digi embossing in this post.

...and I did that textured hair thing again (scored curving lines into
her hair with a paper piercing tool to give it texture):

ADFD sleeping beauty hair

The scored lines seem to make it easier to colour hair.


Step 2) Print Gothic image --at 50%)--on a light cardstock (alter the colour first, if you like). Cut out the windows & half of the door. (I used an exacto blade and as you can see, I didn't worry about making the hidden bits tidy) ;O)


Step 3) Print a small section of the Gothic Arches image & cut it to make the bier for sleeping beauty to lay upon. I made the image darker, before clipping a piece of it in Photoshop & printing it.


Step 4) Print the Landscape image at 33% (You can crop it first to save ink). Place the landscape image behind the Gothic arch windows and trim it to fit. (I overlapped it to get the little hill to show in the left-hand window--the mess will be invisible later muhahaha).

ADFD sleeping beauty close up

Step 5) Cut out the bier & adhere it to the card. Adhere sleeping beauty on top of it. (add flowers and leaves and glue on a scrap of crochet, if you like.)

(The teensy wee flowers were made with the left overs from an edge punch, coloured with watercolour pencil crayon. The leaves are just cut from some paper coloured with a copic marker)

Step 6) Adhere everything to a folded A2 card (5 1/2" x 4 1/4")...

...and th-th-th-that's all, folks:


I also made a purse template filled with pattern to match,
but had no time to finish it if I wanted to get a card in
for that ADFD Lily Pad challenge.


&

If you don't want to do all the fiddly cutting that I did above:
you can simply print the combined backgrounds, cut out the bier,
add sleeping beauty, and 'garnish' with flowers. ;o)

PDF, PNG and JPEG formats:
Click the images to visit Flickr if you'd
like to download JPEGs.
Click the links for PDFs, or find the PNGs below:

Download PDF for background here
graphics fairys gothic arches and landscape combined and bier A2 size

Download PDF for the castle purse here
landscape castle purse mel stampz

Download PDF for LARGE background here
LARGE graphics fairys gothic arches and landscape combined and bier


JPEG format files:

How to save these PNGs:

1) Click on the small images below
(it should open the full image in your browser)
2) Then right click with your mouse
3) chose the option "save image as PNG"


More on how to Download files
types & terms of use here


I would've simply asked you to visit The Graphics Fairy for these, and not have taken the liberty of sharing the combined images, but it took ages in Photoshop, so I thought I'd save you the work. If you use any of these, be sure to credit Karen & link her, pretty please. :o)


Thanks so much for having a look,
Read More
Posted in A-Day-For-Daisies, Digital-Images, Freebies, Tutorials | No comments
Newer Posts Older Posts Home
Subscribe to: Comments (Atom)

Popular Posts

  • free Butterfly Silhouette .studio cut files (in 3 styles)
    Hi, All! Here are those butterfly Silhouette .studio cut files. They are for only for the Silhouette machine... But I do hope to share other...
  • Flying by to say ... 'hello'
    Do you shop for stamps often? I don't have a huge crafting budget, but every once in a while I find some images that call out "you ...
  • a Silhouette Challenge project
    This might look like a card in the photo, but...   ... it's actually a collage on a wooden canvas  to hang on the wall (or give as a gif...
  • Silhouette Cameo - Sketch pen Camera card
    Happy Happy Independence Day, to my American Friends! (and happy belated Canada Day to my fellow Canadians!) So, have those of you with Silh...
  • over 100 free pattern overlays ... at a glance
    Would you believe that the free overlay total is at 139 overlays and counting? (I might have a wee little addiction) ;-) Since overlays can ...
  • Graphics Fairy Inspiration (+vintage printables)
    Thank You all so much for your wonderful comments about the papers I've been obsessed with. Your kind words make me grin so big that I g...
  • Circle Overlays (to revamp your papers!)
    Can you ever have too many ways to use your stash? No card today, just popping in with a cheap trick for revamping your "old" pat...
  • New Popcorn Box template set (pretty stamp room storage) :o)
    Are you in the mood for a template or two? I was going to wait until I had really good photos and a full pictorial, but then I would take fo...
  • "Honey, I shrunk the stationery!" (Hero Arts typewriter notebook)
    Still trying to make more of my cards into little gifts. This Hero Arts typewriter card is another take on the card turned refillable notebo...
  • Everything I've Ever Made (at a glance)
    This post is a visual overview of my blog history-- with thumbnails that are linked to tutorials & templates for pretty much everything ...

Categories

  • 'Mouse'-the-cat (10)
  • *TEMPLATEs (98)
  • 3D-projects (144)
  • A-Day-For-Daisies (7)
  • Amber Ink (9)
  • Angel's-Landing (2)
  • BASICS (47)
  • Blogging-tips (7)
  • Caardvarks (48)
  • Cat's-Pajamas (2)
  • cheap-tricks (224)
  • Christmas (33)
  • Claire-Keay (2)
  • Cricut (3)
  • cut-file (2)
  • Cuttlebug (45)
  • decor (6)
  • Digital-Images (131)
  • Distress-Inks-etc (14)
  • DIYstamps (1)
  • Eat-Cake-Graphics (11)
  • Faves (207)
  • Fred-She-Said (5)
  • Freebies (77)
  • GESSO (9)
  • Halloween (10)
  • Heather Ellis (3)
  • Hero-Arts (14)
  • ISC (7)
  • Jessica-Sprague (2)
  • Just-Rite (2)
  • LPS (63)
  • Mo's-Digital-Pencil (16)
  • My-Favorite-Things (33)
  • organizing (7)
  • Other-People's-Tutorials (36)
  • Paper-Garden-Projects (54)
  • Paper-Temptress (39)
  • Punches (21)
  • Purple-Onion-Designs (23)
  • S.U. (1)
  • SCOR-PAL (4)
  • silhouette (4)
  • Skipping-Stones-Design (7)
  • Squigglefly (6)
  • SRM-Stickers (8)
  • techniques (191)
  • templates (26)
  • Tiffany-Doodles (4)
  • Tutorials (252)

Blog Archive

  • ▼  2013 (16)
    • ▼  July (4)
      • A Triple-stamped Fancy-cut Flower card
      • Flying by to say ... 'hello'
      • a Silhouette Challenge project
      • Silhouette Cameo - Sketch pen Camera card
    • ►  June (4)
    • ►  May (3)
    • ►  April (1)
    • ►  March (1)
    • ►  February (3)
  • ►  2012 (53)
    • ►  December (2)
    • ►  November (2)
    • ►  October (1)
    • ►  August (3)
    • ►  July (2)
    • ►  June (5)
    • ►  May (7)
    • ►  April (8)
    • ►  March (9)
    • ►  February (13)
    • ►  January (1)
  • ►  2011 (74)
    • ►  December (1)
    • ►  November (5)
    • ►  October (10)
    • ►  September (9)
    • ►  August (12)
    • ►  July (5)
    • ►  June (9)
    • ►  May (2)
    • ►  April (6)
    • ►  March (7)
    • ►  February (4)
    • ►  January (4)
  • ►  2010 (84)
    • ►  December (7)
    • ►  October (1)
    • ►  September (6)
    • ►  August (1)
    • ►  June (1)
    • ►  May (7)
    • ►  April (21)
    • ►  March (3)
    • ►  February (17)
    • ►  January (20)
  • ►  2009 (234)
    • ►  December (16)
    • ►  November (21)
    • ►  October (11)
    • ►  September (23)
    • ►  August (29)
    • ►  July (26)
    • ►  June (10)
    • ►  May (16)
    • ►  April (26)
    • ►  March (22)
    • ►  February (27)
    • ►  January (7)
  • ►  2008 (39)
    • ►  December (14)
    • ►  November (25)
Powered by Blogger.

About Me

Unknown
View my complete profile