StampznewBright

  • Subscribe to our RSS feed.
  • Twitter
  • StumbleUpon
  • Reddit
  • Facebook
  • Digg

Tuesday, 28 June 2011

Cut out pressure embossing tutorial

Posted on 10:50 by Unknown
heat embossed thicker stamping on cut out pressure emboss

Don't you love when a frustrating mistake turns into a fun thing to try out?

I was embossing a piece of cardstock and it got several tears in it (and I had
done some fancy heat embossing on it and everything!):


To save it, I ended up cutting the more obvious torn bits out,
and it was fun,
so I thought I'd share this schtuff...


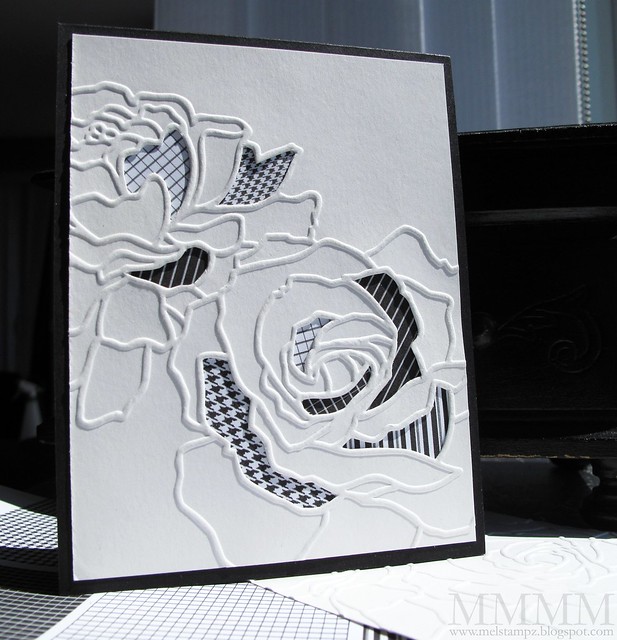
1... a pictorial for how to do 'cut out pressure embossing'
2... general tips for better embossing

-1-

do 'Cut Out pressure Embossing':


  • Pressure embossing machine: Cuttlebug, Big Shot, Wizard
  • Embossing folder (this one is S.U.'s Elegant Lines embossing folder
  • Cardstock (8olb or more is nice)
  • Exacto blade or hobby knife
  • Patterned or coloured paper
  • Scissors & Adhesive (I used double-sided tape)


Step 1) Pressure emboss a piece of cardstock & cut out select areas with a hobby knife. (If you are more comfortable with scissors you could stab them into the center of the area & cut in towards the outline instead, but the hobby blade fits little spots nicely).


Step 2) Snip bits of paper to add to the back of your embossed piece of cardstock where the cut outs are.


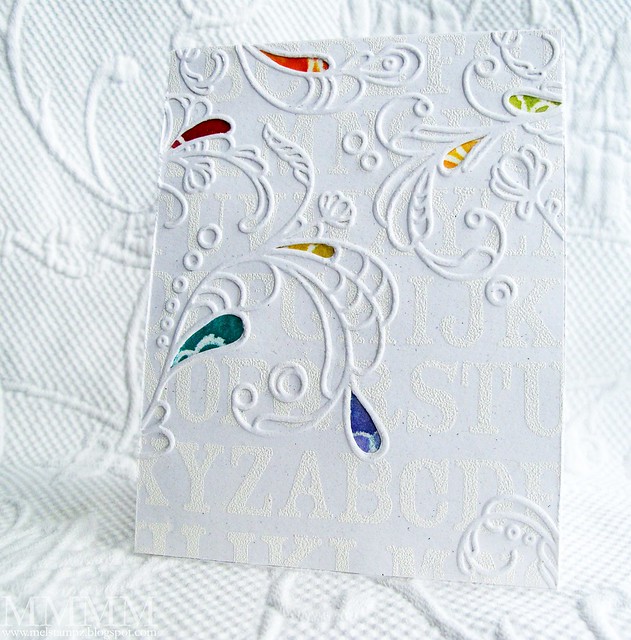
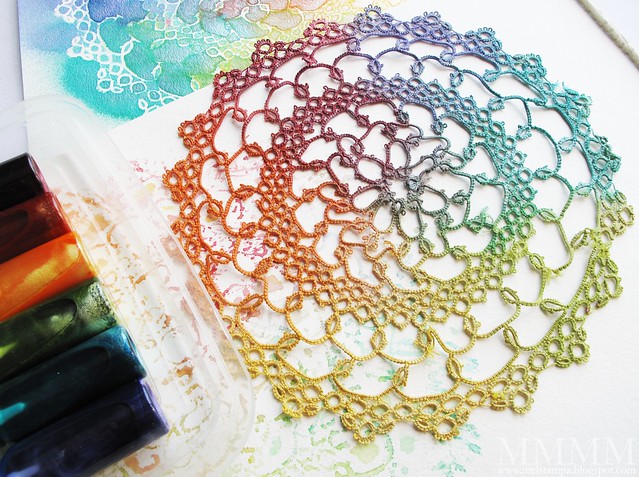
I used sprayed paper left over from colouring a doily using DIY shimmer spray

doily sprayed with DIY glimmer mists mel stampz&.
(doily spraying post here.......&...... how to make the sprays here)


Step 3) Lay it all out behind cut outs before adhering to be sure you like it


Step 4) Adhere bits to the back of cut out embossing...


Step 5) Trim, if necessary.


Step 6) Finally, mount your embossed piece onto a card the same size (this one is a standard A2: 5 1/2" x 4 1/4" card with a top fold):


.................................(clickable blogger pics)

Little Tip: Use a thin enough paper underneath. The spritzed paper
is a delight colour-wise & it has a really nice sparkle to it
from the shimmer mist...

sparkle of diy spritz

...but next time I'd use thinner paper (the 140lb watercolour paper made bumps under the embossed piece that look less than perfect in person. Thankfully, through the magic of photography you can't really see that here! sneaksneak)


There's another version of
cut out pressure embossing here

(and a men's suiting pattern freebie)

-2-

for better pressure embossing:


If you'd like a deeper embossing impression, you can...

1) You can shim your embossing stack: add a piece of cardstock (or 2 or 3) to your plate stack/sandwich.
2) Use thicker cardstock - I've had great results with Strathmore 100lb Bristol Vellum paper
3) Or spritz your cardstock with water or alcohol & emboss it while damp.

If your embossing is tearing, you can...

1) Emboss two pieces of cardstock at once to prevent rips. Sometimes one will still tear but you'll have a good piece to use.
2) Spritz the cardstock with water & alcohol to make it less brittle.

Hope you're having a day
that fits like it was 'cut-out' for you!


P.S. Fancy photo bits thanks to: Pugly Pixel tape (recoloured) from here & the Ambrosia Creative Polaroid Frame from here

P.P.S. Next time, using thickers (foam alphabet sticker) as an ultra affordable background stamp to get heat emboss alphabet on embossed cardstock:


Read More
Posted in cheap-tricks, Cuttlebug, techniques, Tutorials | No comments

Sunday, 26 June 2011

Cut Out pressure embossing technique & Men's Suiting digital freebie

Posted on 13:05 by Unknown
Today's card uses another pressure embossing technique
I'm calling it cut out pressure embossing for lack of a better name :)
It gives you a quick one-layer (very easy to mail) card:

pressure embossing cut out

(Well almost one layer: there are patterns adhered
behind the cut out embossing)

The patterns...

Men's suiting is hot right now (brings back
memories of wearing second-hand men's suit jackets,
vests, n hats... in highschool & feeling so hip!) heeheehee

Sooooh, I thought you might like some free digital
papers of men's suit patterns. They're made in Photoshop
each section of pattern measures 4 1/4" x 2 1/8"...


Dark Men's Suiting patterns:
(fits 8.5 x 11 inch paper)

(PDF is linked here on Flickr)

Lighter Distressed Men's Suiting patterns:
(fits 8.5 x 11 inch paper)

(light PDF is linked here on Flickr)

I used the patterns on the card above to place
under cutout pressure embossing
(The embossing folder is from Stampin' Up Manhattan Flower)

Areas of the embossed cardstock were
cut away with an Exacto blade:


I
t's very easy to do:

1) Emboss some cardstock
2) Cut out sections with hobby blade
3) Stick paper(s) behind cut out areas
4) Mount it on a card

Clickable blogger thumbnails:


There's a full pictorial for how to do
cut out pressure embossing here:

(and general embossing pointers)


Hope you're having a lovely day,


P.S. The patterns are fun to print on canvas:

fedora & ties on printed canvas mel stampz

These are some menswear items that I cut free-hand
then pierced & stitched onto cardstock

(The suiting patterns print lighter on Claudine Hellmuth's sticky back canvas making
the dark pattern more dark gray than black- which is great if you love gray like i do).
Read More
Posted in cheap-tricks, Digital-Images, Freebies, techniques | No comments

Friday, 24 June 2011

missing for a little bit...

Posted on 14:56 by Unknown
Whoops! Looks like things are
stacking up around here a bit...


Be back to blogging soon, sorry!

Sick Mouse kitty, messy house, happy garden, icky allergies (seasonal and the ol' allergic to 3 major food groups thing) & the sweet Hubby are all needing a little too much attention!) Life has some nerve, hey!? ;)

I should have a post by early next week.
Thanks for understanding!
:O)
Mel
Read More
Posted in 'Mouse'-the-cat | No comments

Tuesday, 14 June 2011

Emboss & Colour Fabric (one fish, two fish, old fish, new fish...)

Posted on 18:20 by Unknown


Hello there, You!
Today, a fish-themed card or two.
One fish old and one fish new.
(Sorry, channeling Dr.Seuss today for some reason) ;)

This older card was never blogged, but it uses a
technique that was massively fun to play around with...

Cuttlebug Koi fabric card  mel stampz

...pressure embossing & colouring fabric
(that's been adhered to cardstock to give the fabric stability).


And here's the inside:

Cuttlebug Koi embossed on fabriccard  INSIDE  mel stampz

The papers are BasicGrey 6x6 papers that
I got from Paper Garden Projects back in the day.

Nook & Pantry: turquoise pattern; turquoise
weave; and yellow doily pattern.
Porcelain: yellow flower pattern

I stitched on some gold metallic seed beads
and added a whack of hand sewing.

There's matching envelope with more stitching:

Cuttlebug Koi embossed on fabric card mel stampz

It's so nice to change up & colour something
other than paper and outline images for a change.
Note to self: have to try this out again, soon.


...emboss & colour fabric

  • Fabric
  • Cardstock
  • Glue (Mod Podge if you've got it)
  • Colouring medium (I used Prismacolour pencils & Copic markers)
  • An embossing folder (I used Provocraft Asian embossing folder Koi)
Step 1) Cut a piece of fabric & a piece of cardstock (in matching sizes that fit your embossing folder. You may want the fabric to be a bit bigger than the cardstock if you like a frayed edge look. I made my paper about 1/4" smaller than the fabric.

Step 2) Glue the fabric onto the cardstock (I like Mod Podge since it adds stability or stiffness to the fabric -acid free Mod Podge, if you have it & prefer archival).

Step 3) Let it dry & then run it through your pressure embossing machine.

Step 4) Colour any areas you like. I found Prismacolour pencil crayons & Copic markers to be a great combo (using the markers first & the pencil crayons second to avoid clogging Copic marker tips). You can also add details with a permanent marker. The eyes on these guys are dotted on with a Copic Multiliner.

Little Tip: Using the folder as support for the fabric while you colour is handy to keep the embossing nice and raised & crisp: just keep it under the embossed image (To keep it from shifting, you can tape it on, in place, if you like).

If you just colour without supporting it, the embossing does become less emphasized but you get nice soft looking colouring.

One of the Koi fish here is
cut out & adhered over top:

Cuttlebug Koi fabric CLOSE  mel stampz

And the new fish...
(a romantic manly card for my Fella
who loves fishin' with his Dad):

eat cake fish love note

The little wee fishy is one of the first stamps I ever bought
from Eat Cake Graphics
. He's teeny at 1 x 0.4
inches
but he is too cute, n'est pas?

eat cake fish close

Just look at that smile on his lil' fishy face! giggle giggle


The fish net under the heart is a piece of fusible webbing that came with
curtains from Ikea. The blue heart was cut on a Cricut Expression
(Plantin School book cartridge more about that here)

The background stamp for the texture on the waves
is an old fave: a Penny Black stamp called Paisley Swirls.

Most of the bits of paper are coloured with Copic markers,
but the blue cardstocks are old S.U. colours: baja breeze & soft sky.


The fish dictionary definition text freebie is here if you'd like it:

Click the images & right click and save as for JPEGs or Click the links to go to JPEGs (and PDF links) on Flickr. (I printed a high contrast version to get bright white paper)


fish dictionary definition text paper
on Flickr (with PDF link)

as a snippet:

fish dictionary definition snippet
on Flickr (with PDF link)


Clickable blogger thumbnails:


Hope your day is going just swimmingly!


P.S. no affiliations with these companies, just schtuff i like.
Read More
Posted in Cuttlebug, Eat-Cake-Graphics, techniques | No comments
Newer Posts Older Posts Home
Subscribe to: Comments (Atom)

Popular Posts

  • free Butterfly Silhouette .studio cut files (in 3 styles)
    Hi, All! Here are those butterfly Silhouette .studio cut files. They are for only for the Silhouette machine... But I do hope to share other...
  • Flying by to say ... 'hello'
    Do you shop for stamps often? I don't have a huge crafting budget, but every once in a while I find some images that call out "you ...
  • a Silhouette Challenge project
    This might look like a card in the photo, but...   ... it's actually a collage on a wooden canvas  to hang on the wall (or give as a gif...
  • Silhouette Cameo - Sketch pen Camera card
    Happy Happy Independence Day, to my American Friends! (and happy belated Canada Day to my fellow Canadians!) So, have those of you with Silh...
  • over 100 free pattern overlays ... at a glance
    Would you believe that the free overlay total is at 139 overlays and counting? (I might have a wee little addiction) ;-) Since overlays can ...
  • Graphics Fairy Inspiration (+vintage printables)
    Thank You all so much for your wonderful comments about the papers I've been obsessed with. Your kind words make me grin so big that I g...
  • Circle Overlays (to revamp your papers!)
    Can you ever have too many ways to use your stash? No card today, just popping in with a cheap trick for revamping your "old" pat...
  • New Popcorn Box template set (pretty stamp room storage) :o)
    Are you in the mood for a template or two? I was going to wait until I had really good photos and a full pictorial, but then I would take fo...
  • "Honey, I shrunk the stationery!" (Hero Arts typewriter notebook)
    Still trying to make more of my cards into little gifts. This Hero Arts typewriter card is another take on the card turned refillable notebo...
  • Everything I've Ever Made (at a glance)
    This post is a visual overview of my blog history-- with thumbnails that are linked to tutorials & templates for pretty much everything ...

Categories

  • 'Mouse'-the-cat (10)
  • *TEMPLATEs (98)
  • 3D-projects (144)
  • A-Day-For-Daisies (7)
  • Amber Ink (9)
  • Angel's-Landing (2)
  • BASICS (47)
  • Blogging-tips (7)
  • Caardvarks (48)
  • Cat's-Pajamas (2)
  • cheap-tricks (224)
  • Christmas (33)
  • Claire-Keay (2)
  • Cricut (3)
  • cut-file (2)
  • Cuttlebug (45)
  • decor (6)
  • Digital-Images (131)
  • Distress-Inks-etc (14)
  • DIYstamps (1)
  • Eat-Cake-Graphics (11)
  • Faves (207)
  • Fred-She-Said (5)
  • Freebies (77)
  • GESSO (9)
  • Halloween (10)
  • Heather Ellis (3)
  • Hero-Arts (14)
  • ISC (7)
  • Jessica-Sprague (2)
  • Just-Rite (2)
  • LPS (63)
  • Mo's-Digital-Pencil (16)
  • My-Favorite-Things (33)
  • organizing (7)
  • Other-People's-Tutorials (36)
  • Paper-Garden-Projects (54)
  • Paper-Temptress (39)
  • Punches (21)
  • Purple-Onion-Designs (23)
  • S.U. (1)
  • SCOR-PAL (4)
  • silhouette (4)
  • Skipping-Stones-Design (7)
  • Squigglefly (6)
  • SRM-Stickers (8)
  • techniques (191)
  • templates (26)
  • Tiffany-Doodles (4)
  • Tutorials (252)

Blog Archive

  • ▼  2013 (16)
    • ▼  July (4)
      • A Triple-stamped Fancy-cut Flower card
      • Flying by to say ... 'hello'
      • a Silhouette Challenge project
      • Silhouette Cameo - Sketch pen Camera card
    • ►  June (4)
    • ►  May (3)
    • ►  April (1)
    • ►  March (1)
    • ►  February (3)
  • ►  2012 (53)
    • ►  December (2)
    • ►  November (2)
    • ►  October (1)
    • ►  August (3)
    • ►  July (2)
    • ►  June (5)
    • ►  May (7)
    • ►  April (8)
    • ►  March (9)
    • ►  February (13)
    • ►  January (1)
  • ►  2011 (74)
    • ►  December (1)
    • ►  November (5)
    • ►  October (10)
    • ►  September (9)
    • ►  August (12)
    • ►  July (5)
    • ►  June (9)
    • ►  May (2)
    • ►  April (6)
    • ►  March (7)
    • ►  February (4)
    • ►  January (4)
  • ►  2010 (84)
    • ►  December (7)
    • ►  October (1)
    • ►  September (6)
    • ►  August (1)
    • ►  June (1)
    • ►  May (7)
    • ►  April (21)
    • ►  March (3)
    • ►  February (17)
    • ►  January (20)
  • ►  2009 (234)
    • ►  December (16)
    • ►  November (21)
    • ►  October (11)
    • ►  September (23)
    • ►  August (29)
    • ►  July (26)
    • ►  June (10)
    • ►  May (16)
    • ►  April (26)
    • ►  March (22)
    • ►  February (27)
    • ►  January (7)
  • ►  2008 (39)
    • ►  December (14)
    • ►  November (25)
Powered by Blogger.

About Me

Unknown
View my complete profile