StampznewBright

  • Subscribe to our RSS feed.
  • Twitter
  • StumbleUpon
  • Reddit
  • Facebook
  • Digg

Saturday, 10 March 2012

Painted Distress Ink emboss-resist technique (on a P.O.D. Challenge card)

Posted on 21:40 by Unknown
Purple Onion Designs Harlequine card

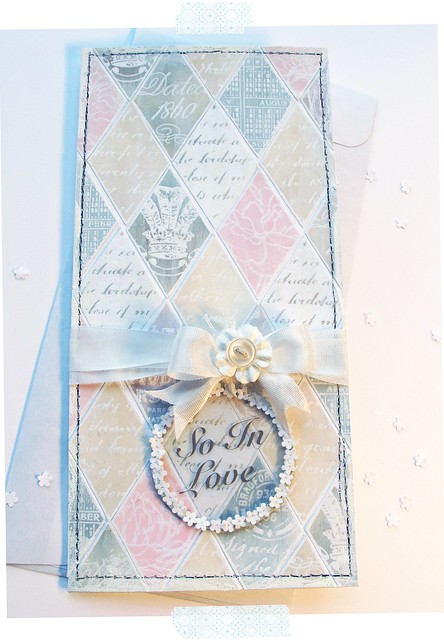
Here's a simple wedding card or an anniversary card
or just a schmooshy-mooshy love card...
(with a painted emboss-resist technique
using Distress Inks and stain).

-1-


Do you love challenges?
It's been ages since I've played along with one, so...

Lilly Pad Cards has a colour challenge going:

(until Thursday March 15th)

with one of my very favourite companies as the sponsor:


Definitely different colours than I'm used to
(since they're not turquoise) ;-)
but such a good challenge & such a soft combo.

Though I did add a little touch of blue like some
of the sample cards from their design team.

Purple Onion Designs Harlequine card DIY acetate tag

(The tag is made using: a metal rimmed tag with the paper removed;
A piece of printable acetate cut & glued onto the metal rim; a rub-on from the Cosmo Cricket Ever After line; and teensy little flowers left from a Fiskars edge punch that I pierced holes in and glued on with clear lacquer).


-2-


(Distress Ink heat emboss resist
blended with white Picket Fence stain)

I'm still learning how to work with Distress Inks &
I realized that (so far) I don't really use them very much.

It's the blending that throws me a little, so I was excited when
I tried the Picket Fence white distress stain over them &
it turned out to be an easy and fun way to blend Distress Inks quickly...


1a stamp POD diamonds in versamark heat emboss in clear embossing powder

Step 1) Heat emboss in clear: Stamp in clear Versamark ink, sprinkle with clear embossing powder & heat set with a heat gun.

(Traditionally, the "emboss resist" technique is done on glossy cardstock, but I much prefer it on regular white cardstock.) I used Purple Onion Designs' background set Harlequin.

3a ink all the diamonds up empty diamond in the POD set lets you use any stamp you want with the other diamonds

Step 2) Ink over the clear embossing with distress ink colours & let the ink dry a little.

For these diamonds, I used Antique Linen & Brushed Corduroy and Iced Spruce (the seasonal Christmas grey-blue which was an oh so thoughtful gift from the ultra lovely Lisa) as well as Brushed Corduroy & Victorian Velvet.

There's no need to worry about blending:

3b ink diamonds up no need to worry about blending

You can have inking that's nice and dark and messy,
since the next step will tone it down...

4 Soften ink & blend with picket fence distress stain over it a little or a lot since you can build the layers

Step 3) Swipe over the Distress Ink with Picket Fence white Distress Stain
(just wipe the excess stain off of the clear heat embossing to remove any stain that is sitting on top of the glossy bits and won't dry).

If you don't have Distress Stain, you could use white paint or gesso watered down, but I find that the distress stain is nice since it doesn't warp the paper as much as more watery mediums might.

The stain can give you an interesting wood grain
or streaked texture:

painted emboss-resist distress

And you can add more stain if you want it lighter, since it
becomes increasingly opaque as you layer it.

-3-

(rubber stamps used here...)

P.O.D.'s Harlequin:


One of my favorite things about the P.O.D. Harlequin stamp
set is the blank diamond:

2a empty diamond in the POD set lets you use any stamp you want with the other diamonds

you can use it with any of your stamps. I used it
with an older P.O.D. calendar stamp that
still works despite the date because it gives the most unique texture:

2b calendar POD stamp as a texture stamp


And with my favourite script background
(it's from Purple Onion Designs too).


Hope you can play along
with the challenge too!


P.S. I also used the new Hero Arts Large Floral Background stamp with the blank Purple Onion Designs' Harlequin stamp (on the pink diamond pieces).
Email ThisBlogThis!Share to XShare to FacebookShare to Pinterest
Posted in Distress-Inks-etc, Purple-Onion-Designs, techniques, Tutorials | No comments
Newer Post Older Post Home

0 comments:

Post a Comment

Subscribe to: Post Comments (Atom)

Popular Posts

  • free Butterfly Silhouette .studio cut files (in 3 styles)
    Hi, All! Here are those butterfly Silhouette .studio cut files. They are for only for the Silhouette machine... But I do hope to share other...
  • DIY digital paper (some freebies)
    The lull in posts (over the last couple of days) was for me to finish up this looooong post I've been wanting to share with you for eons...
  • New Popcorn Box template set (pretty stamp room storage) :o)
    Are you in the mood for a template or two? I was going to wait until I had really good photos and a full pictorial, but then I would take fo...
  • Missing with a migraine, Craft room BEFORE pics, & LINKs for Organizing the craft room
    Edited to add: Sorry guys. I feel like I was hit by a truck. Migraine's lasted so long... but I will be back with a post by tomorrow eve...
  • Graphics Fairy Inspiration (+vintage printables)
    Thank You all so much for your wonderful comments about the papers I've been obsessed with. Your kind words make me grin so big that I g...
  • "Honey, I shrunk the stationery!" (Hero Arts typewriter notebook)
    Still trying to make more of my cards into little gifts. This Hero Arts typewriter card is another take on the card turned refillable notebo...
  • 3 Clean And Simple cards (with SRM stickers)
    You guys may know that I was tragically born without the gene that let's you achieve a C lean A nd S imple card. ;-) Not sure why I find...
  • Making Your Own Colour Shimmer Sprays--Links & Info
    Info & Links Links for how to Mak e yo ur o w n Sh im mery s prays: (These are for you sweet Beth! oxo) ( more info on these colours in...
  • over 100 free pattern overlays ... at a glance
    Would you believe that the free overlay total is at 139 overlays and counting? (I might have a wee little addiction) ;-) Since overlays can ...
  • Felt-based cards (Rock-a-Bye Baby tutorial)
    New idea, Old projects.... I've been debating whether or not to post some older projects/tutorials since the big bad insecurity beast...

Categories

  • 'Mouse'-the-cat (10)
  • *TEMPLATEs (98)
  • 3D-projects (144)
  • A-Day-For-Daisies (7)
  • Amber Ink (9)
  • Angel's-Landing (2)
  • BASICS (47)
  • Blogging-tips (7)
  • Caardvarks (48)
  • Cat's-Pajamas (2)
  • cheap-tricks (224)
  • Christmas (33)
  • Claire-Keay (2)
  • Cricut (3)
  • cut-file (2)
  • Cuttlebug (45)
  • decor (6)
  • Digital-Images (131)
  • Distress-Inks-etc (14)
  • DIYstamps (1)
  • Eat-Cake-Graphics (11)
  • Faves (207)
  • Fred-She-Said (5)
  • Freebies (77)
  • GESSO (9)
  • Halloween (10)
  • Heather Ellis (3)
  • Hero-Arts (14)
  • ISC (7)
  • Jessica-Sprague (2)
  • Just-Rite (2)
  • LPS (63)
  • Mo's-Digital-Pencil (16)
  • My-Favorite-Things (33)
  • organizing (7)
  • Other-People's-Tutorials (36)
  • Paper-Garden-Projects (54)
  • Paper-Temptress (39)
  • Punches (21)
  • Purple-Onion-Designs (23)
  • S.U. (1)
  • SCOR-PAL (4)
  • silhouette (4)
  • Skipping-Stones-Design (7)
  • Squigglefly (6)
  • SRM-Stickers (8)
  • techniques (191)
  • templates (26)
  • Tiffany-Doodles (4)
  • Tutorials (252)

Blog Archive

  • ►  2013 (16)
    • ►  July (4)
    • ►  June (4)
    • ►  May (3)
    • ►  April (1)
    • ►  March (1)
    • ►  February (3)
  • ▼  2012 (53)
    • ►  December (2)
    • ►  November (2)
    • ►  October (1)
    • ►  August (3)
    • ►  July (2)
    • ►  June (5)
    • ►  May (7)
    • ►  April (8)
    • ▼  March (9)
      • You are 'wheely' Beautiful!
      • 84 Patterned Papers & 7 overlays (chevrons, ledger...
      • Tea Party Anyone?
      • Nesting card (and free Bird on a branch digi images)
      • 3 Clean And Simple cards (with SRM stickers)
      • Painted Distress Ink emboss-resist technique (on a...
      • "Honey, I shrunk the stationery!" (Hero Arts typew...
      • More bright paper sets: Text, Quatrefoil tile,Tiny...
      • Graphics Fairy Inspiration (+vintage printables)
    • ►  February (13)
    • ►  January (1)
  • ►  2011 (74)
    • ►  December (1)
    • ►  November (5)
    • ►  October (10)
    • ►  September (9)
    • ►  August (12)
    • ►  July (5)
    • ►  June (9)
    • ►  May (2)
    • ►  April (6)
    • ►  March (7)
    • ►  February (4)
    • ►  January (4)
  • ►  2010 (84)
    • ►  December (7)
    • ►  October (1)
    • ►  September (6)
    • ►  August (1)
    • ►  June (1)
    • ►  May (7)
    • ►  April (21)
    • ►  March (3)
    • ►  February (17)
    • ►  January (20)
  • ►  2009 (234)
    • ►  December (16)
    • ►  November (21)
    • ►  October (11)
    • ►  September (23)
    • ►  August (29)
    • ►  July (26)
    • ►  June (10)
    • ►  May (16)
    • ►  April (26)
    • ►  March (22)
    • ►  February (27)
    • ►  January (7)
  • ►  2008 (39)
    • ►  December (14)
    • ►  November (25)
Powered by Blogger.

About Me

Unknown
View my complete profile