


Now don't pass out on me, but...
It's a dude card!
(They scare me & I usually get stuck being girly by default.
How about you?)
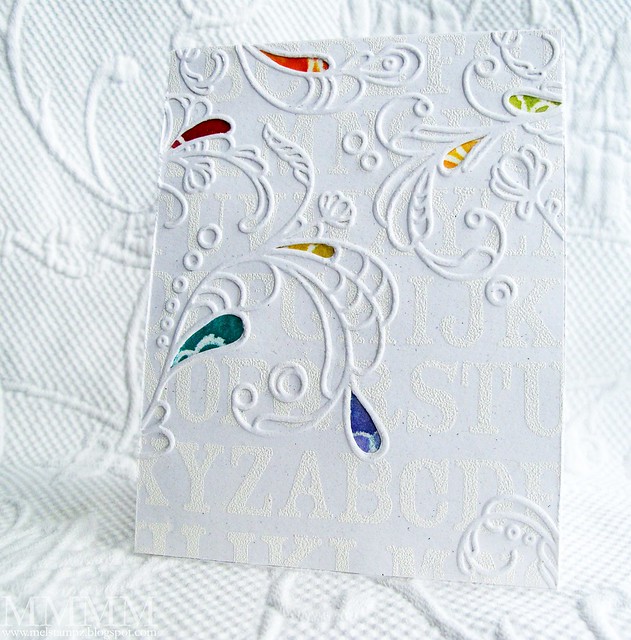
The lovely Heather sent me some gorgeous
Skipping Stones Design stamps
&
I went girlish with the Grunge set as a force of habit:
It's a dude card!
(They scare me & I usually get stuck being girly by default.
How about you?)
The lovely Heather sent me some gorgeous
Skipping Stones Design stamps
&
I went girlish with the Grunge set as a force of habit:

(click the pic to visit that post)
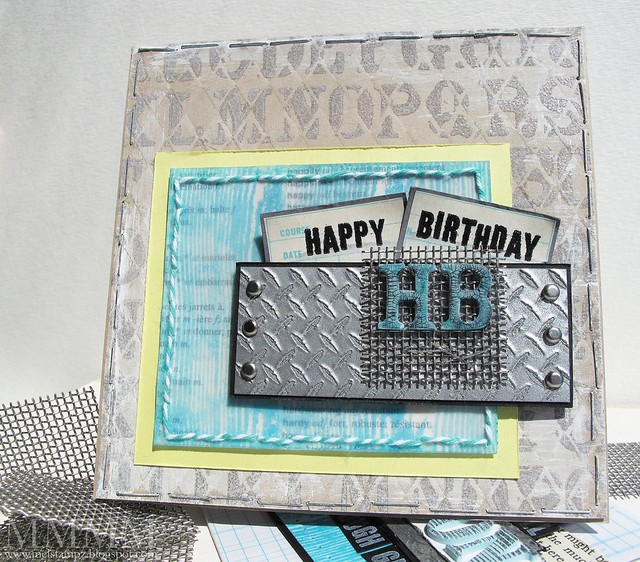
And now it's gone "manly!"
But, first a whole lotta yadda yadda about making your own
DIY reversed foam stamp to use with pressure embossing.

...foam Thickers reversed alphabet stamp

This technique makes a foam reverse alphabet background stamp
that costs next to nothing & works wonderfully.
It's great to use for the stamping technique called
kissing as well as with the inked embossing folder technique.

The straight-forward way:
If you have great alphabet background stamps in rubber or acetate, you can simply stamp on the cardstock and then pressure emboss it, but I like heat embossing which can crack if you emboss it...
To avoid cracked heat embossing, I apply the ink to the embossing folder with this reversed alpha stamp, pressure emboss it, and then add embossing powder & heat emboss the wet ink.
Adding lettering detail to pressure embossing (directly on the folder) requires a reversed alphabet or text stamp (like Tim Holtz's ingenious Reflections stamps made just for that purpose which you can see used in a ScrapTime video here at 4:5o).
Tim's reversed stamps would make a scrumptious addition to my craft hoard, but I'm rather broke, so I made my own large scale version with foam Thickers letters that I had on hand.
I used the Rockabye Thickers, but the nice thing is that there are lots of companies & gorgeous fonts to choose from. They cost about $3.00 to $5.00 US. And a large background stamp will not even use the whole package. Of course if you have a good quality alphabet die, you can die cut your own out of fun foam for even less!

(for thickers kissed pressure embossing)
- Thickers or other foam alpha stickers
- Acetate or overhead sheet
- Grid paper for placement guide
- Embossing plates or folder & machine etc.
- Versamark or Pigment ink
- Heat embossing optional: Embossing powder & heat gun
brads; more thickers; crackle paint; distress ink; turquoise pigment ink; clear embossing powder; baker's twine; needle; paper piercer.
This piece of cardstock is nice & big
(for a 5 and a half inch square card):
(for a 5 and a half inch square card):

Enough talk already!
Here's more talk about how to make this easy DIY stamp.
Here's more talk about how to make this easy DIY stamp.

Step 1) Make a fun foam alphabet stamp (that is reversed for different kinds of kissing):
1A) Cut a piece of acetate (overhead projector sheet) to fit your pressure embossing machine plates or the size of cards you normally make backgrounds for.
1B) Tape the acetate sheet to something with a grid or lines that will serve as a placement guide for the letters.
1C) Take a store-bought or homemade foam alphabet and stick it on the sheet. (This is a Thickers self-adhesive foam set. Thickers are quite easy to restick if you find you want to fix the spacing. It takes a little time, but it gives you a nice background, in the end).
1D) To line up each new row of letters, lift the acetate off of the grid surface & move it so that it is lined up for the next row, tape it in place, stick the letters on, and repeat for each row.

Step 2) Leave the acetate sheet taped to the sturdy surface for stamping.
To use your reverse stamp
with an embossing plate:

...Step 3) Prepare the stack for your pressure embossing machine. For a Cuttlebug with a Sizzix Textures plate the stack I use is:
- A plate
- Sizzix textures plate face up (this part will be added after you ink it)
- Cardstock to be embossed (and inked)
- Plumber's gasket or tan mat
- B plate
- Cardstock shims (just pieces of cardstock cut to fit) the amount you need of these will depend on how your machine is calibrated. Mine takes 3 thick cardstock sheets.

Step 4) Ink up the foam stamp. (Pigment or chalk inks seem to work the best since they stay in place better than dye ink). I imagine it would also work quite well with paints.

Step 5) Lay the texture plate onto the inked foam alphabet (with the pattern that you want to emboss facing down)

Step 6) Press firmly all over to transfer the ink onto the plate (but without shifting the plate) .

Step 7) Lift off the plate and you will have ink alphabet transferred onto it. It will look backwards but will give you a kissed alphabet background that is readable.

Step 8) Add the plate into the stack (or sandwich) that you prepared earlier.

Step 9) Layer on the cardstock, tan mat or plumbers gasket, B plate, and cardstock shims.

Step 10) Run the stack through the embossing machine.
Here's an example on gray cardstock:

But since this looks very similar to the plastic embossing plate... here's another example with a different texture (on Kraft coloured cardstock):

This example is embossed. I used White pigment ink & while the ink was wet, I added clear embossing powder, then heated it with a heat gun.

How to use your reverse stamp
with an embossing folder:
Step 1) Cut a piece of cardstock to fit inside the pressure embossing folder you want to use.

Step 2) Tape the acetate sheet of your background taped to a sturdy surface & ink it up. (I love chalk ink on foam. It holds its shape nicely & stays wet long enough to heat emboss.)

Step 3) Lay the embossing folder over the inked alphabet, being careful not to shift it. Apply even pressure (an acrylic block or embossing plate works quite well to give even pressure).
Step 4) Set your cardstock in the folder on the un-inked side (You can tape it in place if you want to make sure it won't shift in your machine).
Step 5) Close the folder onto the cardstock & pressure emboss it, as usual.
Step 6) Add embossing powder to the wet ink & heat emboss, if you like. (Or you could use chalks or do an emboss resist, black magic, or some other technique).
This stuff was done
to "man-ify" the card:
to "man-ify" the card:

Step 1) Cut the kissed & heat embossed background to measure 5.5" and add staples all around the outside edges of it.

Step 2) Swipe it with a dry brush (no water) just a little bit of white paint using horizontal and vertical brushstrokes.

Step 3) Heat emboss it again to bring out the shine of the embossing from under the paint (it is like magic watching that happen!)

Step 4) Make some
4A) Adhere some Thickers (foam letters) to a piece of metal mesh &
apply Tim Holtz Rock Candy crackle paint to them.

4B) Let the crackle paint dry & then ink it up. I used Broken China Distress Ink.
It made a subtle colour in the cracks...
not "manly" enough.... so I added black Copic marker:

4C) Dab some Marker on & blend it in. (Using colourless blender or working really quickly).

Then the cracks were nice & dark.
Step 5) Do some More manly stuff: Faux metal embossing:

5A) Prepare the S.S.D. Grunge stamp ahead of time: cover it with Versamark to protect it.
5B) Apply several layers of Versamark & silver embossing powder to cardstock, heating with a heat gun to melt the embossing powder.
5C) Heat the embossing powder 1 last time to make it soft.
5D)Press the stamp into the warm embossing powder, being careful not to shift it.
Trouble-shooting: If the stamped image impression doesn't take, simply heat it again & press.
If it still doesn't take you may need to add more layers of embossing powder.
The end result is a very masculine faux metal texture:

(The grey cardstock shows through a teeny bit, giving colour variation.
Doesn't that sound macho?) ;o)

Step 6) Trim the faux metal.

Step 7) Add some brads.

Step 8) Stamp a pretty wood pattern background (also from the S.S.D. Grunge set). I stamped it with some turquoise pigment ink on vellum & embossed it in clear).

Step 9) Adhere the wood-pattern embossed vellum to a piece of dictionary paper. Pierce it & stitch it (I used baker's twine).
Finally, stick it all on a 51/2" square card
and there you have it:
and there you have it:
Here's another masculine card
made with the same stamp set (and some Thickers too):

A little get well not, for the man who's tough as...

...nails! (teehee)
I added the nails by cutting 2 slits in the cardstock & sliding them in
(but they did need a little glue to stay in place permanently).
(You can download the blue ledger paper here, if you like)
Hope your crafting is a blast... manly or girly, ;o)


0 comments:
Post a Comment